
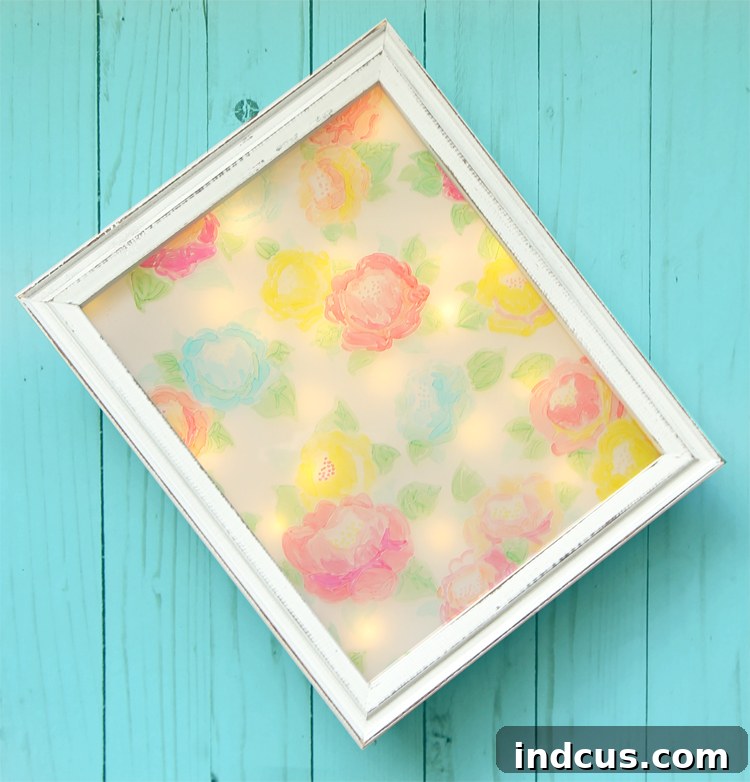
Craft a Dazzling DIY Floral Shadow Box Night Light for Enchanting Rooms
Transforming a child’s bedroom into a magical, comforting sanctuary often begins with the right lighting. A night light is an absolute essential, providing a gentle glow that banishes shadows and offers peace of mind. While store-bought options are plentiful, there’s a unique charm in creating something truly special and personalized. We embarked on a delightful DIY journey to craft a custom night light for a shared girls’ bedroom, leveraging the subtle sparkle of fairy lights nestled within a shadow box. The result was not just functional but also incredibly adorable, adding a touch of whimsical elegance to their space. Today, we’re thrilled to share this comprehensive tutorial, empowering you to replicate this enchanting project and brighten any room with your own handmade creation.
This project is more than just a night light; it’s a piece of custom art that brings warmth and character to any decor. The combination of delicate floral patterns and soft, diffused fairy lights creates an ethereal glow that’s perfect for lulling little ones to sleep or simply adding a serene ambiance to a nursery, bedroom, or even a cozy reading nook. It’s an accessible craft, requiring no advanced artistic skills, thanks to a clever tracing technique that makes beautiful results achievable for everyone. Get ready to dive into the world of DIY decor and create a truly unique illuminated masterpiece!
Essential Materials for Your Enchanting Floral Night Light
Before we embark on this creative adventure, gathering the right tools and materials is key to a smooth and enjoyable crafting process. We’ve curated a list of exactly what you’ll need, including links to help you find the perfect components. Investing in quality materials ensures not only a beautiful finish but also the longevity of your handmade night light. Remember, these links are affiliate links, which means we may earn a small commission if you make a purchase, at no extra cost to you.
- Shadow Box: Choose a shadow box with enough depth to accommodate the fairy lights comfortably behind the front panel. Sizes can vary, but a standard 8×10 or 10×10 inch box works wonderfully for a prominent display. Opt for one with an accessible back panel or a way to easily remove and reinsert the glass front. The frame material can be wood, plastic, or metal, depending on your desired aesthetic.
- Fairy Lights: Battery-operated LED fairy lights are ideal for this project, as they don’t require an outlet and remain cool to the touch, making them perfectly safe for children’s rooms. Look for a strand that’s at least 6-10 feet long to ensure ample coverage and brightness within the shadow box. Warm white lights create a cozy, inviting glow, but feel free to experiment with cool white or even colorful strands for a different effect.
- Spectrum Noir Markers (Alcohol Ink Markers): These markers are the secret weapon for achieving that beautiful, watercolor-like floral design on glass. Alcohol inks blend smoothly and dry quickly, offering vibrant colors and unique translucent effects. While Spectrum Noir is a fantastic brand, any high-quality alcohol ink markers will work. A selection of greens, pinks, purples, and blues will allow for a diverse floral palette.
- Clear Tape: Essential for temporarily securing your floral template and for neatening up the fairy light arrangement inside the box. Standard transparent Scotch tape or painter’s tape (for the template) will suffice.
- Vellum Paper: This translucent paper plays a crucial role in diffusing the fairy lights, transforming harsh points of light into a soft, even glow. Vellum also adds a subtle layering effect, enhancing the depth of your floral design. Ensure you have several sheets, as you might layer them for desired opacity.
- Floral Scrapbook Paper: This will serve as your tracing template. Choose a design with clear, distinct floral patterns that you’d like to replicate on the glass. The more intricate the paper, the more detailed your final night light will be. Consider papers with varying sizes of flowers and leaves for a dynamic composition.
Having all these items ready before you start will help streamline the crafting process and allow your creativity to flow freely. Now, let’s move on to the step-by-step instructions to bring your vision to life!
Step-by-Step Instructions: Crafting Your Glowing Floral Masterpiece
Creating this DIY floral night light is a rewarding experience, combining simple techniques with stunning results. Follow these detailed steps to assemble your beautiful illuminated artwork.
Step 1: Preparing Your Shadow Box and Floral Template
Begin by carefully removing the glass panel from your chosen shadow box. Most shadow boxes have latches or tabs on the back that allow you to open them and access the interior. Handle the glass with care, as it can be fragile and sharp. Once the glass is removed, give it a thorough cleaning with glass cleaner and a lint-free cloth to ensure there are no smudges or dust that could interfere with your artwork. Next, select your floral scrapbook paper. This paper will serve as your guide for tracing. Place the cleaned glass panel directly on top of the floral scrapbook paper. Position the paper so that the floral designs you wish to trace are perfectly visible beneath the glass. To prevent any shifting during the tracing process, which is crucial for accuracy, you may want to gently secure the paper to your workspace or to the glass itself using a few small pieces of clear tape or painter’s tape on the edges. This ensures a stable surface for your artistic endeavor. Take a moment to visualize your final design, choosing patterns that complement each other and will look stunning when illuminated.
Step 2: Bringing Your Floral Design to Life on Glass
With your glass securely positioned over the floral scrapbook paper, it’s time for the magical part: tracing! Take your alcohol ink markers and carefully trace the outlines and details of the floral designs visible through the glass. Don’t be afraid to layer colors or blend them slightly; alcohol markers on glass create a uniquely soft, watercolor-like effect that’s both elegant and captivating. This technique allows anyone, regardless of their drawing skills, to create intricate and beautiful floral patterns. The translucency of the alcohol inks will allow the light to pass through later, enhancing the glow. You’ll be amazed at how professional and artistic your design looks without ever having to freehand anything. Experiment with different shades of green for leaves and various vibrant hues for petals to add depth and dimension to your piece. This step is about enjoying the creative process and watching your design emerge.
Once you lift the glass from the scrapbook paper, you’ll reveal your beautifully adorned panel, complete with stunning floral designs. And here’s the best part – shhh… no one will ever know you didn’t freehand them! The secret tracing method ensures a flawless, professional finish every time. Take a moment to admire your work; it’s a testament to how simple tools can create extraordinary art.
Step 3: Integrating the Fairy Lights for a Magical Glow
Now, it’s time to introduce the source of your night light’s enchantment: the fairy lights. Most shadow boxes have a small opening or a slight gap where the back panel meets the frame, or sometimes a designated hole for cords. Carefully string the fairy lights through this opening, guiding them into the interior of the shadow box. Once inside, gently arrange the strand of lights, taping them into place using clear tape. The goal is to distribute the lights as evenly as possible across the back panel of the shadow box. This ensures a consistent and soft glow that illuminates your floral design without creating harsh hot spots. Pay attention to keeping the battery pack accessible, usually hanging out of the back, for easy on/off access and battery changes. You might need to adjust and re-tape a few times to achieve the perfect spread, but the effort is well worth it for the beautiful diffused light.
Step 4: Diffusing the Light with Vellum Paper
The next crucial step is to prepare your vellum paper, which acts as a diffuser for the fairy lights, transforming them from individual points of light into a continuous, soft glow. Measure the inside dimensions of your shadow box’s back panel and carefully cut the vellum paper to size. You want it to fit snugly within the frame, covering the entire back surface where the lights are positioned. Slide the cut vellum sheet into the frame, placing it in front of the fairy lights. The beauty of vellum is its versatility: if one sheet seems too transparent and the individual lights are still too visible, simply add a second or even a third piece of vellum. Layering allows you to achieve the perfect level of opacity, ensuring a beautifully diffused, ethereal light that enhances your floral design without distracting from it. This step is key to achieving that signature gentle radiance.
Step 5: Final Assembly and Illumination
You’re almost there! It’s time for the final assembly of your DIY floral shadow box night light. Carefully slide the decorated glass panel back into its original position within the shadow box frame. A vital tip here: ensure that the side of the glass with your alcohol marker design is facing *inward*, towards the vellum and fairy lights. This not only protects your beautiful artwork from dust and potential smudges but also prevents little curious fingers from rubbing off the design. Once the glass is securely in place, close up the back of your shadow box, fastening any latches or clips. With everything in place, the only thing left to do is insert the batteries into your fairy light pack and flip the switch. Prepare to be enchanted as your shadow box comes to life, revealing a glowing floral work of art that radiates a soothing, magical light. It’s a truly satisfying moment to see your creative efforts culminate in such a beautiful and functional piece.
The Benefits of Your Handmade Floral Night Light
This DIY floral shadow box night light offers a multitude of advantages, making it an ideal addition to any home, especially a child’s bedroom. First and foremost, safety is paramount. Because we utilized LED fairy lights, they produce very little heat, remaining cool to the touch even after hours of use. This eliminates any worries about overheating or fire hazards, providing complete peace of mind, particularly in rooms where children sleep or play. The gentle illumination is perfect for helping little ones drift off to sleep without fear of the dark, offering a comforting presence throughout the night.
Beyond its safety and comforting aspects, the aesthetic appeal of this night light is unparalleled. Unlike generic store-bought options, your handmade creation is a unique piece of art. The delicate floral design, brought to life with the soft glow of the lights, creates a serene and dreamy atmosphere. What’s truly remarkable is its versatility: it looks absolutely stunning both day and night. During daylight hours, the vibrant alcohol ink design on the glass serves as a beautiful piece of framed art, complementing the room’s decor. As dusk falls and the lights are switched on, it transforms into an ethereal, glowing display that adds warmth and magic. This dual functionality ensures your effort results in a cherished item that enhances the room’s beauty around the clock.
Tips for Success and Customization Ideas
To ensure your DIY floral shadow box night light turns out perfectly, here are a few extra tips: Always clean the glass thoroughly before tracing to prevent smudges from becoming part of your permanent design. When working with alcohol markers, remember they dry quickly, so work efficiently or in sections. If you make a mistake, a cotton swab dipped in rubbing alcohol can often correct it if caught quickly. Test your fairy lights before the final assembly to ensure they’re working correctly and have fresh batteries.
The beauty of DIY lies in customization! While we’ve chosen a floral theme, feel free to let your imagination run wild. Consider other themes that might suit a child’s room or your own decor:
- Stargazer Night Light: Trace constellations, stars, and moons onto the glass for a cosmic theme.
- Nature Scenes: Recreate silhouettes of trees, animals, or serene landscapes.
- Abstract Art: Use alcohol inks to create flowing, marbled patterns directly on the glass for a modern look.
- Personalized Quotes: Use stencils or a fine-tip paint marker to add an inspiring quote or a child’s name to the glass.
- Color Variations: Experiment with different colored fairy lights (blue, pink, multi-color) to change the mood of the light.
- Embellishments: Once the glass is dry, you could add small adhesive gems, glitter, or even tiny dried pressed flowers to the inside of the shadow box for extra sparkle and texture.
This project is not just about creating a night light; it’s about crafting a personalized piece of art that brings joy and comfort. It’s an excellent way to add a unique, handcrafted touch to your home decor or to create a thoughtful, personalized gift. We encourage you to try this project and experience the satisfaction of creating something beautiful and functional with your own hands. Share your creations and inspire others!







