
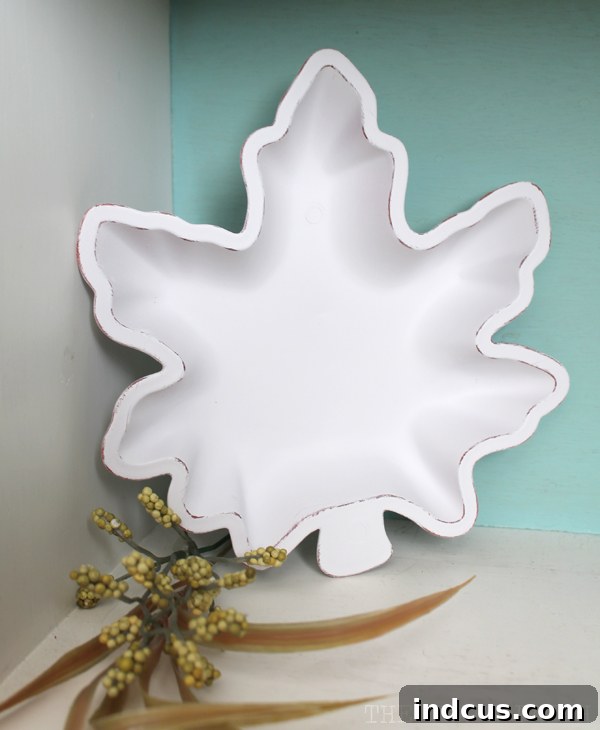
Stunning Dollar Store Leaf Bowl Makeover: Transform Cheap Plastic into Chic Farmhouse Decor
Hi friends! Are you ready to unlock the secret to creating gorgeous, high-end home decor without emptying your wallet? Today, we’re embarking on an exciting journey to transform a simple, inexpensive Dollar Tree find into a statement piece that exudes charm and sophistication. Prepare to be amazed by the incredible power of a little creativity and a can of spray paint!
Many of us love strolling through dollar stores, not just for everyday essentials, but for the thrill of discovering hidden gems with untapped potential. Last week, my eyes landed on this particular plastic bowl at Dollar Tree, and immediately, an idea sparked.
Its leaf-inspired shape was undeniably cute and perfectly suited for fall decor. However, there was one glaring issue: the plastic material looked undeniably cheap, giving it a flimsy, mass-produced feel. I also noticed they offered the same bowl in an equally charming acorn shape, making both excellent candidates for a budget-friendly glow-up. For a mere dollar, I knew I had to take this little leaf bowl home and see if I could elevate its appearance from mundane plastic to something truly upscale.
The Magic Behind the Makeover: Materials You’ll Need
One of the best aspects of this DIY project is its simplicity and affordability. You likely have most of these items on hand already, making it an instant craft idea! Here’s what you’ll need to replicate this stunning transformation:
- Plastic Leaf Bowl (or Acorn Bowl) from Dollar Tree: The star of our show! Any similar plastic decorative bowl with a nice shape would also work.
- Spray Paint: I highly recommend Rust-Oleum in a flat white finish. The flat finish is crucial for achieving that desirable ceramic or matte stoneware look. However, feel free to experiment with other colors like matte black, cream, or even a muted green for a different aesthetic.
- Fine-Grit Sandpaper: Essential for smoothing edges and creating a more refined, handmade appearance.
- Protective Drop Cloth or Cardboard: To protect your work surface from overspray.
- Optional: Painter’s tape (if you want to create patterns), decorative fillers (mini pumpkins, pinecones, potpourri), vinyl cutting machine and vinyl (for adding custom designs).
Step-by-Step Transformation: From Plastic to Pristine
This project is incredibly beginner-friendly, requiring no special skills or tools. Just a little patience and attention to detail will yield fantastic results.
1. Preparation is Key: Cleaning Your Canvas
Before you even think about paint, it’s vital to prepare your plastic bowl. Give it a good wash with soap and water to remove any dust, dirt, or oils from handling. A clean surface ensures the spray paint adheres properly and creates a smooth, even finish. Allow the bowl to dry completely before moving on. Set up your workspace in a well-ventilventilated area, preferably outdoors, and lay down your drop cloth or cardboard to protect the surrounding area.
2. The Power of Paint: Achieving a Professional Finish
Now for the fun part! I busted out my trusty can of Rust-Oleum in flat white, a shade that instantly brings a modern farmhouse or minimalist aesthetic to any item. When spray painting, remember this golden rule: several thin coats are always superior to one thick coat. A heavy coat can lead to drips, uneven coverage, and a clumpy texture that defeats the purpose of an “upscale” look.
Hold the can about 6-8 inches away from the bowl and apply light, even passes. Rotate the bowl as you spray to ensure full coverage from all angles. Allow each coat to dry to the touch (usually 10-15 minutes, check your specific paint can instructions) before applying the next. I applied about 3-4 thin coats to achieve complete opacity and a beautifully uniform finish. The flat finish of the paint is truly the magic ingredient here; it instantly mutes the plastic’s sheen and gives it the appearance of unglazed ceramic or matte stoneware.
3. The Finishing Touch: Sanding for a Seamless Look
Once the final coat of paint was completely dry – and I mean *completely* dry, typically 24 hours to cure properly – it was time for the secret step that truly sells the “ceramic” illusion. I lightly sanded all the edges of the leaf bowl using fine-grit sandpaper. This simple action softens any slightly raised imperfections from the plastic molding or paint, creating a smooth, tactile surface that feels more substantial and handmade.
The result? You would honestly never guess that this elegant piece started its life as a cheap dollar store plastic bowl! The combination of the flat paint and the subtle sanding elevates its appearance dramatically, fooling even the keenest eye into believing it’s a high-quality ceramic or stoneware item.
Showcasing Your Masterpiece: Styling Your Transformed Bowl
Now that your dollar store leaf bowl has undergone its incredible metamorphosis, it’s time to integrate it into your home decor! Its versatile look makes it perfect for various styles, from modern farmhouse to rustic chic. Here are some creative ideas for styling your newly elevated decor piece:
- Seasonal Centerpiece: For fall, fill it with decorative mini pumpkins, gourds, pinecones, faux acorns, or a mix of dried botanicals and potpourri. It makes an eye-catching focal point on your dining table or coffee table.
- Entryway Catch-All: Place it on an entryway console table to hold keys, mail, or other small items that tend to clutter your space.
- Decorative Display: Use it to display small decorative orbs, beads, or even a cluster of air plants.
- Bathroom Elegance: In a guest bathroom, it could hold small guest soaps or rolled hand towels, adding a touch of spa-like luxury.
- Shelf Styling: Incorporate it into a styled bookshelf or open shelving unit, perhaps with a small faux plant or a few books.
- Candle Holder Base: Place a pillar candle or a collection of votives inside (ensure they are in separate holders for safety), creating a warm, inviting glow.
A crucial disclaimer: since spray paint is generally not food-safe, I wouldn’t recommend using this bowl directly to hold unwrapped food items. However, if this bowl were filled with individually wrapped candy corn or M&M’s, I might just risk it for a festive touch! Ha!
The Enduring Power of Paint: Why This Makeover Works
I am consistently amazed at the transformative power of a simple can of paint. In this particular case, the key to its new, expensive-looking allure lies in the choice of FLAT paint. The matte finish instantly camouflages the plastic’s inherent cheapness, absorbing light rather than reflecting it, which mimics the tactile and visual qualities of unglazed pottery or ceramic. It effortlessly transitions from a cheap dollar store bowl to an expensive-looking farmhouse decoration or a minimalist accent piece.
Beyond the paint, the inherent beauty of the leaf shape itself contributes to the success of this DIY. Dollar Tree often carries surprisingly well-designed items that just need a little boost. You could even take this project a step further by adding a custom vinyl design or stencil to the center part of the bowl once the paint has fully cured. A monogram, a simple botanical illustration, or a fall-themed quote would be super cute and add another layer of personalization!
Why Embrace Dollar Store DIYs? The Benefits of Budget Decor
Projects like this leaf bowl makeover highlight several compelling reasons to embrace budget-friendly DIY home decor:
- Cost-Effectiveness: Save a significant amount of money compared to purchasing similar items from high-end decor stores.
- Personalization: Tailor your decor to your exact taste and style, creating pieces that truly reflect your home’s personality.
- Sense of Accomplishment: There’s immense satisfaction in looking at a beautiful item and knowing you created it with your own hands.
- Upcycling and Sustainability: Give new life to inexpensive items, reducing waste and practicing a more sustainable approach to home decorating.
- Creative Outlet: DIY projects offer a wonderful way to express your creativity and unwind.
Tips for Your Next Dollar Store Crafting Adventure
Inspired by this transformation? Here are a few general tips to keep in mind for your future dollar store craft endeavors:
- Look Beyond the Material: Focus on the shape and structure of an item rather than its original finish or material. Plastic, glass, and even cheap wood can often be transformed.
- Choose Simple Shapes: Items with clean lines and classic shapes are usually the easiest to elevate.
- Experiment with Paint Finishes: Don’t limit yourself to flat white. Matte black, stone-textured paints, metallic sprays, or even chalk paint can create entirely different, equally stunning effects.
- Sanding is Your Friend: Especially for plastic items, a light sanding (before or after painting, depending on the desired effect) can make a huge difference in feel and appearance.
- Prioritize Safety: Always work in a well-ventilated area when using spray paint and wear appropriate protective gear like gloves and a mask.
This simple Dollar Tree leaf bowl makeover is a testament to the fact that you don’t need a lavish budget to create a stylish and inviting home. With a keen eye for potential and a little DIY spirit, you can transform ordinary objects into extraordinary decor. So next time you’re at the dollar store, keep an open mind and unleash your inner decorator. Happy crafting!







