

Welcome to Pinterest Tested! Ever wondered if those ingenious kitchen hacks, miraculous cleaning solutions, or tantalizing recipes you scroll past on Pinterest actually deliver on their promises? You’ve landed in the right place! Every week, we dive deep into the most popular and intriguing Pins, putting them through rigorous real-world trials to determine if they truly live up to the hype. Consider us the MythBusters of domesticity, dedicated to separating fact from fiction so you can cook smarter, clean cleaner, and live more efficiently without wasted effort or expense. Join us on this journey to uncover the hidden gems and debunk the duds from the vast world of Pinterest inspiration.
Unlock a Healthier, Cheaper Kitchen: The Ultimate Guide to Homemade Cooking Spray (Pinterest Tested!)
Today’s featured Pin, originating from the insightful folks at Nature’s Nurture, caught our attention for its promise of a simple, cost-effective kitchen staple. The concept? Ditching expensive, store-bought cooking sprays loaded with mysterious ingredients for a homemade alternative. As someone constantly seeking ways to simplify my kitchen, reduce expenses, and make healthier choices, this Pin resonated deeply. Could a DIY cooking spray truly replace its commercial counterpart? Let’s find out!
The Challenge: Can Homemade Cooking Spray Revolutionize Your Kitchen?
The central question driving today’s test is straightforward yet impactful: Can I finally stop buying overpriced cooking spray from the store and effectively make a superior, healthier version right in my own home? Beyond just cost savings, I was curious about the performance, ingredient control, and overall user experience of a homemade solution. Store-bought cooking sprays are often convenient, but they come with a hefty price tag, questionable propellants, and sometimes leave a sticky residue that’s a nightmare to clean. If a homemade version could circumvent these issues while performing just as well, it would be a true game-changer for any home cook looking to optimize their kitchen practices.
Why Consider Making Your Own Cooking Spray?
Before diving into the experiment, let’s explore the compelling reasons why many home cooks are seeking alternatives to commercial cooking sprays:
- Cost Savings: A can of cooking spray might seem inexpensive, but the cost per ounce is significantly higher than buying bulk oil. Making your own leverages the oils you already have on hand, drastically cutting down long-term expenses.
- Ingredient Control & Health: Commercial sprays often contain propellants (like butane or propane), dimethicone (an anti-foaming agent), and other emulsifiers. When you make your own, you know exactly what goes into it – typically just oil, and sometimes water, allowing for a cleaner, chemical-free cooking experience.
- Environmental Impact: Reusable spray bottles reduce reliance on disposable aerosol cans, contributing to less waste and a greener kitchen.
- Versatility: Homemade sprays allow you to choose your preferred oil (olive, avocado, canola, coconut) based on its smoke point, flavor profile, and health benefits, tailoring it to specific culinary needs.
- Avoiding Residue: Some commercial sprays leave a tenacious, sticky film on cookware over time that can be challenging to remove. Homemade versions generally avoid this issue.
The Homemade Cooking Spray Experiment: My Method
To embark on this test, the requirements were minimal, promising an accessible solution for anyone interested. My initial setup involved:
- A Simple Spray Bottle: I picked up a small, empty spray bottle from the dollar store. The idea was to keep the initial investment as low as possible to truly test the budget-friendliness of this hack.
- The Core Ingredients: I filled the bottle with a straightforward mixture: half water and half vegetable oil. This common ratio is often cited in DIY recipes, intended to create a thinner, more easily dispersible mist than pure oil.
With my homemade concoction ready, it was time to put it through some real-world kitchen challenges. I chose two common cooking scenarios that frequently demand a non-stick surface: scrambled eggs and baking cookies. These tests would provide a comprehensive evaluation of the spray’s effectiveness across different cooking temperatures and food types.
Test 1: The Scrambled Eggs Challenge
Scrambled eggs are notoriously sticky without proper lubrication. This makes them an ideal candidate for assessing the non-stick capabilities of any cooking spray. I heated a pan, gave it a generous spray with my homemade mixture, and proceeded to cook a batch of scrambled eggs. Here’s what the result looked like:
To my pleasant surprise, the eggs slid out of the pan with remarkable ease. There was no excessive sticking, no stubborn bits left behind, and the texture was perfectly cooked. In essence, they looked and behaved precisely the same as any other time I’ve made eggs using a commercial cooking spray or even butter. This initial success was a strong indicator that the homemade spray was indeed performing as promised for everyday cooking tasks.
Test 2: The Cookie Baking Comparison
For the second, more rigorous test, I decided on a side-by-side comparison during a baking session. I prepared a batch of cookies and divided a baking pan into two sections. One half was sprayed with my trusted store-bought cooking spray, while the other half received an application of the homemade version. After baking the cookies to perfection and allowing them to cool slightly, I removed them from the pan. The immediate observation of the pan afterwards was quite telling:
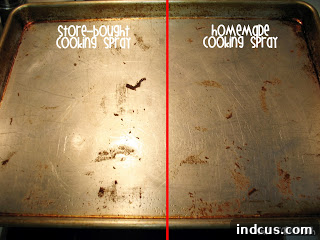
Visually, both sides of the pan appeared almost identical. The cookies lifted off equally easily from both the store-bought and homemade sprayed areas, leaving behind minimal residue. This result was incredibly encouraging, demonstrating that the homemade cooking spray could stand toe-to-toe with its commercial counterpart even under the high heat and potential stickiness of baking. The performance was consistent, efficient, and, most importantly, effective, dispelling any doubts about its utility for a wide range of kitchen applications.
The Verdict: A Resounding Success (with a Key Update!)
THE INITIAL RESULTS: Based on the scrambled egg and cookie tests, my homemade cooking spray performed just as effectively as the store-bought alternative. The immediate advantages were clear: making my own would be significantly cheaper than continually purchasing aerosol cans, and I loved the transparency of knowing my spray contained only oil and water—no added chemicals, propellants, or fillers. This Pin-test was initially deemed a clear winner, a simple yet powerful kitchen hack that truly delivered on its promise of efficiency and cost savings.
Update: While the concept of homemade cooking spray was a success, the initial choice of a cheap dollar store sprayer proved to be a temporary solution. Over time, the inexpensive mechanism inevitably clogged up and broke down, a common pitfall when relying on entry-level spray bottles for consistent oil application. This experience highlighted an important lesson: investing in a quality sprayer is crucial for long-term satisfaction and performance with homemade cooking spray.
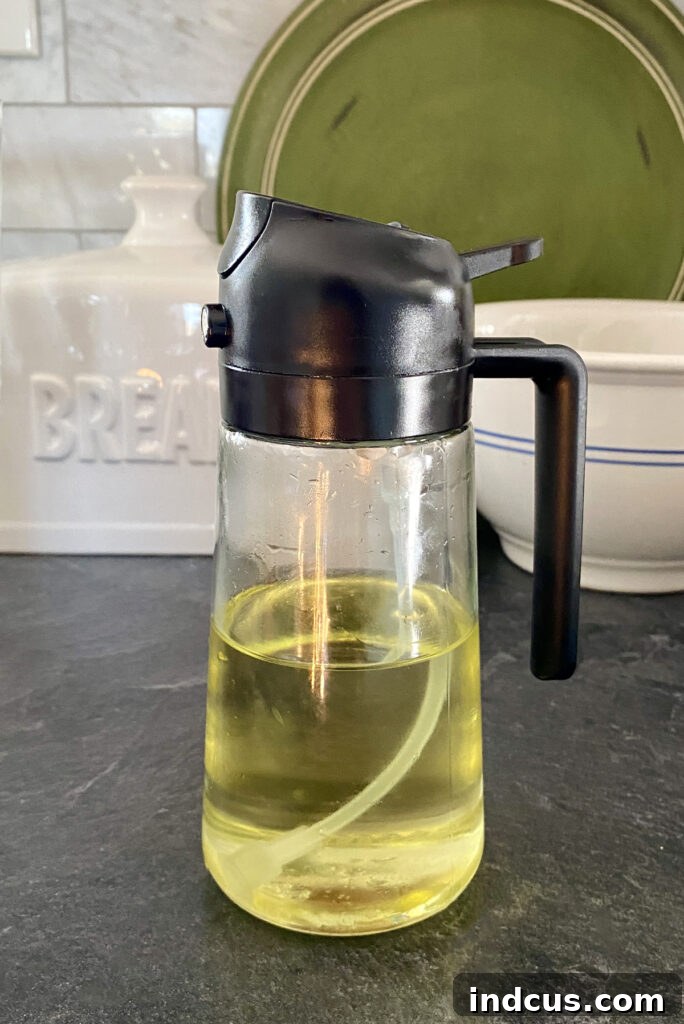
Recognizing the need for a more durable and effective delivery system, I purchased this specific oil sprayer on Amazon, and it has been an absolute game-changer for oil application in my kitchen. This sprayer, unlike its flimsy predecessor, is designed with quality and functionality in mind. It consistently delivers a wonderfully fine, even mist, which is essential for uniform coating and preventing excess oil. Furthermore, it features a clever pour spout conversion, allowing for easy switching between spraying and pouring oil directly, adding another layer of versatility to my cooking. This device has truly elevated my homemade cooking spray experience, making it a joy to use rather than a chore.
However, it’s vital to provide a realistic perspective: even with a superior sprayer, homemade cooking spray might not be a perfect substitute for *every* single cooking scenario. For exceptionally sticky foods, such as my homemade bread that tends to cling tenaciously to the pan, this spray alone doesn’t provide enough release. In such cases, I still find it necessary to use parchment paper or apply a more generous layer of solid shortening or butter. But for the vast majority of everyday cooking and baking—from sautéing vegetables and frying eggs to baking cookies and roasting meats—it works brilliantly. Therefore, despite this minor caveat for extreme situations, I am still confidently calling this Pin-test a resounding win for practicality, health, and savings!
Beyond the Basics: Enhancing Your Homemade Cooking Spray Experience
For those looking to fully embrace the benefits of DIY cooking spray, consider these additional tips and insights:
Choosing the Right Oil
The beauty of homemade spray is customization. Different oils have different smoke points and flavor profiles:
- Vegetable Oil/Canola Oil: Neutral flavor, high smoke point, great for general cooking and baking.
- Olive Oil: Best for lower heat cooking, sautéing, and adding flavor to dishes. Not ideal for high-heat searing due to a lower smoke point.
- Avocado Oil: Very high smoke point, neutral flavor, excellent for high-heat cooking and grilling. A healthier, but often pricier, option.
- Melted Coconut Oil: Adds a subtle tropical flavor; great for baking or certain sautéed dishes. Keep in mind it solidifies at room temperature, so it might require warming to spray effectively, and could clog some sprayers.
Experiment with different oils to find what works best for your culinary needs.
To Add Water or Not to Add Water?
The original recipe uses a 50/50 oil and water mixture. The water helps thin the oil, allowing it to atomize into a finer mist. However, there are pros and cons:
- Pros of Water: Finer spray, less oil used per application.
- Cons of Water: Oil and water naturally separate, requiring a vigorous shake before each use. Over time, there’s a slight risk of bacterial growth or mold, especially if not used regularly. It also reduces the oil’s effective non-stick power slightly.
Many prefer to use pure oil (e.g., olive or avocado oil) in a high-quality sprayer designed for oil. While the spray might be slightly less fine, it eliminates the separation issue and potential for spoilage, and offers maximum non-stick power. If using pure oil, ensure your sprayer is up to the task – the Amazon one I recommend works well with pure oil.
Maintaining Your Sprayer for Longevity
Even with a good quality sprayer, proper maintenance is key:
- Regular Cleaning: Periodically empty the sprayer, wash it with warm, soapy water, and rinse thoroughly. For stubborn oil residue, a vinegar rinse can help. Ensure it’s completely dry before refilling.
- Shake Before Use: If using an oil and water mixture, always shake well to emulsify the two liquids just before spraying.
- Store Properly: Keep your sprayer in a cool, dark place to preserve the oil and prevent clogging. Avoid direct sunlight.
Creative Flavor Infusions
Take your homemade cooking spray a step further by infusing your oil with flavors. Add a few sprigs of rosemary, thyme, or a couple of crushed garlic cloves to your oil (ensure they are fully submerged). Let it sit for a few days to infuse before straining and filling your sprayer. This is fantastic for adding subtle flavor to roasted vegetables or pan-fried chicken.
Final Thoughts: Embrace the DIY Revolution in Your Kitchen
The journey with homemade cooking spray, from a simple Pinterest Pin to a tested and refined kitchen staple, has been incredibly rewarding. It’s a testament to the power of thoughtful experimentation and a willingness to step away from conventional store-bought solutions. Not only does this hack save money and reduce exposure to unnecessary chemicals, but it also empowers you with greater control over your cooking ingredients and methods.
While the initial choice of a cheap sprayer might lead to early frustrations, investing in a robust, high-quality oil sprayer transforms this simple DIY project into a genuine kitchen luxury. For most daily cooking tasks, it performs beautifully, making it an indispensable tool for health-conscious, budget-savvy home cooks. So, go ahead—try making your own cooking spray. Your wallet and your health will thank you!
What are your thoughts on homemade cooking spray? Have you tried it, and do you have any tips or favorite oils to share? We love hearing about your kitchen adventures. Share your experiences in the comments below, and stay tuned for more Pinterest Tested insights next week!







