
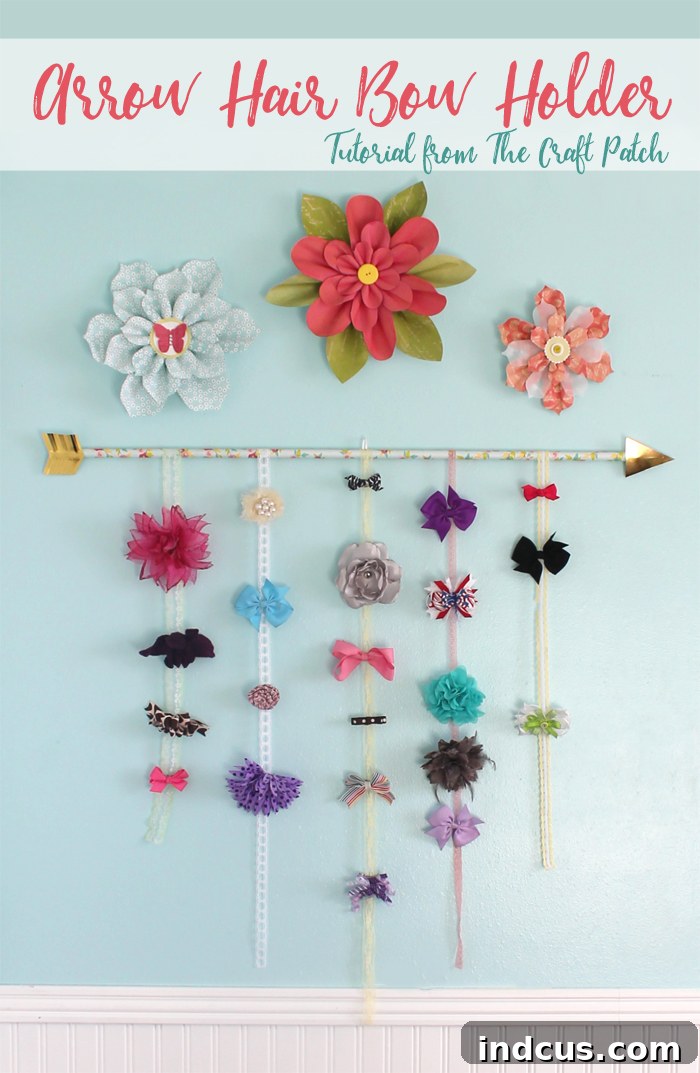
DIY Arrow Hair Bow Organizer: A Creative Solution for Kids’ Room Clutter
As a parent, you know the struggle: a drawer overflowing with hair bows, tangled ribbons, and mismatched clips. It’s a common scenario in many households with little girls, and it can quickly turn finding the right accessory into a frustrating treasure hunt. If you’re tired of rummaging through endless bins and losing precious minutes each morning, then it’s time for a simple, yet stylish solution. I faced this exact challenge with my two girls, constantly digging through a chaotic collection of hair bows. That’s why I decided to create a functional and aesthetically pleasing hair bow organizer to hang proudly on their wall – an elegant arrow design that doubles as charming room decor.
This project isn’t just about tidying up; it’s about adding a personal touch to your child’s space while making daily routines smoother. This DIY arrow hair bow holder is not only incredibly practical but also adds a whimsical, handmade charm to any girl’s room. I initially crafted a similar arrow design as decor for my craft room, and it immediately struck me how perfectly its form could be adapted into a delightful display for all those adorable hair accessories. Let’s transform that overwhelming bow pile into an organized, eye-catching feature!
Why Choose an Arrow Design for Your Hair Bow Holder?
The arrow motif is more than just a passing trend; it offers a timeless and versatile aesthetic that can complement various room decors, from bohemian to modern, and even rustic themes. Its clean lines and simple shape provide a perfect foundation for attaching ribbons, clips, and bows. Beyond its visual appeal, the elongated shape of an arrow naturally lends itself to maximizing storage space without overwhelming the wall. It’s a subtle nod to adventure and direction, making it a playful yet sophisticated addition to a child’s bedroom or playroom. Plus, it’s a unique choice that stands out from typical square or rectangular organizers, adding a distinctive handmade touch that truly personalizes the space.
Gather Your Materials: What You’ll Need for Your Arrow Bow Holder
One of the best aspects of this DIY project is its simplicity and affordability. Most of the materials can be found at your local craft store, and you might even have some lying around your house already. Opting for readily available and inexpensive supplies makes this an accessible craft for anyone, regardless of their crafting experience. Here’s a detailed list of what you’ll need to create your very own arrow hair bow organizer:
Essential Supplies:
- Wooden Dowel: Choose a dowel that is approximately 1/2 to 3/4 inch in diameter and at least 24-36 inches long. The length will determine how many bows your organizer can hold, so consider the size of your collection and available wall space. A sturdier dowel is better for holding a larger number of bows without sagging.
- Scrapbook Paper: Select decorative scrapbook paper in patterns or colors that match your room’s decor or your child’s preferences. One or two sheets (12×12 inches) should be sufficient. You can choose solid colors, polka dots, stripes, florals, or even metallic finishes to add a special touch. This is where you can really let your creativity shine!
- Hot Glue Gun and Glue Sticks: An indispensable tool for quick and strong bonding. Ensure you have plenty of glue sticks on hand for attaching the ribbon, arrow pieces, and securing the hanger.
- Elmer’s Glue Stick (or similar craft glue stick): Perfect for cleanly attaching the scrapbook paper to the dowel without creating wrinkles or bubbles. A reliable glue stick ensures a smooth, professional finish.
- Lace or Ribbon: Approximately 2-3 yards of lace or ribbon. The width can vary, but a width of 1/2 to 1 inch works well for attaching bows. You might even consider using multiple ribbons of different textures or colors for a more layered look. Grosgrain ribbon is durable and holds clips well, while satin can add a touch of elegance.
- Scissors or Craft Knife: For cutting paper and ribbon precisely. A craft knife can be particularly useful for straight edges on the paper strips.
- Pencil and Ruler: For measuring and marking your paper and dowel accurately.
- Optional: Cardstock or metallic paper for arrow tip and feathers, paint or glitter for embellishments, Command strips or small nail/brad for hanging.
Step-by-Step Guide: Crafting Your Arrow Hair Bow Organizer
Now that you have all your materials, let’s dive into the fun part: creating your arrow hair bow holder! This project is designed to be straightforward and enjoyable, even for novice crafters. Take your time with each step, and don’t be afraid to add your own creative flair.
Step 1: Preparing Your Wooden Dowel with Decorative Paper
Begin by measuring the circumference of your wooden dowel. You’ll need to cut your scrapbook paper into strips that are slightly wider than this circumference, ensuring a small overlap when wrapped. The length of these strips should correspond to the length of your dowel, or you can cut shorter strips and piece them together seamlessly. For a smooth finish, it’s often best to cut strips that are the full length of your dowel if possible, minimizing seams. Apply a liberal amount of Elmer’s glue stick (or your preferred craft glue stick) to the back of one paper strip. Start at one end of the dowel, carefully align the paper, and press it firmly onto the dowel. Slowly wrap the paper around, smoothing out any air bubbles as you go. Overlap the edges slightly and press firmly until the glue has dried enough to secure the paper. Repeat this process until the entire dowel is covered in your chosen decorative paper. This step transforms a plain wooden stick into a vibrant and personalized base for your hair bow holder.
Step 2: Attaching the Ribbons or Lace for Hanging Bows
Once your dowel is beautifully wrapped and the glue is dry, it’s time to add the hanging elements for your hair bows. Unroll your chosen lace or ribbon. Decide on the desired length for each hanging strip – typically, 18-24 inches works well, allowing plenty of space for multiple bows. You’ll want to cut several strips of equal length. For a balanced look, aim for 3-5 strips, depending on the length of your dowel and how dense you want your bow display to be. Using your hot glue gun, apply a small line of glue along the back of the dowel where you want to attach your first ribbon. Press the end of the ribbon firmly into the hot glue, holding it until it sets. Repeat this for all your ribbon or lace strips, spacing them evenly across the length of the dowel. Ensure the ribbons hang straight down and are securely attached. The hot glue provides a strong, instant bond, allowing you to quickly move on to the next step.
Step 3: Creating and Attaching the Arrow Head and Tail
This is where your dowel truly transforms into an arrow! Using a contrasting piece of cardstock, metallic paper, or even felt, cut out an arrow point (a triangle or arrowhead shape) and an arrow tail (feather-like shapes). You can freehand these or use a stencil for more precise results. For the tail, consider cutting two or three feather shapes and layering them slightly for a more dynamic look. Once you’re satisfied with your shapes, apply a generous amount of hot glue to the back of the arrow point and firmly attach it to one end of the dowel. Repeat this process for the arrow tail pieces, securing them to the opposite end of the dowel. Hold each piece in place for a few seconds until the hot glue cools and creates a strong bond. Ensure all edges are well-adhered to prevent them from peeling off over time. This step completes the iconic arrow aesthetic of your hair bow organizer.
Step 4: Hanging Your DIY Arrow Hair Bow Organizer
With your arrow complete, it’s time to display your beautiful creation! To hang mine on the wall, I created a small loop using a piece of matching ribbon. I folded a short piece of ribbon into a loop and securely attached it to the center of the back of the arrow dowel using more hot glue. This central loop provides a single point of suspension, ensuring the arrow hangs evenly. Then, I simply hammered one small brad (a small nail with a decorative head) into the wall in the desired location and hung the ribbon loop from it. To prevent the arrow from shifting or tilting, especially when loaded with bows, I added small pieces of sticky tac (that reusable blue adhesive teachers often use for posters) under the arrow head and tail. This keeps the entire organizer securely flush against the wall. Alternatively, you could use Command hooks for a damage-free hanging solution, or small cup hooks if you prefer a more permanent fixture. Consider the height – place it low enough for your child to access their bows, but high enough to prevent accidental pulling.
Tips for Customization and Enhancements
This DIY arrow hair bow organizer is a fantastic canvas for personalization. Here are some ideas to make it uniquely yours:
- Theme Matching: Choose scrapbook paper and ribbon that align with your child’s room theme – think unicorns, mermaids, superheroes, or floral patterns.
- Paint and Glitter: Before wrapping, you could paint the wooden dowel for a base color or add glitter glue for extra sparkle.
- Embellishments: Attach small charms, beads, faux flowers, or even small stuffed animal heads to the dowel or ribbons for added decorative flair.
- Varying Textures: Experiment with different types of ribbons like velvet, satin, grosgrain, or even macrame cords for diverse textures.
- Multi-Level Display: If you have a very large collection of bows, consider making two or three arrows of varying lengths and hanging them staggered on the wall.
- Hair Clip Holders: For snap clips and barrettes, you can hot glue a thin strip of felt or elastic horizontally between two hanging ribbons to create additional attachment points.
- Gift Idea: These organizers make thoughtful and handmade gifts for birthdays or baby showers, especially when personalized for the recipient.
Benefits of an Organized Hair Bow Collection
Beyond the aesthetic appeal, having a dedicated hair bow organizer brings numerous practical benefits:
- Time-Saving Mornings: No more frantic searching! All bows are visible and easily accessible, making morning routines quicker and less stressful.
- Reduced Clutter: Clears drawers and surfaces, contributing to a tidier and more organized bedroom or bathroom.
- Extended Bow Lifespan: Keeping bows neatly hung prevents them from getting crushed, tangled, or lost at the bottom of a bin, preserving their quality.
- Encourages Independence: When bows are easy to see and reach, children can often pick out their own accessories, fostering a sense of independence and choice.
- Decorative Element: The organizer itself becomes a charming piece of wall decor, showcasing the beautiful collection of bows as part of the room’s design.
- Budget-Friendly: A DIY solution is often far more economical than purchasing pre-made storage units, allowing you to save money while getting exactly what you need.
Conclusion: Enjoy Your Beautifully Organized Hair Bows!
Creating this DIY arrow hair bow organizer is a rewarding project that addresses a common household challenge with creativity and style. It’s a simple, enjoyable craft that results in a highly functional and beautiful piece of decor for any child’s room. Not only will you eliminate the clutter and frustration of tangled bows, but you’ll also add a personalized, whimsical touch that brightens up the space. The satisfaction of seeing all those adorable hair accessories neatly displayed is immense, and the ease of choosing the perfect bow each day will be a welcome change. So gather your supplies, unleash your inner crafter, and enjoy the process of bringing order and charm to your little one’s room with this fantastic arrow hair bow holder!







