
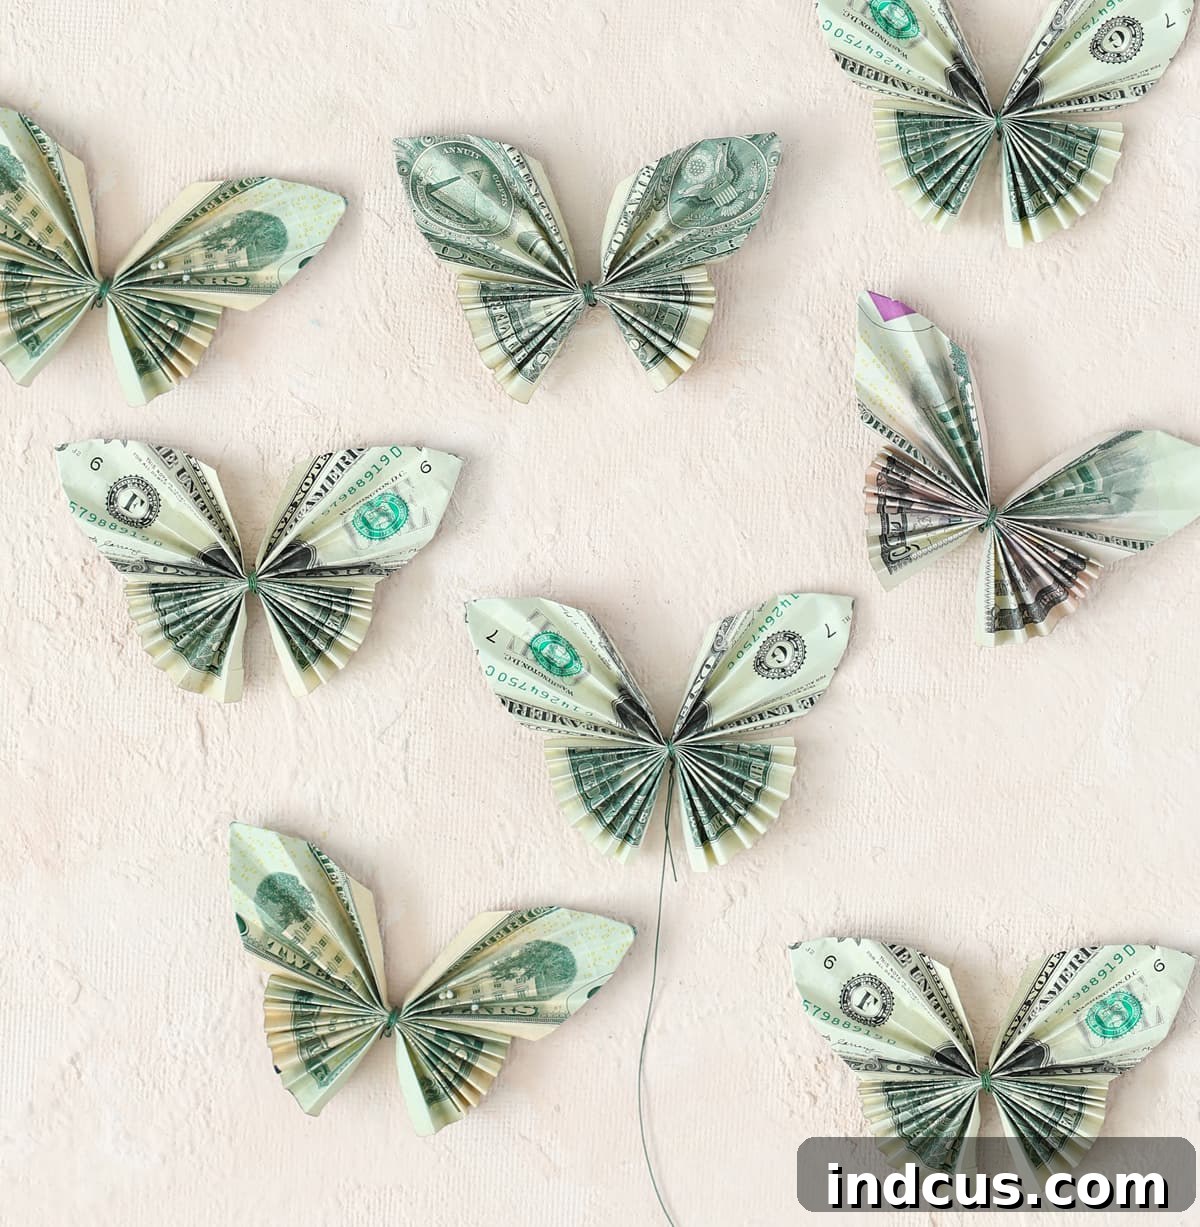
DIY Money Origami Butterfly: Turn Dollar Bills into Beautiful Keepsakes
Are you looking for a truly unique and memorable way to give a cash gift? Forget the plain envelope and instead, learn the delightful art of money origami by transforming ordinary dollar bills into charming butterflies! This comprehensive, step-by-step guide is perfect for beginners, offering clear instructions, helpful photos, and even a video tutorial to ensure your success. Discover how to craft these intricate yet surprisingly simple money butterflies and explore a myriad of creative ways to present them for any special occasion.
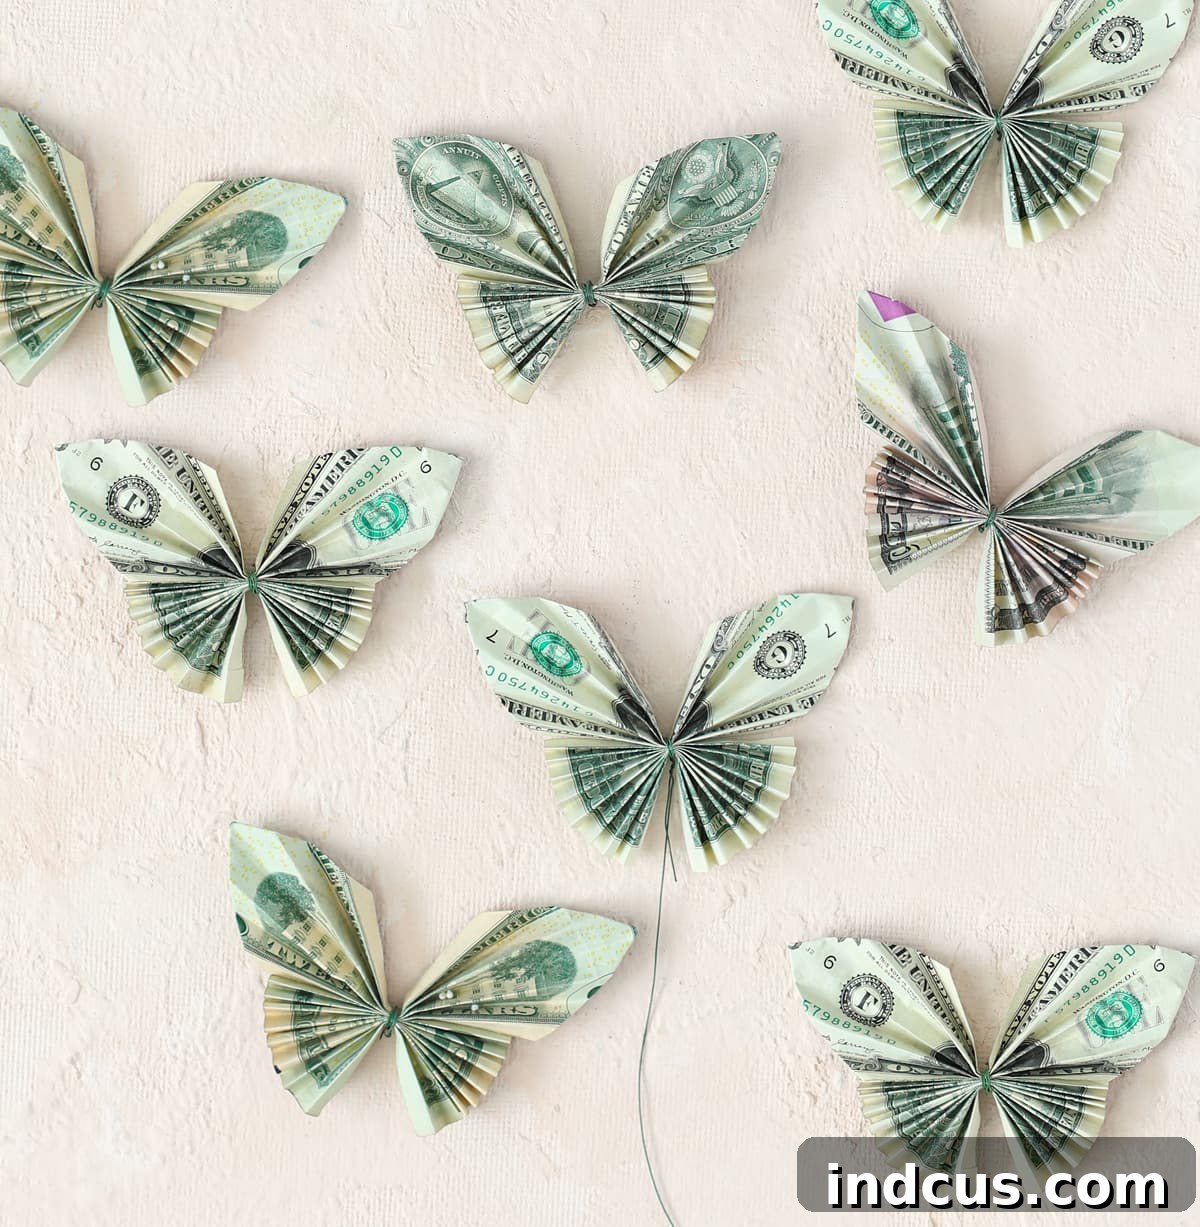
Giving money as a gift is often practical, but it can sometimes feel impersonal. This money origami butterfly tutorial changes all that, elevating your cash present into a thoughtful and visually appealing creation. Of all the money folding techniques I’ve explored, this particular butterfly design stands out for its simplicity and undeniable charm. It’s an incredibly beginner-friendly project, requiring only basic folding skills, making it accessible to anyone eager to add a personal touch to their gifts.
These money butterflies are incredibly versatile. They make fantastic additions to bouquets for graduations, birthdays, or anniversaries. They can be incorporated into decorative leis, nestled within gift baskets, or even displayed in a shadow box. Throughout this post, I’ll not only guide you through the folding process but also inspire you with innovative ideas on how to showcase your finished money butterflies. To cater to different learning styles, I’ve included both a detailed photo tutorial and a supplemental video. Let’s begin crafting these wonderful winged creations!
Essential Materials for Your Money Butterflies
Before you embark on your origami journey, gather these simple supplies. The beauty of this craft lies in its minimal material requirements, making it an accessible and inexpensive way to personalize a cash gift.
- Dollar Bills: You will need two bills for each butterfly you intend to create. The denomination is entirely up to you and the value of the gift you wish to give. Whether you use crisp one-dollar bills for a charming accent or higher denominations for a more substantial present, the folding process remains the same.
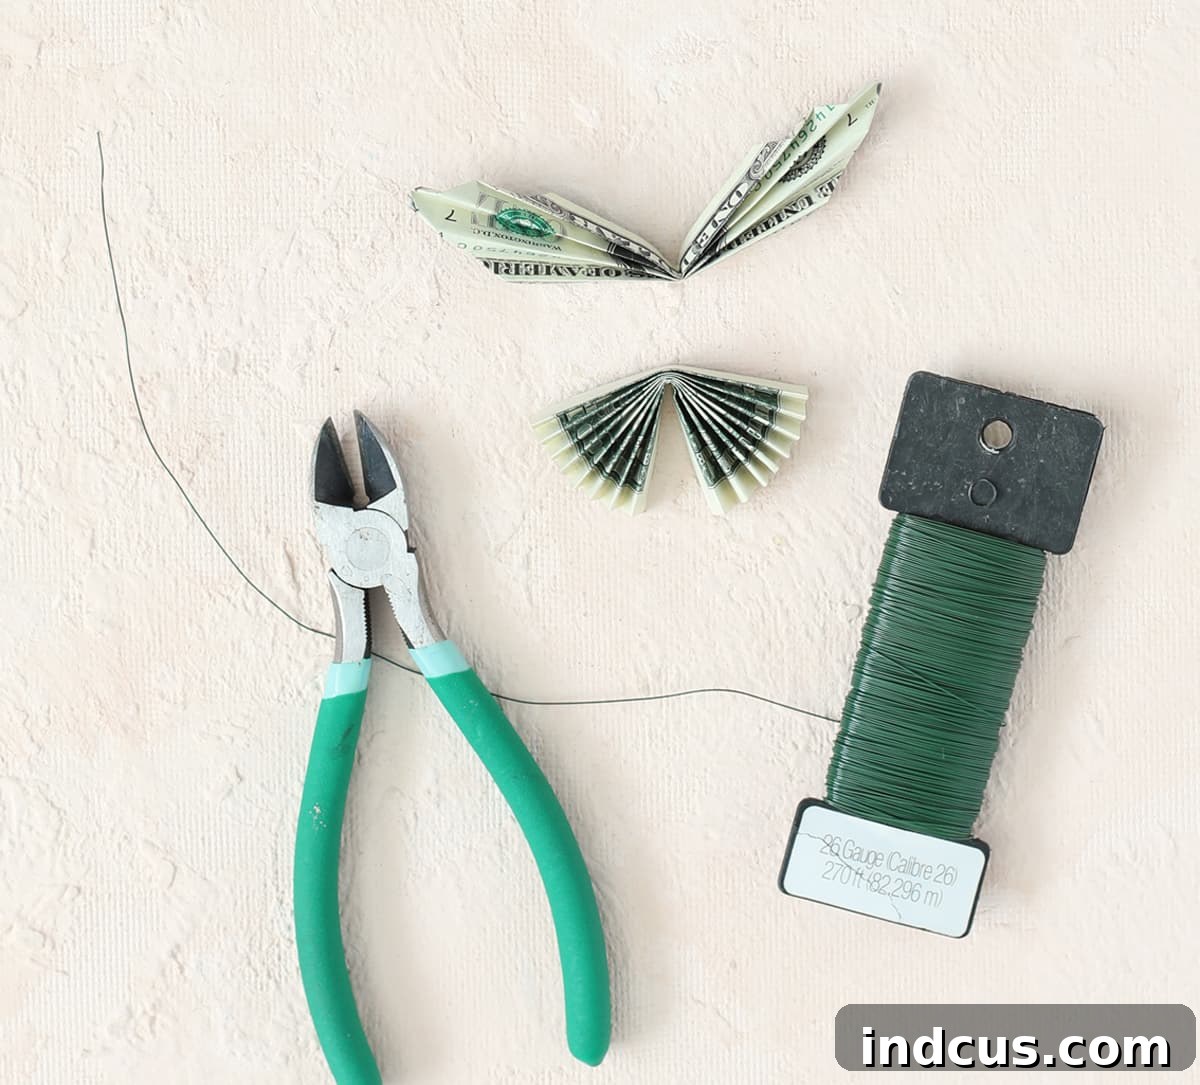
- Florist Wire, String, or Thread: This will be used to bind your two folded bills together, forming the body of the butterfly. Florist wire provides excellent rigidity, which is ideal if you plan to attach your butterflies to a bouquet or need them to stand upright. For a softer look or items like leis, strong string or durable thread will work perfectly.
Optional but Recommended Preparation: Ironing Your Bills
While entirely optional, I highly recommend taking a few moments to iron your dollar bills before you start folding. Using a regular clothing iron on a low setting (without steam is usually best) will smooth out any creases and make the bills crisp. This seemingly small step significantly enhances the final appearance of your money butterflies, resulting in sharper folds and a more polished, professional look. Crisp bills are also easier to fold precisely, making the entire crafting process more enjoyable.
Step-by-Step Tutorial: Folding Your Money Origami Butterfly
Follow these clear instructions to transform two ordinary dollar bills into a beautiful origami butterfly. Pay close attention to the details, and remember that precision in folding leads to the most stunning results.
Part 1: Preparing Bill Number One (The Top Wings)
This first bill will form the upper, more intricate wings of your butterfly, characterized by its pointed tips and accordion folds.
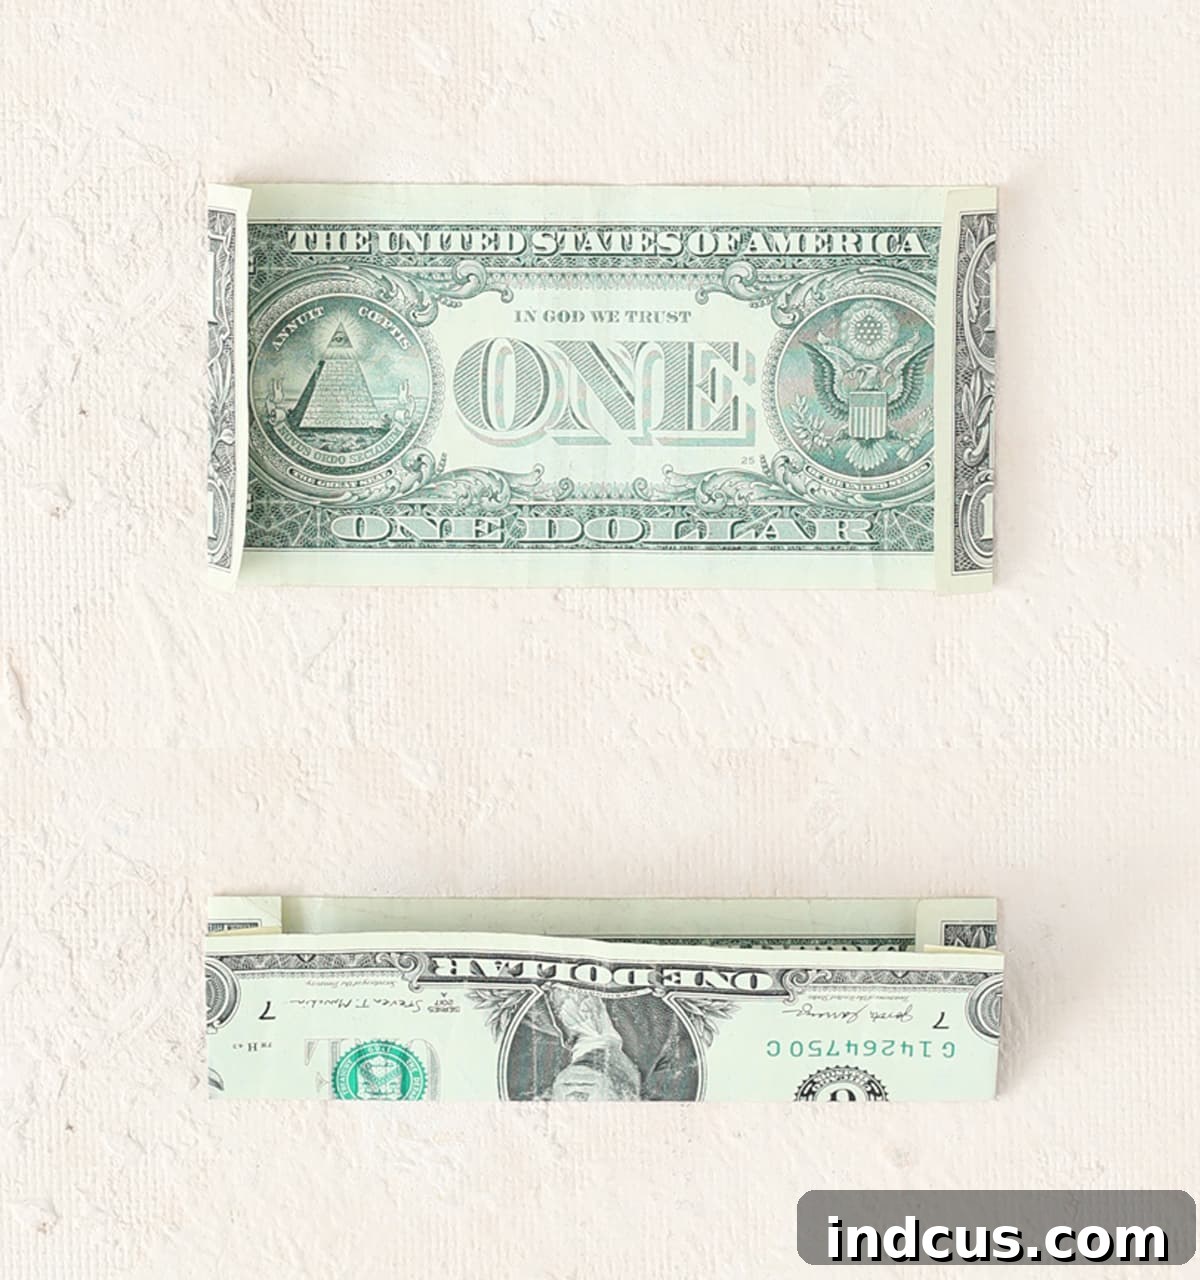
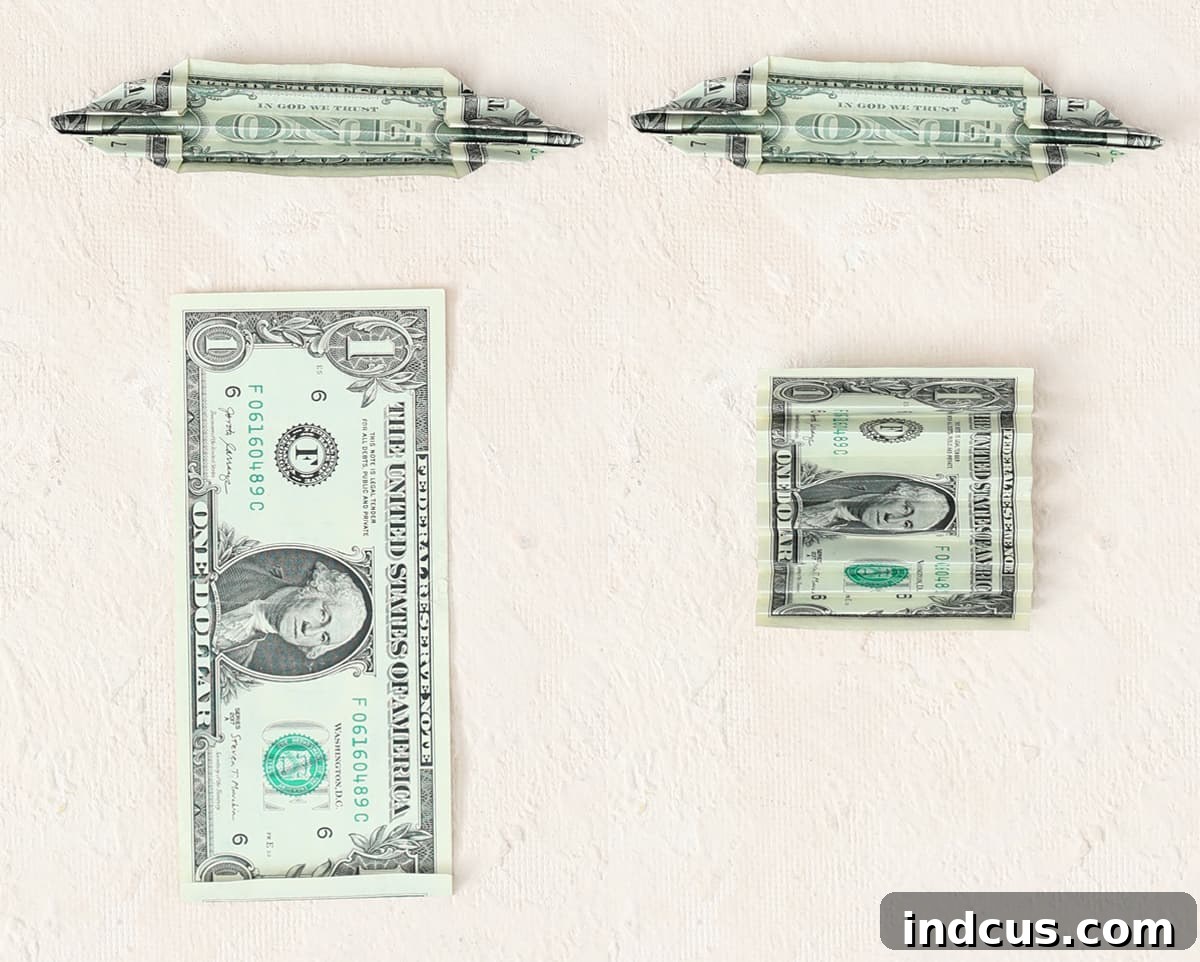
Step 1: Edge Folds for Defined Wings. Take your first dollar bill. Along each of the short ends (the width of the bill), carefully fold the edge inward by approximately 1/4 inch. If you are using a $1 bill, a good guide is to fold it so the crease runs right through the center of the printed ‘ONE’ symbol. These initial folds create a cleaner, more finished edge for your butterfly’s wings, giving them a more refined appearance.
Step 2: Establish the Central Crease. Next, bring the bottom edge of the bill up to meet the top edge and fold the bill perfectly in half. Press firmly along the crease to ensure it’s well-defined. This fold serves a crucial purpose: it provides a precise center guide that will be indispensable for the subsequent steps. Once you have a strong central crease, unfold the bill completely back to its original flat state. The guide line should now be clearly visible down the middle.
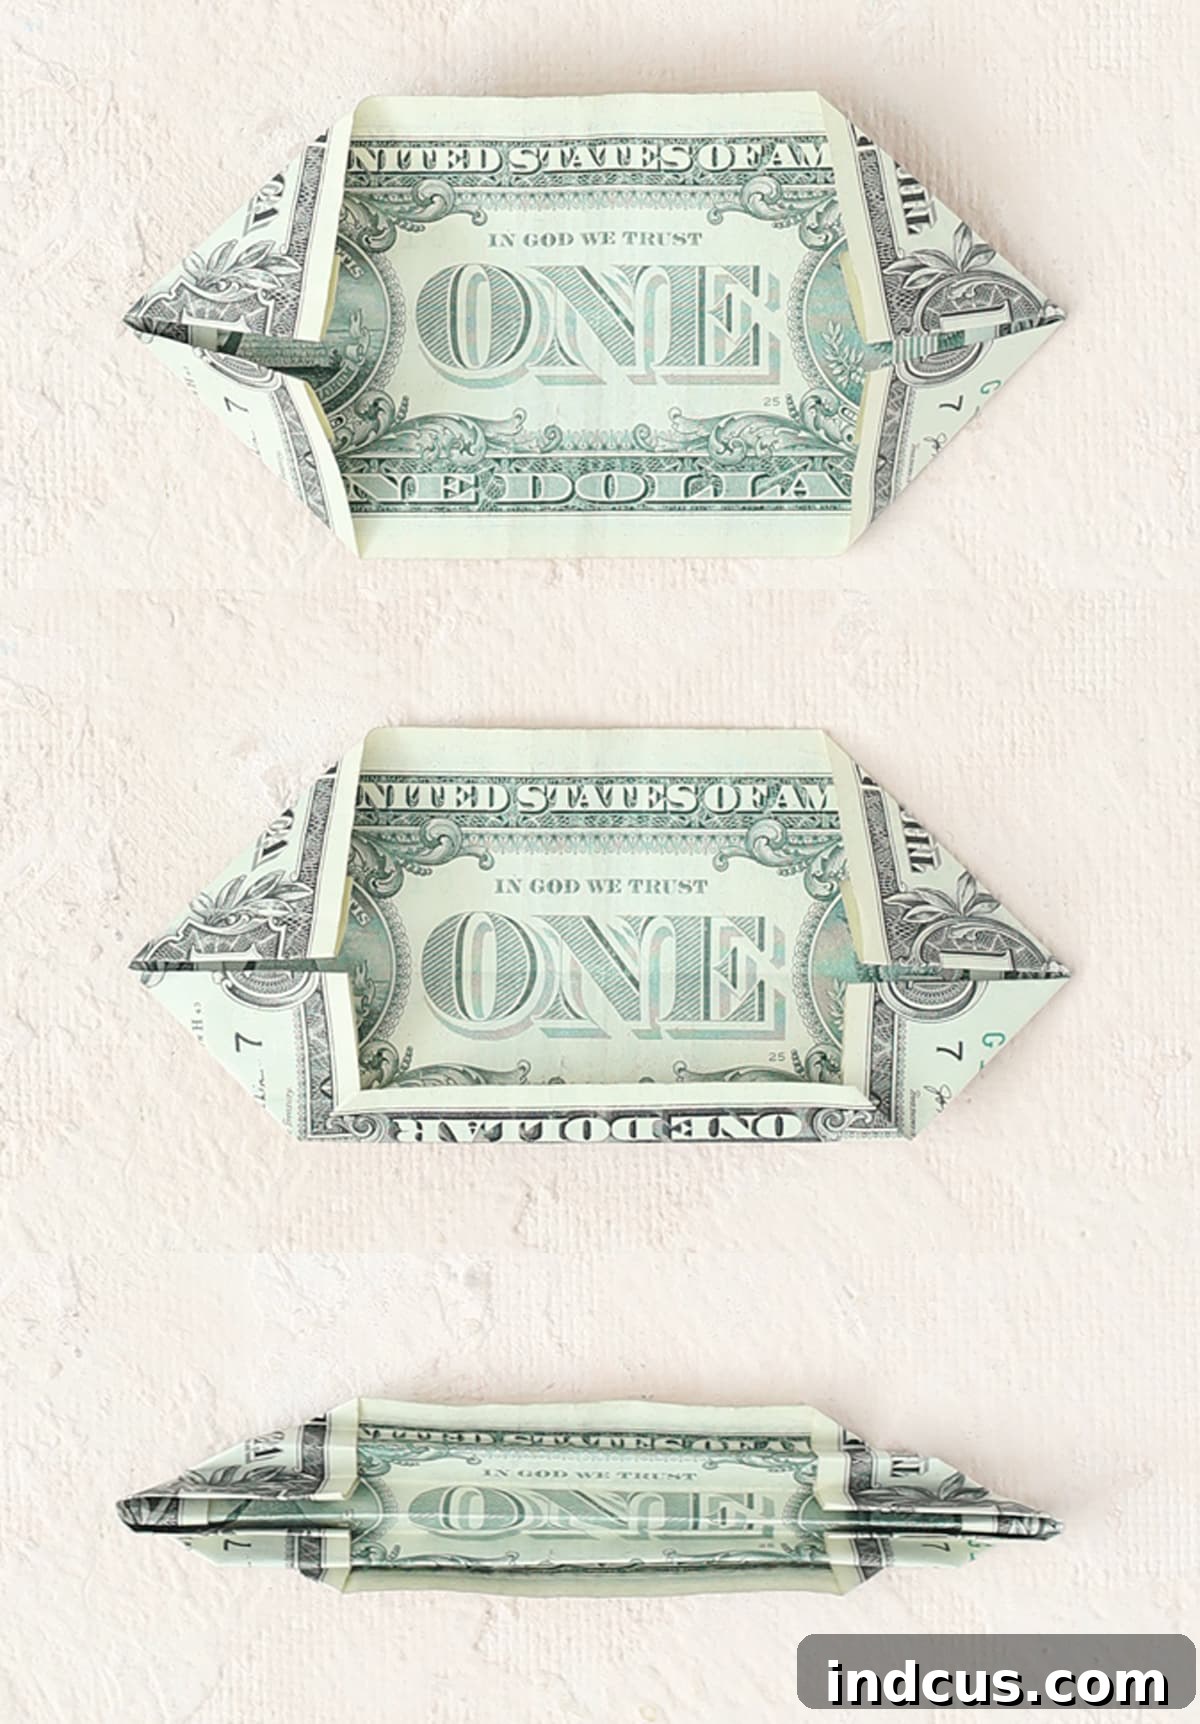
Step 3: Crafting the Wing Tips. With the bill unfolded and the central crease visible, focus on the two short edges you folded in Step 1. You will now create two triangular points on each of these short edges. Using the central guide crease you just made, fold each corner inward to meet the center line, forming a neat triangle. The objective is to make these triangles as even and symmetrical as possible. These folds are essential as they will become the elegant, pointed tips of your butterfly’s upper wings.
Step 4: The Accordion Fold for Texture. Now it’s time to add the characteristic texture to your butterfly’s wings. Begin by folding the bottom edge of the bill upwards. A good guide for the width of this first fold is to match the width of the white border present on the bill’s design. Once this initial fold is made, continue with an accordion or fan-fold pattern all the way up the bill. Ensure each fold is consistent in width and crisp. This accordion folding creates the beautiful, pleated texture that gives your butterfly its distinct and elegant wing structure.
Part 2: Preparing Bill Number Two (The Bottom Wings)
This second bill forms the simpler, fan-like bottom wings, providing balance and volume to your butterfly.
Step 5: Simple Accordion Fold. Preparing Bill Number Two is remarkably straightforward. Take your second dollar bill and begin accordion folding it along its short end. As with Bill Number One, maintaining consistent fold widths is key to a beautiful outcome. A helpful tip is to use the white border of the bill as a guide for the width of your folds. This creates a neat, evenly pleated fan that will perfectly complement the first bill and form the lower set of wings. This bill should be fully folded into an accordion shape.
Part 3: Assembling Your Money Butterfly
Now that both bills are meticulously folded, it’s time to bring them together to form your magnificent money butterfly.
Step 6: Binding the Wings Together. This step unites the two separate folded bills into a single, cohesive butterfly. First, fold each of your prepared bills in half lengthwise to create a distinct center line for each. Align the center lines of both bills, stacking them on top of each other. The more intricate, pointed bill (Bill Number One) typically goes on top, forming the upper wings, while the simpler accordion-folded bill (Bill Number Two) forms the lower wings. Once aligned, tightly wrap your chosen binding material – florist wire, string, or thread – around the exact center where the two bills meet. Ensure it’s secure enough to hold them firmly but not so tight that it tears the paper. If using florist wire and planning to attach the butterfly to a bouquet, leave a sufficiently long tail of wire to facilitate easy attachment.
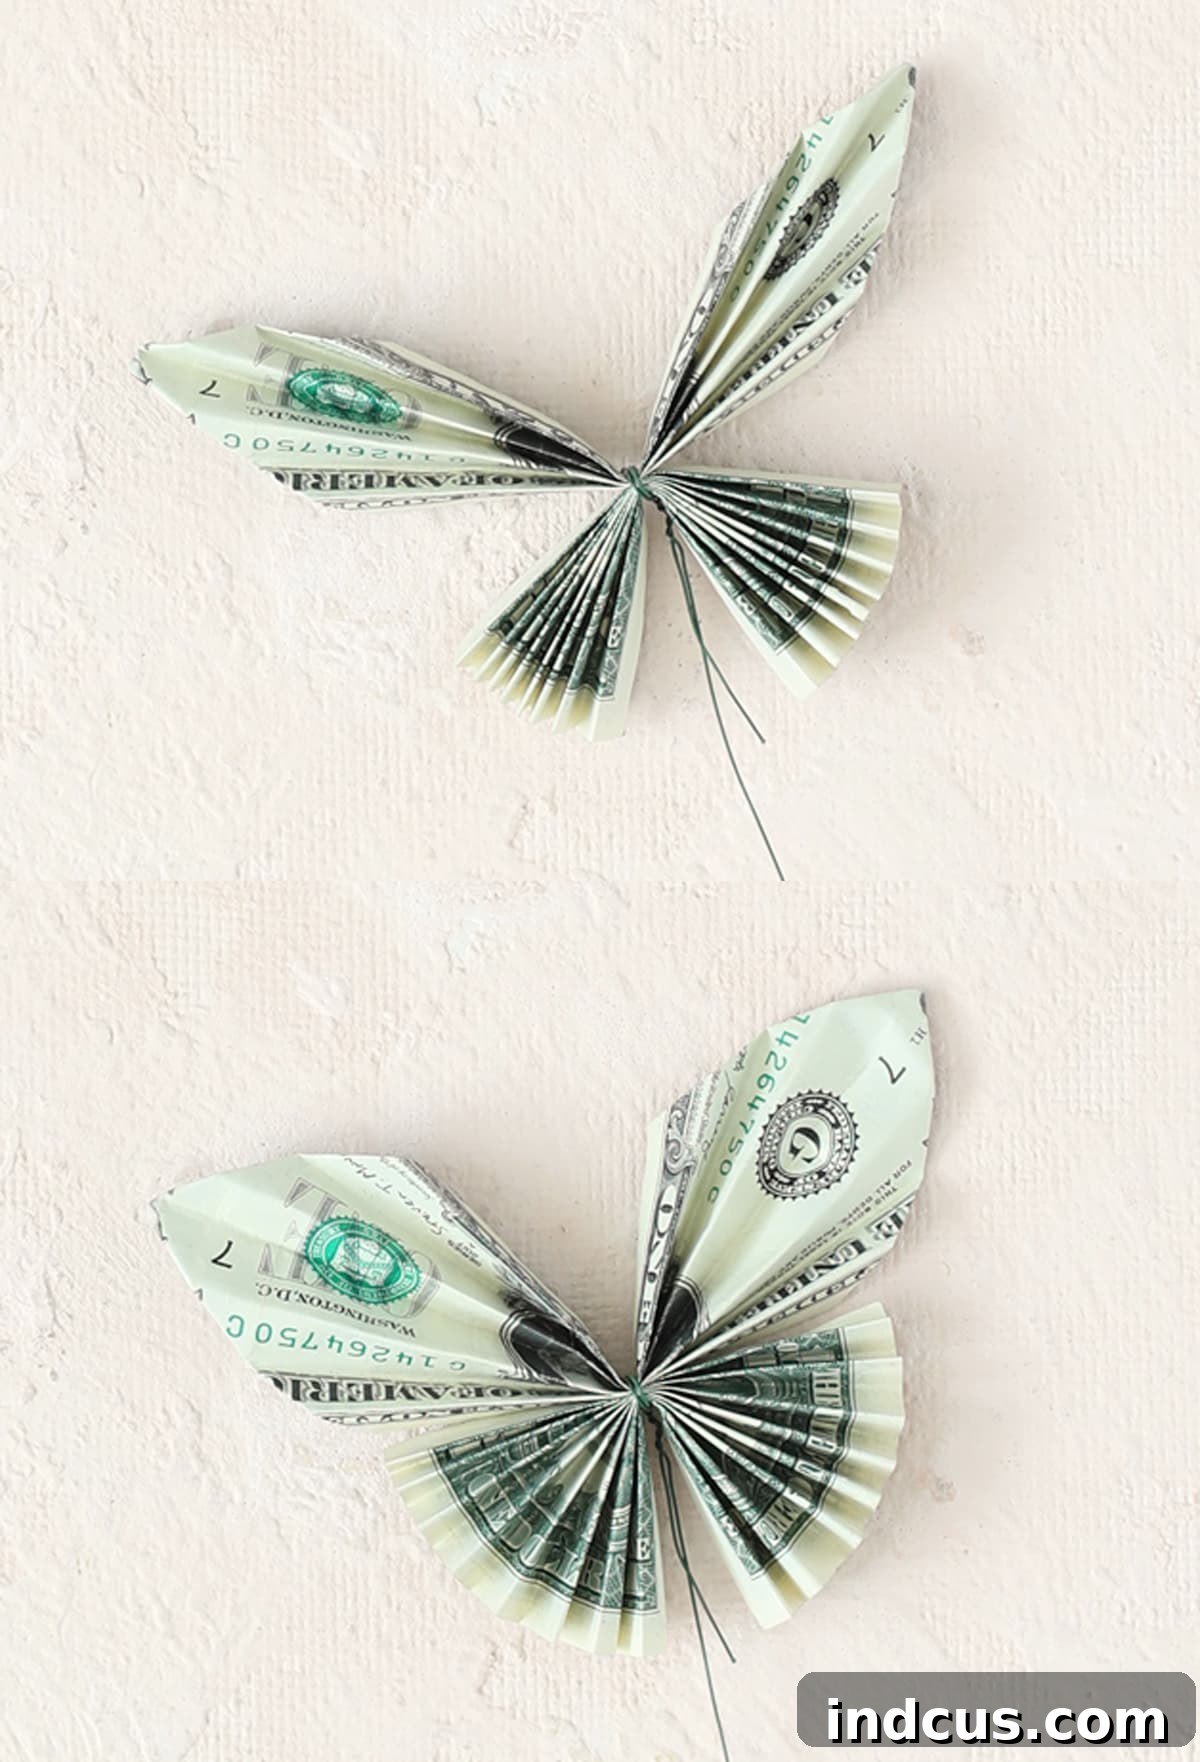
Step 7: The Final Fluff and Presentation. Your money butterfly is almost complete! The final step involves gently shaping and fluffing the wings to give your creation volume and life. Carefully press down on the tips of the upper wings and gently fan out all the accordion folds. Take your time with this step, delicately adjusting each fold until you achieve a beautiful, symmetrical butterfly shape. Once fluffed, your gorgeous money butterfly is ready for display or gifting. Marvel at your creation – isn’t it stunning?
Watch the Money Butterfly Folding Process: Video Tutorial
For those who prefer a visual guide or need a little extra help with the folding techniques, I’ve created a comprehensive video tutorial. This video walks you through each step mentioned above, providing real-time demonstrations that can be paused, rewound, and replayed as needed. Watching the folds in action can often clarify details that are harder to grasp from static images alone. Simply click play and follow along!
Creative Ways to Gift Your Money Origami Butterflies
Now that you’ve mastered the art of folding money butterflies, the truly exciting part begins: presenting them! These beautiful creations deserve more than a simple card. Here are some inspiring ideas to make your money gift unforgettable:
Adorn a Bouquet or Plant
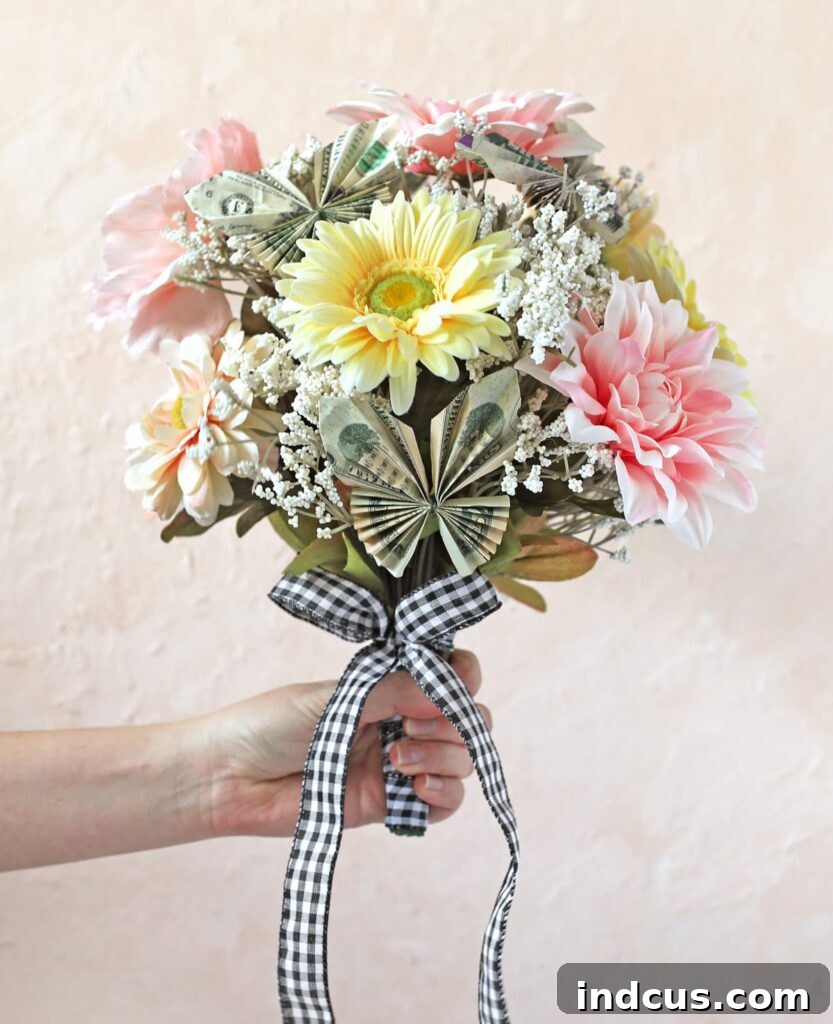
One of the most popular and visually stunning ways to present money butterflies is by adding them to floral arrangements. Imagine a vibrant bouquet of fresh flowers, or a charming artificial one, with these dollar bill butterflies nestled among the blossoms. For my own project, I integrated my money butterflies into a bouquet of faux flowers, creating a truly unique graduation gift.
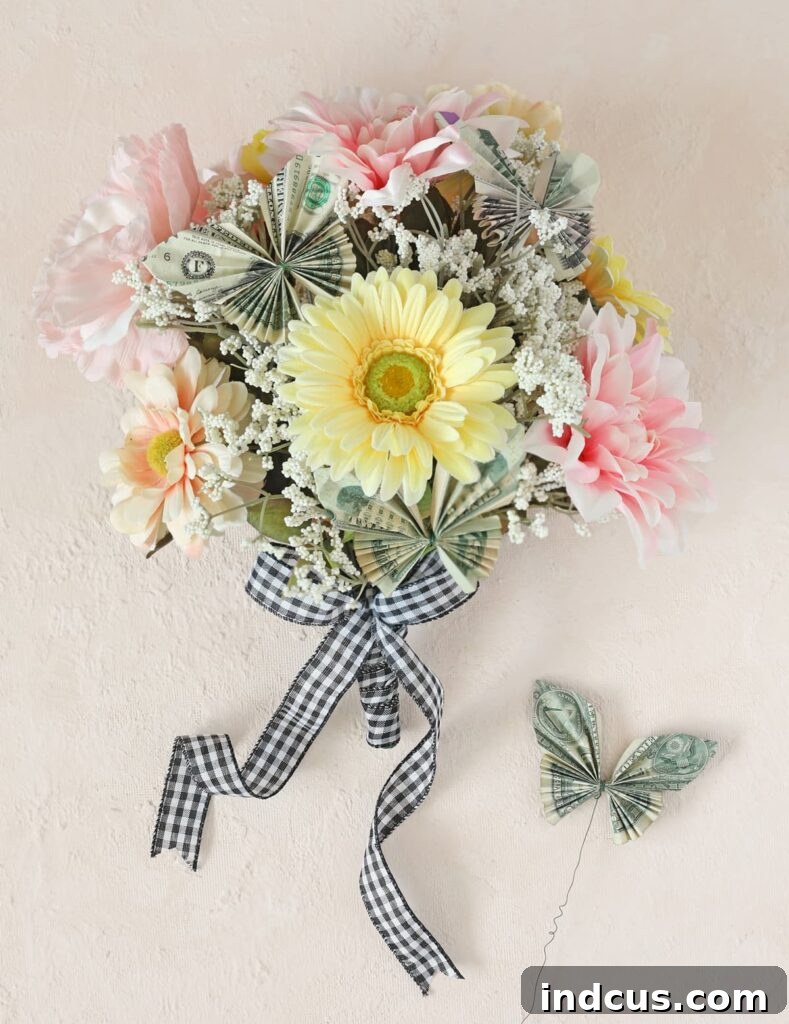
You can also attach them to a live houseplant, making for a delightful and long-lasting gift. This approach adds an element of surprise and whimsy that a plain monetary gift simply cannot achieve. It’s an ideal choice for graduations, Mother’s Day, birthdays, or as a thoughtful “get well” present.
Craft a Memorable Lei
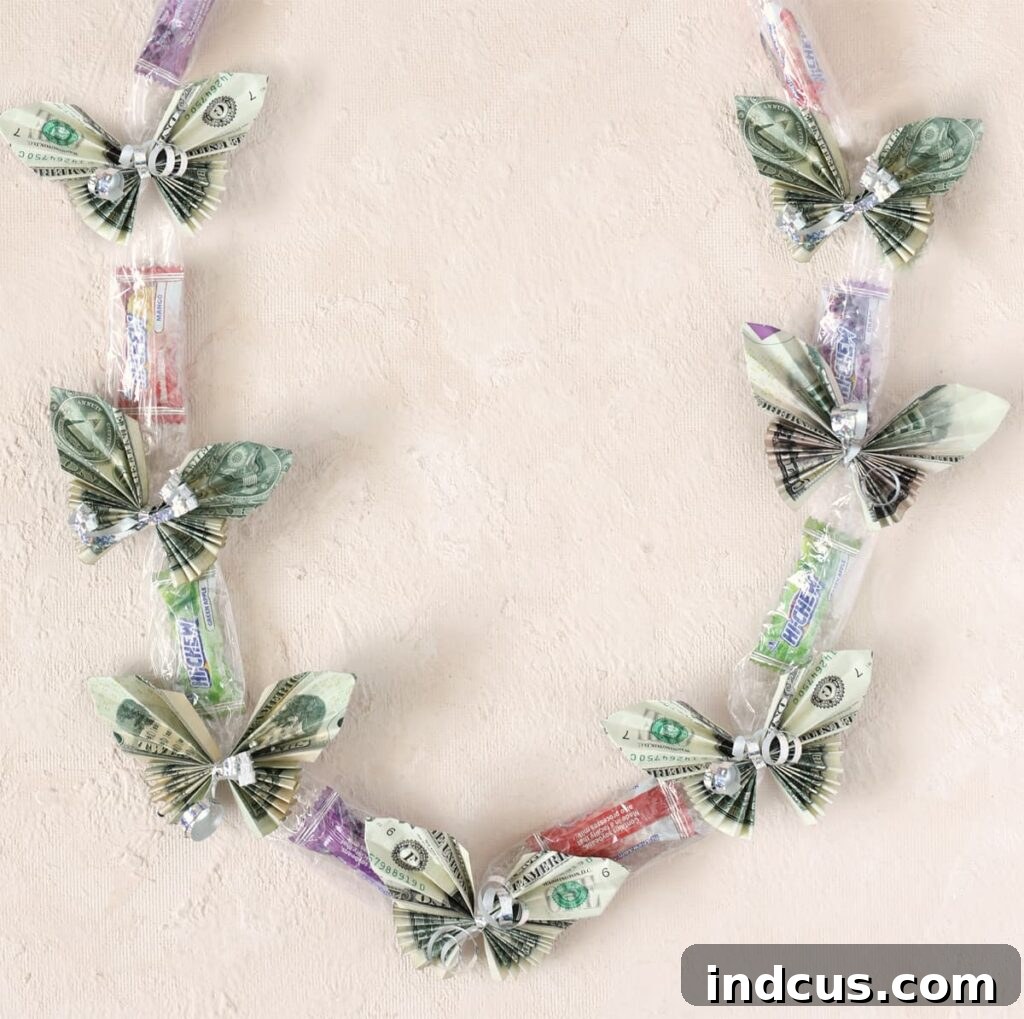
For celebrations like graduations or birthdays, a money lei is a fantastic and celebratory option. These butterflies are absolutely adorable when incorporated into a lei, whether it’s solely a money lei or combined with candy for a sweet touch. The rigidity of florist wire can be particularly useful here, allowing the butterflies to maintain their shape within the lei structure. It’s a fun, festive, and highly personalized way to honor someone’s achievement.
Enhance Gift Baskets or Boxes
Transform an ordinary gift basket into something extraordinary by scattering a few money butterflies throughout. They can perch on items, peek out from tissue paper, or be attached to the handle. For a more formal presentation, arrange them artfully in a shadow box frame. This creates a beautiful piece of art that also holds monetary value, making it a unique keepsake for weddings, anniversaries, or special milestones.
Decorative Accents
Beyond traditional gifts, money butterflies can serve as delightful decorative accents. Use them as unique table decorations for a party, attach them to place cards for a special dinner, or even incorporate them into a homemade greeting card for an extra dimension. The possibilities are truly endless when you start thinking outside the box.
Tips for Perfect Money Origami Butterflies
Achieving truly spectacular money butterflies is all about a few key techniques and careful attention to detail. Here are some advanced tips to help you perfect your craft:
- Crisp Bills are King: As mentioned, ironing your bills is perhaps the most impactful step for neat folds and a professional finish. It reduces bulk and makes the paper more pliable for precise creasing.
- Precision Tools: While not strictly necessary, tools like a bone folder can help you achieve incredibly sharp and flat creases, making your butterflies look exceptionally polished. A ruler can also assist in making consistent 1/4 inch initial folds.
- Symmetry is Key: Strive for symmetry in every fold, particularly when creating the triangular points and during the accordion folding process. Evenly spaced folds and balanced wing shapes will result in a more aesthetically pleasing butterfly.
- Practice Makes Perfect: Don’t be discouraged if your first butterfly isn’t flawless. Origami, like any craft, benefits from practice. Start with lower denomination bills until you feel confident in your technique.
- Gentle Fluffing: The final fluffing step is crucial. Be gentle but firm as you open up the accordion folds. You want to create volume without tearing the paper. Experiment with how much you open the folds to achieve different wing shapes and appearances.
- Secure Binding: Ensure your florist wire, string, or thread is tied securely at the center. A loose bind will cause the butterfly to lose its shape over time. If using wire, twist it tightly several times.
Frequently Asked Questions About Money Origami Butterflies
Here are answers to some common questions you might have about making these unique money gifts:
- Can I use currencies other than U.S. dollar bills? Yes, absolutely! The principles of this origami design can be applied to other paper currencies, as long as the bills are relatively crisp and rectangular. The exact dimensions might vary, requiring slight adjustments to the fold widths, but the overall technique remains the same.
- How long does it take to make one money butterfly? Once you get the hang of it, a single money butterfly can be completed in as little as 5-10 minutes. For beginners, allow yourself 15-20 minutes for your first attempt to follow the steps carefully.
- Is this suitable for children to make? While older children with good fine motor skills and patience might enjoy this, the precision required for crisp folds might be challenging for very young children. It’s best suited for teens and adults, or younger children with adult supervision and assistance.
- What denominations work best? Any denomination can be used! One-dollar bills are excellent for practice or for creating a larger number of butterflies for decorative purposes. Higher denominations like fives, tens, or twenties are perfect when the butterfly itself is the primary gift.
- Will folding the money damage it? No, when done carefully, folding money for origami does not damage it. The bills can be unfolded and used as regular currency afterward. The creases might remain, but they do not render the bill unusable.







