
DIY Counter Height Bench: Build the Perfect Seating Solution for Your Kitchen Island
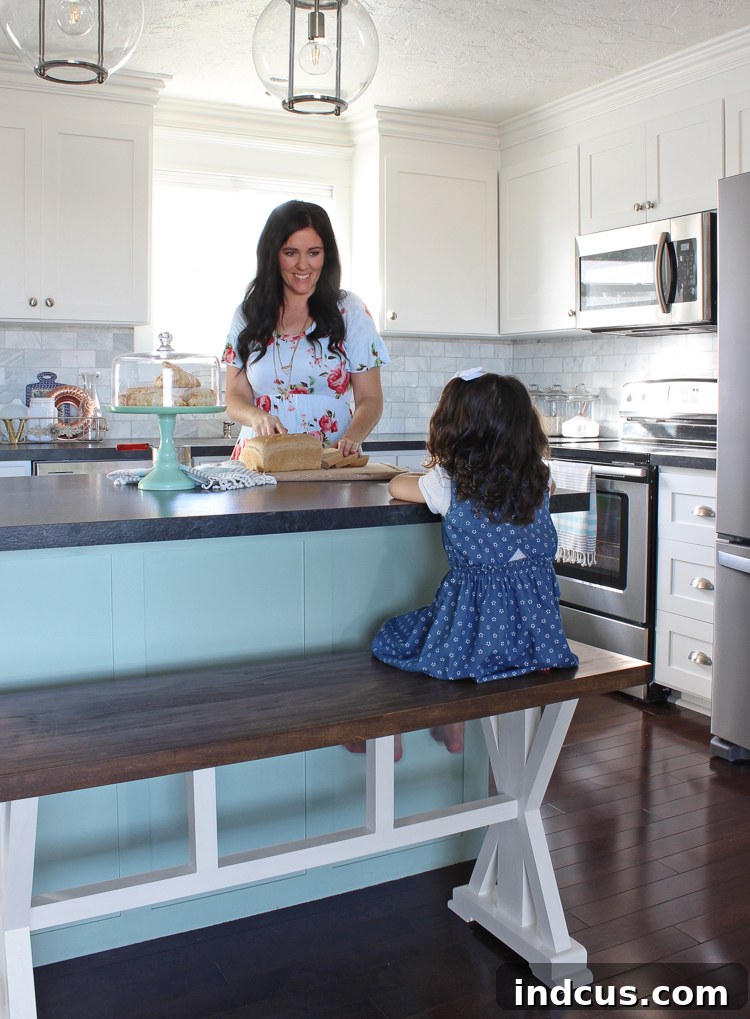
Hello friends and fellow DIY enthusiasts! We’ve been absolutely thrilled by the incredible response and love for our recent kitchen remodel. It truly is wonderful to finally have a space that perfectly embodies my personal style and meets our family’s needs. One of the standout features that has garnered significant attention and numerous inquiries is the custom-built bench at our kitchen island.
For a long time, I found myself constantly frustrated with traditional bar stools. They seemed to perpetually migrate across the house, rarely staying neatly tucked under the island, creating a cluttered and uninviting atmosphere. I embarked on an extensive search for new bar stools, meticulously scouring countless online stores and local shops, but nothing truly captured my imagination or seemed worth the investment. That’s when I realized the perfect solution was to do what I always do – embrace the power of DIY! Building our own counter height bench allowed us to create a seating arrangement that not only perfectly fits our kitchen island but also offers a stylish, functional, and cohesive look, replacing the scattered chaos of individual stools with a streamlined, inviting space. This project transforms your kitchen’s aesthetic while providing versatile seating for family and guests.
This DIY counter height bench project is categorized as an intermediate woodworking endeavor. If you have some prior experience with furniture construction and are comfortable operating various power tools, you’ll find this rewarding and well within your capabilities. We’ve broken down the entire process into easy-to-follow steps, ensuring a smooth and successful build. Let’s gather everything you’ll need to get started on your very own custom kitchen island bench!
Step 1: Gather Your Materials and Purchase Wood
Before diving into the construction of your custom counter height bench, it’s crucial to prepare your workspace and gather all necessary tools and materials. This careful planning ensures a smooth and efficient building process, minimizing interruptions and maximizing safety. We’ve outlined everything you’ll need below, from essential power tools to specific wood types and finishing supplies.
Tools Needed for Your DIY Bench
Having the right tools is paramount for any successful woodworking project. Here’s a comprehensive list of what you’ll need, along with a brief note on their primary function for this bench build:
- Miter Saw: Essential for making precise crosscuts and critical angled cuts for the X-legs.
- Table Saw: Used for ripping boards to specific widths, particularly for the bench seat and the custom 1×1 pieces.
- Router, ½ inch Roundover Bit and ½ inch Cove Bit: For creating decorative and smooth edges on the bench feet, adding a touch of refined craftsmanship.
- 3/8” Countersink Bit: To drill pilot holes for screws, ensuring the screw heads sit flush or below the wood surface for a clean finish.
- Kreg Jig: Indispensable for creating strong, concealed pocket-hole joints for the substructure of the bench.
- Pneumatic Finish Nailer: For quickly and securely attaching trim pieces and the bench seat with minimal visible fasteners.
- Drill: For pre-drilling holes and driving screws throughout the assembly process.
- Clamps: Crucial for holding pieces together firmly during gluing, screwing, and routing, ensuring strong and accurate joints.
- Oscillating Tool: Perfect for flush-cutting dowels or other small pieces for a seamless finish.
- Orbital Sander: For efficient and smooth sanding of all wood surfaces before painting or staining.
- Tri-Square or Combination Square: Essential for marking accurate cut lines and checking for squareness during assembly.
Materials Needed
Beyond the tools, you’ll require various fasteners, adhesives, and finishing products to bring your DIY kitchen island bench to life:
- Wood Glue: For permanent and strong bonds between wood pieces, enhancing the structural integrity of the bench.
- Kreg Screws, 1.5 inch: Specifically designed for use with the Kreg Jig, creating powerful pocket-hole joints.
- Wood Screws, 1.5 inch: For general assembly where strong, direct fastening is needed, particularly for the legs and supports.
- Finish Nails, 1.5 inch: For attaching the foot base and other structural elements that will be painted.
- Finish Nails, 1 inch: Ideal for securing the bench seat to the substructure, providing a less obtrusive fastener.
- 3/8 Wood Dowel: Used to fill visible countersink holes, particularly on the angled X-legs, for a polished, professional look.
- Sandpaper (60, 120, 220, 400 grit): A range of grits for achieving a perfectly smooth surface, from initial shaping to final preparation for finishing.
- Wood Filler: To fill any small gaps, imperfections, or nail holes, ensuring a flawless surface for painting.
- Latex Paint: For painting the bench base, offering durability and a clean, fresh aesthetic. Choose a color that complements your kitchen decor.
- Paint Brush: For smooth and even application of paint.
- Wood Conditioner: Essential for preparing the poplar seat for staining, ensuring an even absorption and preventing blotchiness.
- Wood Stain (Briarsmoke and Dark Walnut): For achieving your desired rich wood tone on the bench seat. We used a mix of Briarsmoke and Dark Walnut for a custom shade.
- Wipe On Polyurethane: To protect the stained seat, providing a durable and beautiful satin finish.
Wood To Purchase
Selecting the right wood is key to the bench’s durability and appearance. We’ve chosen specific wood types based on their characteristics and how they complement the finished look:
- (3) Pine 1x4x8′: This affordable and easy-to-work-with wood is perfect for the bench’s base, which will be painted.
- (2) Pine 2x2x8′: For structural supports in the bench’s base, offering good stability.
- (1) Pine 1x2x8′: For additional substructure elements.
- (1) Poplar 1x2x8′: Poplar is chosen for the seat’s trim pieces due to its smooth grain and excellent staining properties.
- (1) Poplar 1x2x3′: More poplar for the shorter seat trim.
- (2) Poplar 1x4x8′: The main material for the bench seat itself, chosen for its beautiful grain when stained and its durability.
We specifically chose pine for the bench’s base and structural components because of its cost-effectiveness and ease of painting, which will be the chosen finish for this section. For the bench seat, which we wanted to stain to highlight the natural wood grain, we opted for poplar. Poplar offers a smoother, more uniform grain than pine, takes stain beautifully, and provides a premium look and feel.
Step 2: Cutting Your Wood Pieces with Precision
Precision in cutting is the foundation of a professional-looking piece of furniture. Take your time with this step, remembering the adage, “measure twice, cut once.” We’ve outlined an efficient cutting sequence to minimize waste and streamline the process.
Detailed Cut List
Pine Pieces:
- From the first 1x4x8′ board, cut four pieces at 13 inches and four pieces at 6-1/2 inches.
- From the second 1x4x8′ board, cut four pieces at 20 inches and four pieces at 3-1/2 inches.
- From the third 1x4x8′ board, cut two pieces at 46-1/2 inches.
- From the 1x2x8′ board, cut two pieces at 13-1/2 inches. Note: These pieces will need to be ripped down using a table saw to a nominal 1×1 size (which translates to approximately 3/4 x 3/4 inches actual dimensions). This step is crucial for the substructure end pieces.
- From the first 2x2x8′ board, cut one piece at 33 inches, four pieces at 10-1/2 inches, and two pieces at 9-3/4 inches.
- From the second 2x2x8′ board, cut four pieces at 11-1/2 inches.
Poplar Pieces:
Poplar is typically sold by the linear foot, making it easier to acquire the exact lengths you need for these specific cuts:
- From the 1x2x8′ poplar board, cut two pieces at 46-1/2 inches.
- From the 1x2x3′ poplar board, cut two pieces at 15 inches.
- From the two 1x4x8′ poplar boards, cut four pieces at 46-1/2 inches. These will form the main panels of your bench seat.
Understanding Your Parts List
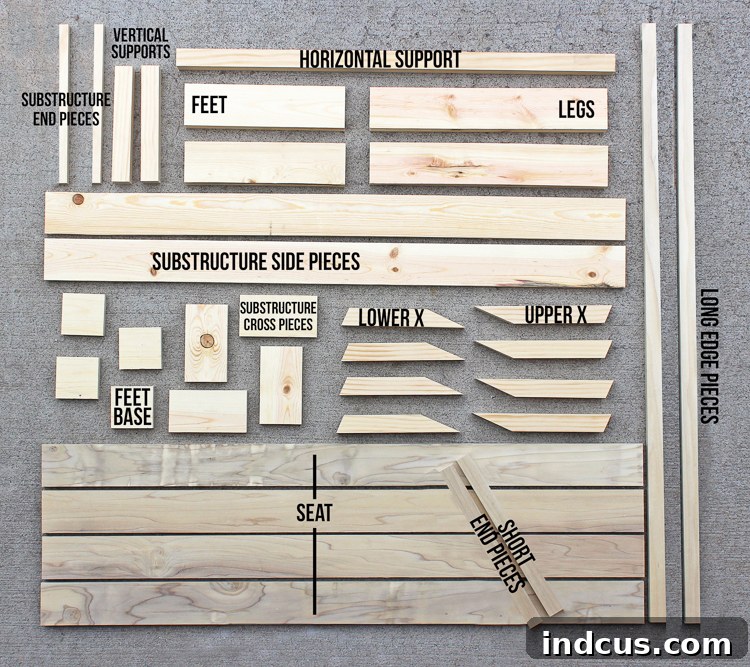
You might notice a difference between the cut list above and the parts list below, specifically regarding the 2x4s. This is an intentional design choice for enhanced quality. Standard lumber yard 2x4s often have slightly rounded edges, which can lead to unsightly gaps or imperfect joints when constructing furniture. To achieve perfectly crisp, square corners for a more refined finish, we opted to create our own 2x4s by laminating two 1x4s together. This method ensures that the final dimensions are precise and the corners are perfectly sharp. This approach, while adding an extra step, prevents the need to alter numerous other measurements and significantly improves the overall aesthetic of the bench’s base. Therefore, in the Parts List, you’ll see “2x4s” representing these custom-made laminated components.
Pine Components (for the bench base):
- (2) 2×4 – 13” feet: These will form the sturdy base of your bench legs.
- (2) 2×4 – 20” legs: The main vertical support for each X-leg assembly.
- (4) 1×4 – 3-1/2” feet base: These smaller pieces attach to the bottom of the 2×4 feet.
- (4) 1×4 – 6-1/2” substructure cross piece: Horizontal supports within the bench’s frame.
- (2) 1×4 – 46-1/2” substructure side piece: The long side rails for the bench’s inner frame.
- (1) 2×2 – 33” horizontal support: A critical cross-member for overall stability.
- (4) 2×2 – 10-1/2” lower X: These form the lower angled sections of the X-legs.
- (4) 2×2 – 11-1/2” upper X: These form the upper angled sections of the X-legs.
- (2) 2×2 – 9-3/4” vertical support: Additional vertical bracing for the bench frame.
- (2) 1×1 – 13-1/2” substructure end piece: The custom-ripped pieces that cap the ends of the substructure.
Poplar Components (for the bench seat):
- (2) 1×2 – 15” short end pieces: These will frame the short sides of your bench seat.
- (2) 1×2 – 46-1/2” long edge pieces: These will frame the long sides of your bench seat.
- (4) 1×4 – 46-1/2” seat: These four pieces will be glued together to form the main surface of your bench seat.
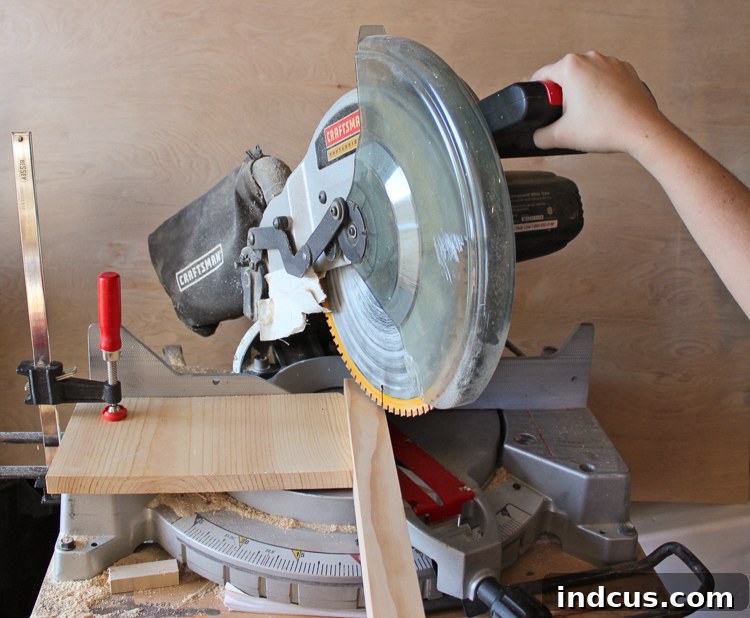
All pieces, with the specific exception of the upper and lower X pieces, should be cut with perfectly square ends. For the upper and lower X pieces, the angles of the cuts are critical for the aesthetic and structural integrity of the X-leg design. While the cuts will be the same for both upper and lower X pieces, their overall lengths differ. One end of each X piece will require a 24-degree miter cut. Adjust your miter saw precisely to this angle. The cut on the opposite end is its 90-degree reciprocal, which translates to a 66-degree cut.
Most miter saws are designed to adjust up to a 45-degree angle, making a direct 66-degree cut impossible in the standard orientation. However, there’s a simple and effective workaround: rotate your X piece 90 degrees. This repositioning places the short side of the wood piece against the miter saw fence. Working with a short edge against the fence can create instability and a safety hazard. To mitigate this, clamp a piece of scrap wood with perfectly square edges firmly to your miter saw table. Use this clamped scrap as a temporary fence to provide stable support for your X piece during the 66-degree cut. As with all power tool operations, extreme caution is advised. Always be acutely aware of the saw blade’s position relative to your hands and fingers. Wear appropriate safety glasses and hearing protection.
Step 3: Crafting the Bench Feet
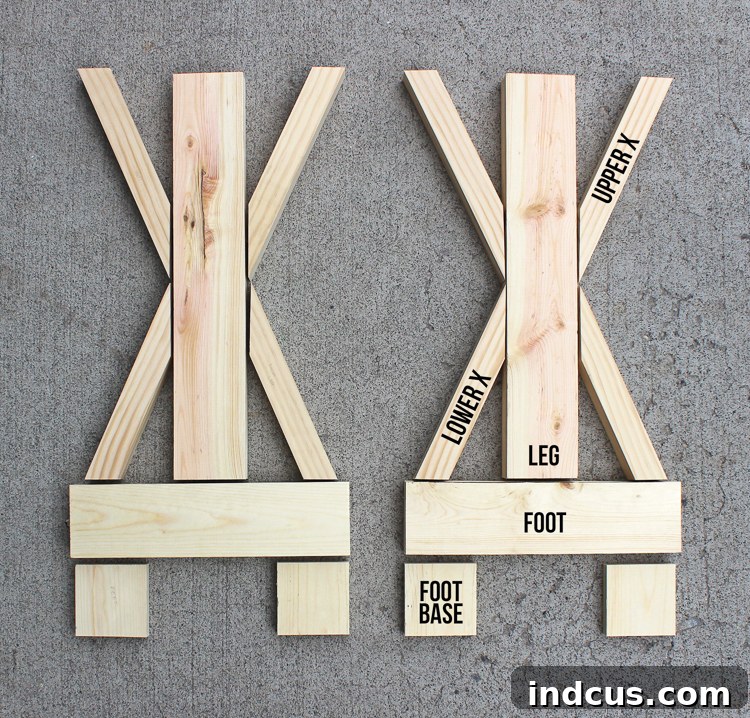
We’ll begin the assembly of our counter height bench from the ground up, starting with the sturdy and aesthetically pleasing feet. The first step involves routing the base of the feet. Using your router, apply a 1/2-inch round-over bit along the top edge of the foot base to create a smooth, softened profile. Then, switch to a 1/2-inch cove bit to create a decorative concave curve along the bottom edge, as illustrated in the provided diagram. This combination of routed edges adds a touch of custom detail and elegance to the bench’s foundation.
Next, focus on the 2×4 main piece of each foot. The top corners of these pieces also require routing. Using the 1/2-inch round-over bit, carefully soften the edges of the top corners. This not only enhances the visual appeal but also creates a safer, more finished feel, reducing sharp corners that might catch on clothing or cause injury.
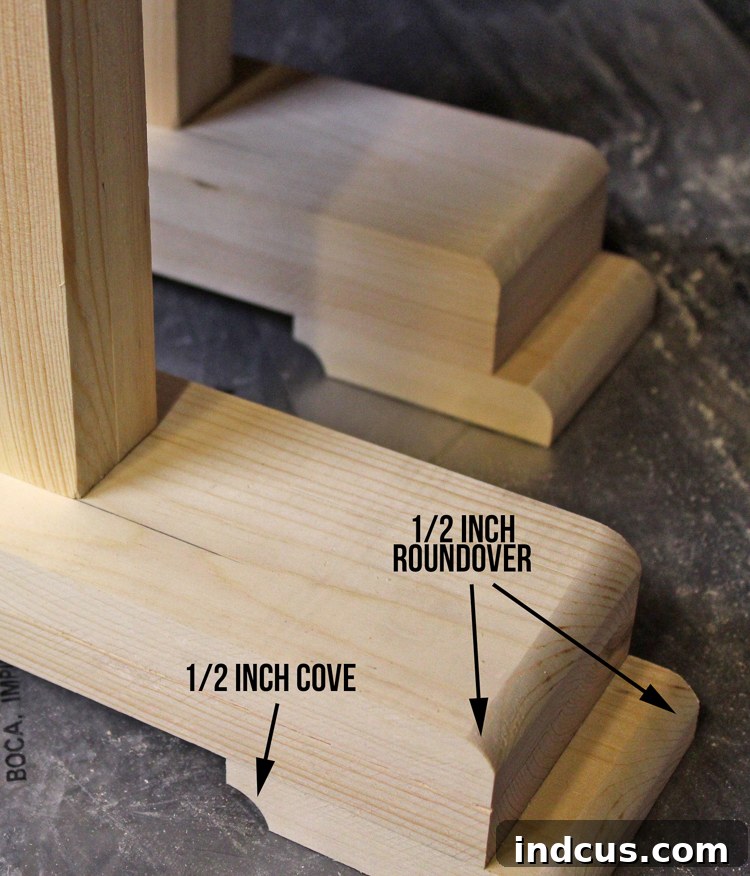
The final step for the feet assembly is to securely attach the routed foot base to the 2×4 foot piece. For optimal strength and a seamless bond, first apply a generous amount of wood glue to the mating surfaces. Carefully position the foot base, ensuring it extends 3/4 inch beyond the end of the 2×4 foot piece, as this overhang is part of the design. Once positioned, clamp the pieces firmly together. While the glue begins to set, use a pneumatic finish nailer with 1 1/2-inch finish nails to reinforce the joint. The nailer makes this task quick and efficient, leaving minimal visible fasteners that can be easily filled later for a flawless paint finish. Allow the glue to cure completely according to the manufacturer’s instructions before moving on.
Step 4: Assembling the Robust Bench Legs
Unlike some of the substructure elements, the main leg components require the superior strength and holding power of screws over nails for long-lasting durability. Begin by carefully centering the main 2×4 leg piece onto the assembled foot. Precision here is key for a balanced and stable bench. Once positioned, turn the assembly upside down. On the bottom side of the foot, use your 3/8-inch countersink bit to drill two pilot holes. These holes will be used to attach the 2×4 leg to the foot. Additionally, drill one countersink hole for each of the lower X-leg parts that will connect to this section of the foot.
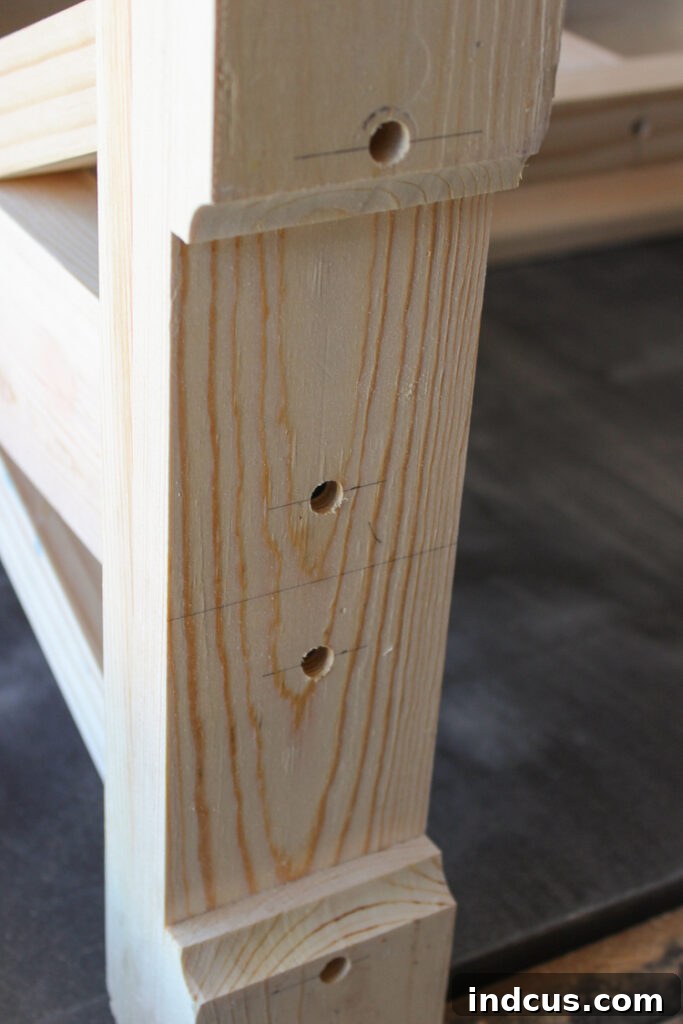
Referencing the layout lines you may have drawn on the top of the feet (or by re-measuring for perfect alignment), apply wood glue to the mating surfaces of the 2×4 leg and the foot. Securely fasten the 2×4 leg to the foot using 1.5-inch wood screws driven into the countersunk holes from the underside of the foot. Ensure the leg is perfectly perpendicular to the foot during this attachment, using a tri-square to verify accuracy.
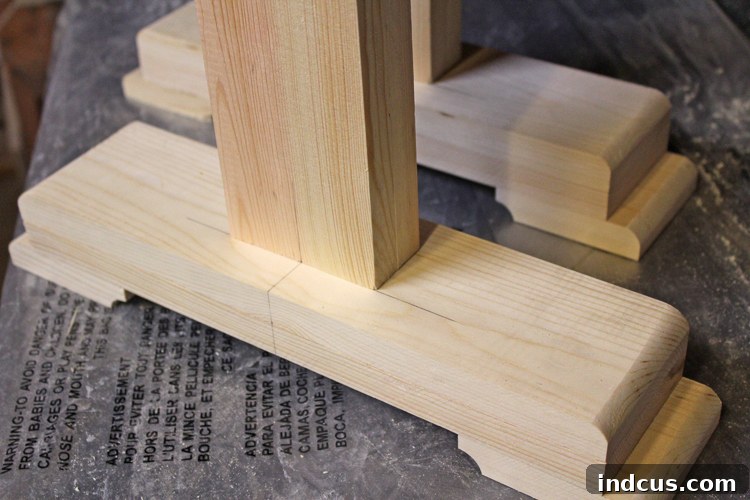
Now, prepare to attach the upper and lower X-leg components. For both the upper and lower X parts of the leg, you will need to drill two countersink holes each, as illustrated in the provided image. Before drilling, it’s highly recommended to use a square to draw clear reference lines onto the main 2×4 leg piece. These lines will guide you in drilling the countersink holes at the precise angles required for the X-pieces to sit flush and securely. The angles on these X-pieces are crucial, and accurate pilot holes will ensure a strong and aesthetically pleasing joint.
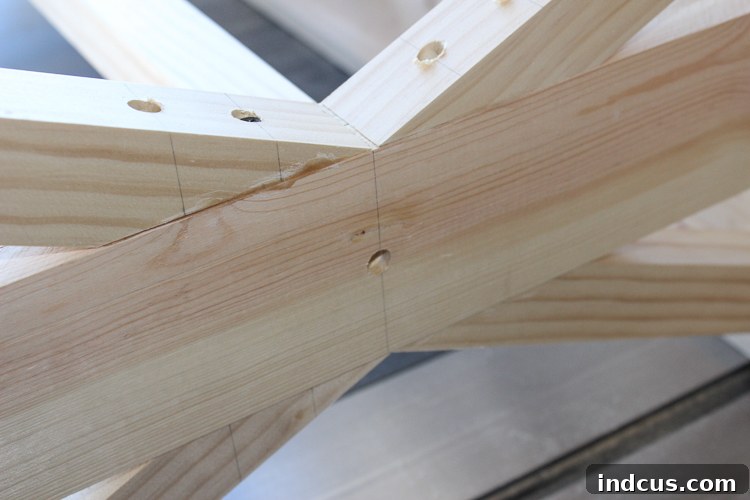
Once the main 2×4 leg is firmly attached to the foot, apply wood glue to the joining surfaces and screw the lower X part of the legs into place, securing them with 1.5-inch wood screws into the pre-drilled countersunk holes. To ensure perfect positioning of the upper X part of the legs, a clever trick involves turning the entire leg assembly upside down, resting the foot in the air. Place the upper X piece onto a flat, level surface. If your measurements and cuts were accurate, the upper part of the X should sit perfectly flush on this flat surface and should align precisely where it meets the lower X part and the main 2×4 leg. This technique helps verify the angles and prevents any rocking or misalignment. Once confirmed, apply wood glue and screw the upper X into place, completing the robust and visually striking X-leg assembly.
Step 5: Constructing the Sturdy Substructure
The substructure forms the unseen but vital framework that supports the bench seat and ties the legs together, ensuring stability and strength. Begin by laying out all the substructure pieces on a flat, level surface exactly as they will be assembled, referring to the diagram below. This visual arrangement helps to confirm all pieces are correctly oriented and accounted for before you start fastening.
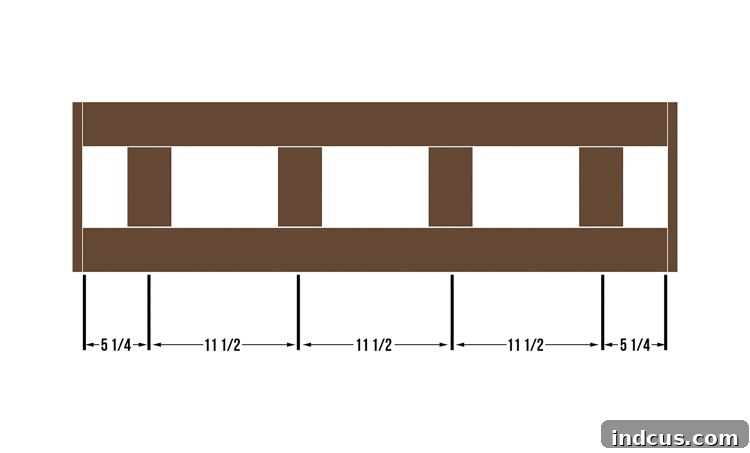
Next, use your Kreg jig to drill pocket holes. Each cross piece within the substructure will require two pocket holes on each end. The Kreg jig system allows for strong, hidden joints, which is ideal for a sturdy substructure that will be painted. After all the necessary pocket holes are drilled, apply wood glue to the mating surfaces of the joints. Use clamps to hold the pieces firmly in alignment. Then, using the accompanying Kreg bit and 1.5-inch Kreg screws, assemble the entire substructure, driving the screws into the pocket holes. Ensure that all joints are tight and square as you work. Finally, apply glue to the ends of the 1×1 end pieces and secure them into place using a finish nailer and 1.5-inch nails. These pieces cap the ends of the substructure, completing the frame and adding a finished look.
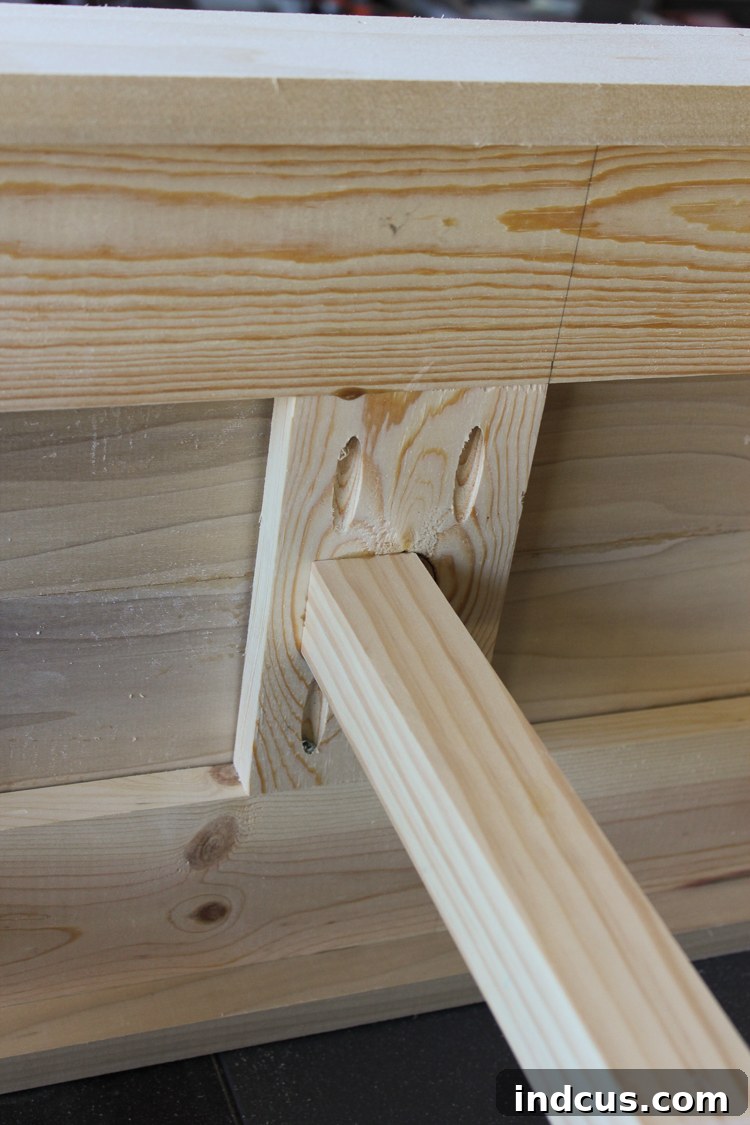
Step 6: Center Supports Installation and Full Assembly
With the legs and substructure partially complete, it’s time to integrate the crucial center supports that will provide additional rigidity and stability to your bench. The 2×2 horizontal support beam needs to be carefully positioned. It should be centered both front-to-back within the main 2×4 leg and vertically aligned with the middle of the X-leg assembly. Once precisely located, drill a single countersink hole from the outside face of the leg, extending into the end of the horizontal support. This hidden fastener will help secure the support firmly.
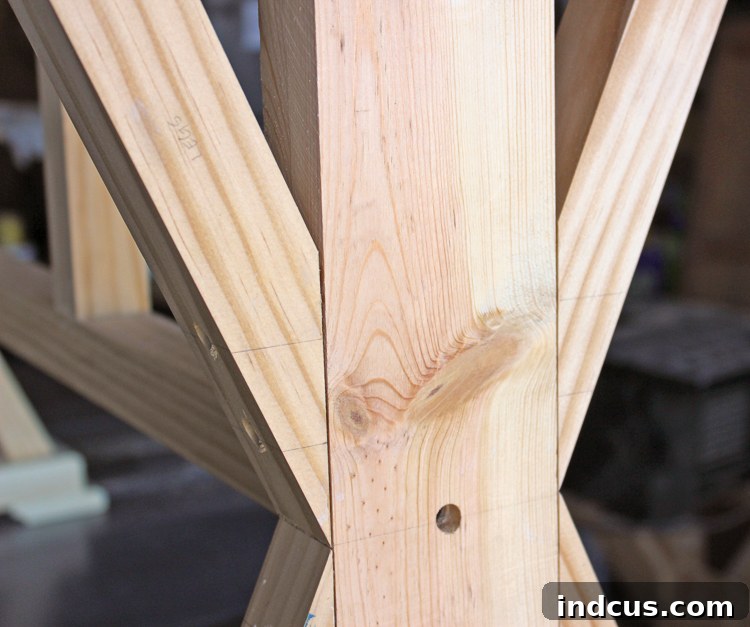
Next, prepare the horizontal cross piece for the vertical supports. Two countersink holes need to be drilled into this piece. Measure and mark these holes precisely 10 3/4 inches from each end of the horizontal cross piece. These will serve as the attachment points for the two vertical support pieces that will connect below. Accurate placement here is vital for evenly distributed support.
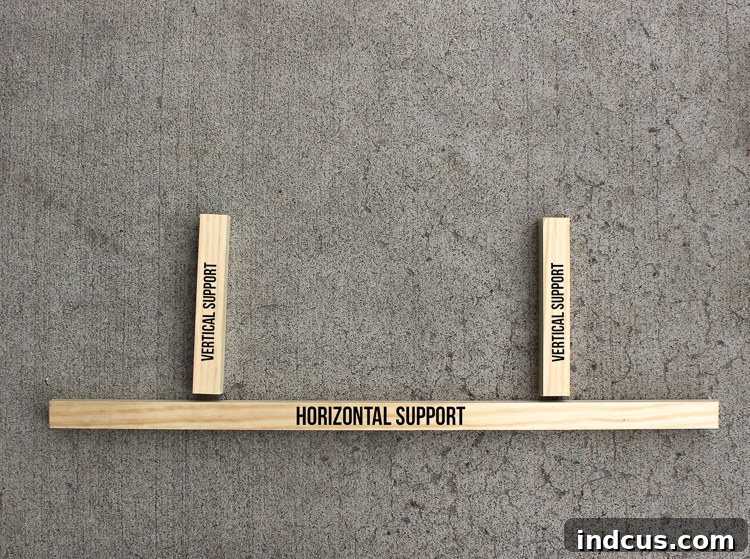
Apply wood glue to the ends of the two vertical support pieces and the corresponding marked locations on the horizontal cross piece. Clamp the vertical supports firmly to the horizontal cross piece and then secure them permanently with 1.5-inch wood screws, driven into the pre-drilled countersink holes. Ensure a strong, square joint for maximum stability.
Once the vertical supports are attached to the horizontal cross piece, apply wood glue to the ends of the horizontal cross piece and its mating surfaces on each leg. Securely screw the horizontal cross piece to each leg using 1.5-inch wood screws, ensuring that the entire assembly is square and tight. This creates a robust, interconnected base for the bench.
Finally, it’s time to marry the substructure to the leg assemblies. Using your countersink bit, drill holes in the cross pieces of the substructure. These holes should align perfectly with the top of the 2×4 leg components, the upper X part of the legs, and the top ends of the vertical support pieces. Apply wood glue to all mating surfaces. Carefully position the substructure onto the legs and vertical supports, ensuring perfect alignment. Then, using 1.5-inch wood screws, securely fasten the substructure to the legs and the vertical support pieces. This final assembly step creates the complete, rigid base of your counter height bench, ready for the finishing touches.
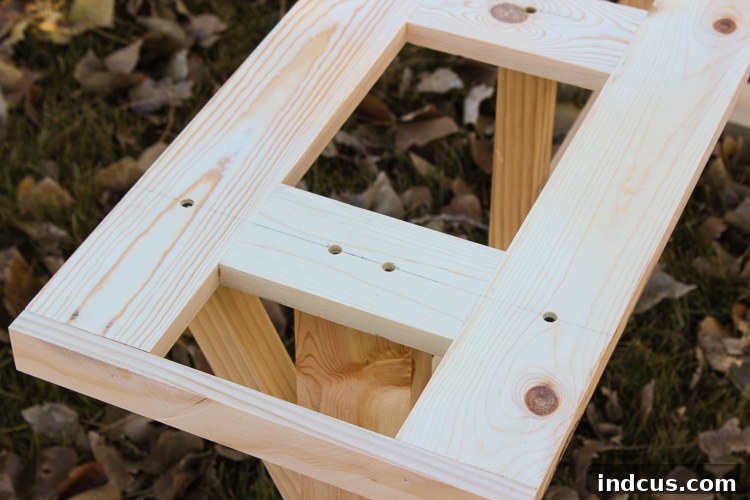
Step 7: Flawless Finish – Filling Countersink Holes
Achieving a truly professional finish often comes down to the small details, and concealing fasteners is a prime example. While pre-made buttons or plugs are common for filling countersink holes, the unique angles of the X-leg components in this design make them unsuitable. The angled holes wouldn’t allow a standard, straight-cut plug to sit flush or look natural. Instead, we opted for a more customized solution: using short pieces of 3/8-inch wood dowel. Cut several short sections of the dowel, apply wood glue to each piece, and carefully tap them into the countersink holes. Ensure they are seated firmly, with a small portion protruding from the surface.
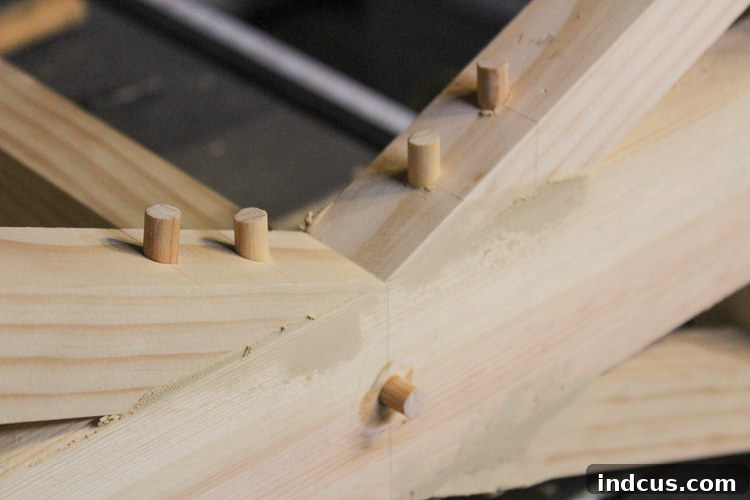
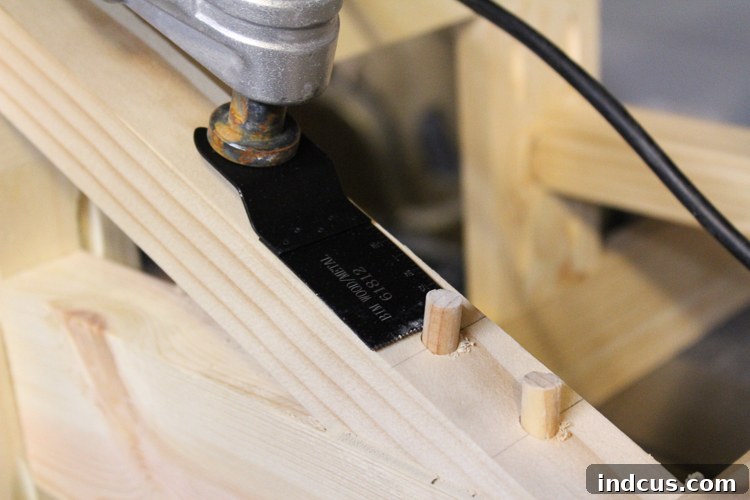
Once the wood glue has thoroughly dried and fully cured, it’s time to flush-cut the protruding dowel pieces. The most effective tool for this task is an oscillating tool fitted with a flush-cut blade. Carefully guide the blade along the surface of the wood, trimming the dowels perfectly flush with the surrounding material. If you don’t have an oscillating tool, a sharp handsaw or a Japanese pull saw can also achieve this, though it may require a steadier hand to avoid marring the surrounding wood.
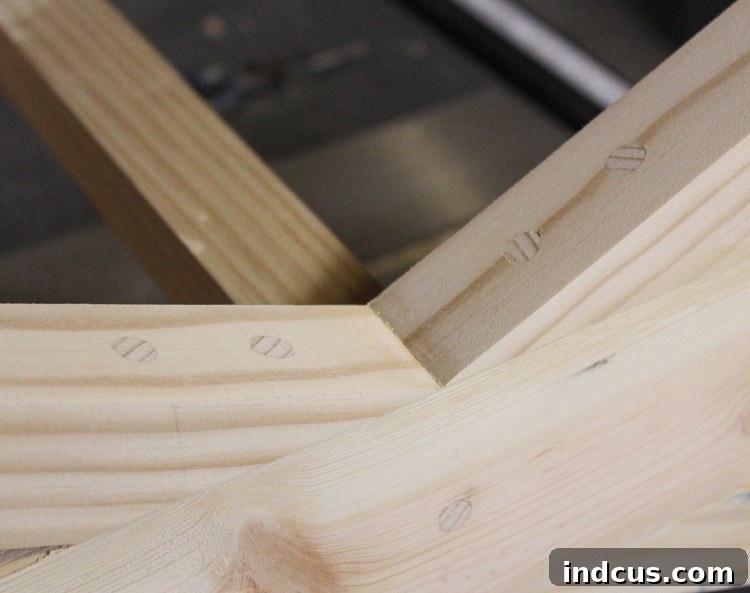
After the dowels are flush-cut, the next crucial step is to sand them smooth. Using an orbital sander with progressively finer grits of sandpaper (starting with 120, then 220), gently sand the areas where the dowels were inserted until they are indistinguishable from the surrounding wood. The goal is a perfectly smooth and continuous surface.
Finally, before proceeding to the seat construction and finishing, take the time to thoroughly sand the entire bench base. Start with 120-grit sandpaper to address any minor imperfections, pencil marks, or rough spots. Then, move to 220-grit sandpaper for a smoother finish. This comprehensive sanding prepares the pine base perfectly for painting, ensuring a uniform and high-quality adherence of the paint. Remove all sanding dust before moving to the next step.
Step 8: Constructing and Finishing the Bench Seat
The bench seat is the most visible and used component of your new counter height bench, so attention to detail here is paramount for both aesthetics and comfort. Begin by preparing the main seat panels. Take your four 1×4 poplar seat pieces and apply a generous, even bead of wood glue along the long edges that will join together. Carefully align and press the boards together, ensuring a tight seam. Use multiple clamps across the entire width of the glued panels to apply firm, even pressure. This edge-gluing technique creates a wide, solid panel for your bench seat. Allow the glue to dry and cure completely overnight to ensure maximum strength, removing clamps only when the glue is fully set.
Once the glue is dry, the seat panel will be approximately 14 inches wide (four 3/4-inch thick boards plus glue lines). To achieve the desired finished width of 13 1/2 inches, use a table saw to rip 1/4 inch from each long edge of the now-solid panel. This not only brings the seat to its exact dimension but also provides clean, factory-like edges for the trim. Next, apply wood glue to the long edges of the seat panel and attach the two long 1×2 poplar edge pieces using a finish nailer and 1-inch nails. Ensure these trim pieces are flush with the top surface of the seat. Finally, apply glue and nail the two short 1×2 poplar end pieces to the short ends of the seat, completing the boxed-in look of the seat frame.
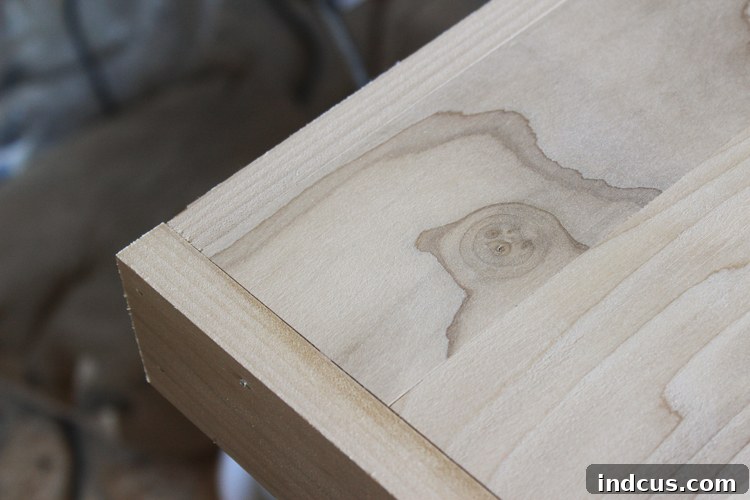
With the seat fully constructed, carefully slip it over the assembled substructure of the bench base. The fit should be snug but not forced. Once properly aligned, secure the seat permanently to the substructure by driving 1-inch finish nails through the bottom of the seat trim and into the substructure components. Ensure the nails are strategically placed for strong adhesion without being overly visible.
Now, address any minor imperfections and nail holes on the bench seat. Using wood filler that matches the natural tone of the poplar (or can be stained), carefully fill all exposed nail holes and any small gaps or blemishes on the seat surface. Allow the wood filler to dry completely, then sand these areas smooth.
The final preparation for finishing involves a comprehensive sanding of the entire bench seat. This multi-grit sanding process is crucial for a professional-grade stained finish. Begin with a coarse 60-grit sandpaper to remove any substantial imperfections or glue residue. Progress to a medium 120-grit sandpaper, then to a fine 220-grit sandpaper, working your way around the entire seat. The objective is to eliminate all scratch marks from the previous grits and achieve a uniformly smooth surface. Conclude the preparation for staining by performing a final sanding with ultra-fine 400-grit sandpaper. This extra step closes the wood pores and creates an incredibly smooth surface that will absorb the stain evenly, preventing blotchiness and enhancing the depth of the finish. Thoroughly wipe away all sanding dust with a tack cloth before proceeding to the finishing steps.
For the bench base, apply several thin, even coats of satin latex paint. Allow adequate drying time between coats and lightly sand with 220-grit sandpaper for optimal adhesion and a smooth finish if desired. For the bench seat, first apply a liberal coat of wood conditioner. This step is critical for poplar, ensuring the stain penetrates evenly and prevents a splotchy appearance. After the conditioner has absorbed (follow product instructions for timing), apply your chosen wood stain (we used a mix of Briarsmoke and Dark Walnut for a custom look). Wipe off excess stain according to the manufacturer’s instructions. Finally, protect the beautiful stained finish with multiple thin coats of wipe-on polyurethane, lightly sanding with 400-grit sandpaper between coats for maximum durability and a silky-smooth satin finish. Wipe-on poly is particularly forgiving and easy to apply for DIYers.
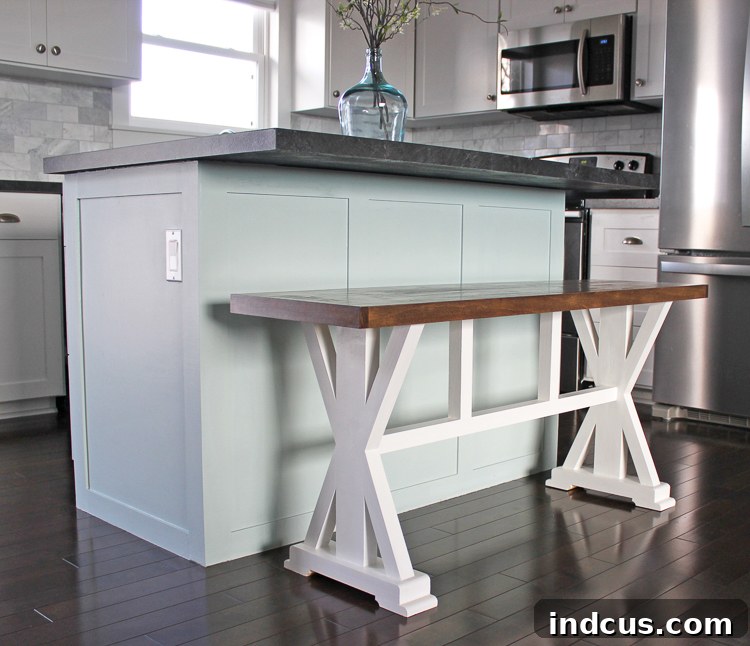
The finished counter height bench perfectly matches the height of standard counter height stools, ensuring a comfortable and ergonomic seating experience at your kitchen island. One of the most significant advantages of choosing a bench over individual stools is its remarkable versatility and capacity. Depending on their age and size, three, or even four, children can comfortably sit together at the island, making it an ideal gathering spot for family meals, homework, or creative projects. This custom bench not only optimizes your kitchen space but also fosters a warm and inclusive atmosphere.
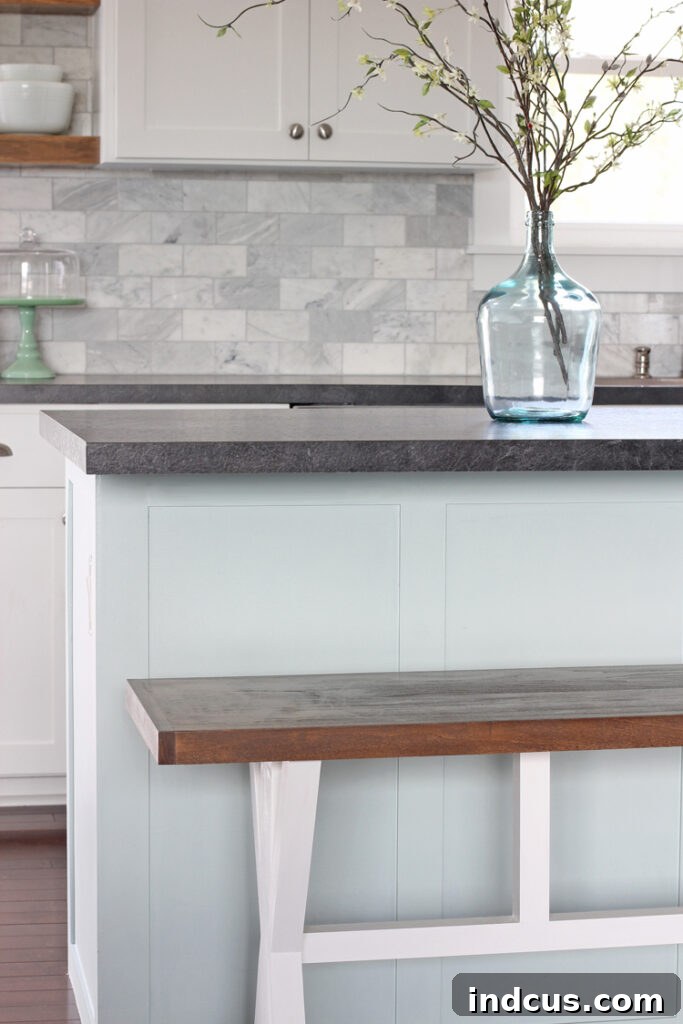
Building this custom counter height bench is a rewarding project that transforms your kitchen island into a more functional and stylish space. The satisfaction of crafting a piece of furniture perfectly tailored to your home is immense, and the durable construction ensures it will be a cherished part of your kitchen for years to come. If you encounter any questions during your building process, please don’t hesitate to leave a comment below. I’ll do my best to guide you through any challenges you might face. Thanks for stopping by and happy building!







