
The quest for a perfectly layered look often comes with an unforeseen enemy: bulk. That extra fabric from traditional undershirts can bunch, ride up, and create an unflattering silhouette, turning a chic outfit into a source of constant discomfort. If you’ve ever wrestled with a full-length undershirt under a fitted dress or felt overheated with unnecessary fabric around your waist, then you understand this struggle. But what if there was a simple, elegant solution that offered all the benefits of layering without any of the drawbacks? Enter the humble, yet revolutionary, half shirt.
A half shirt is exactly what it sounds like: an undershirt designed to stop just below the bust line. This ingenious design eliminates all the excess fabric around your midsection, delivering a smooth, streamlined layer that stays perfectly in place. While these specialized layering pieces can be found in stores, they often come with a premium price tag for what is essentially “half a shirt.” But why pay more when you can effortlessly create your own custom half shirts from existing items in your wardrobe? This is not just a clever fashion hack; it’s a sustainable, cost-effective, and surprisingly simple DIY project that will transform your layering game forever.
Embracing the Genius of the Half Shirt: The Ultimate Layering Undershirt
For decades, women have relied on camisoles, tank tops, and full undershirts to provide modesty, warmth, or a seamless base layer. While these serve their purpose, they often come with a familiar set of frustrations. Full undershirts, in particular, are notorious for adding unwanted bulk, riding up throughout the day, or creating an extra layer of heat that can be stifling, especially in warmer climates or during transitional seasons. Imagine wearing a beautiful sleeveless dress or a sheer blouse, only to have your undershirt constantly peeking out from the bottom or bunching uncomfortably around your hips. It’s an irritating wardrobe malfunction that many of us have simply learned to tolerate.
The half shirt, also known as a crop undershirt or layering bra, addresses these issues head-on. By cutting off the lower portion of the shirt, you retain the essential upper coverage and the smooth neckline, while shedding the problematic extra fabric. This results in a layering piece that is:
- Seamless and Smooth: It eliminates the bulk that can disrupt the clean lines of your outfit.
- Incredibly Comfortable: No more riding up, bunching, or constant adjusting. Your bust naturally holds the shirt in place.
- Cooler and Lighter: Less fabric means less heat, making it ideal for year-round wear.
- Cost-Effective: You can transform old t-shirts into versatile layering staples for free.
- Sustainable: Giving new life to garments you already own reduces waste.
This simple garment acts as an invisible force multiplier for your wardrobe, allowing you to layer with confidence and comfort under virtually any top, dress, or sweater. It’s truly one of the best inventions for modern layering, offering an elegant solution to a common fashion dilemma.
Your DIY Wardrobe Revolution: Crafting Your Own Half Shirt
Ready to experience the magic of the half shirt for yourself? This project is so straightforward, you’ll wonder why you haven’t done it sooner. It requires minimal materials and absolutely no sewing skills, making it accessible to even the most novice DIYer. Forget expensive specialty layering pieces; your perfect half shirt is just a few cuts away.
Materials You’ll Need:
- A Stretchy T-Shirt or Tank Top: The key here is stretch. Cotton blends, modal, or anything with a bit of spandex or elastane will work perfectly. The stretch ensures the edges won’t fray and the shirt will stay comfortably in place. Choose a shirt that fits well around your bust and shoulders. Old t-shirts, slightly worn tees, or even thrift store finds are excellent candidates.
- A Sharp Pair of Scissors: Fabric scissors are best for a clean cut, but any sharp pair will do.
- A Pencil or Tailor’s Chalk: For marking your desired cut line.
- Measuring Tape (Optional): Useful if you want a precise length or want to replicate a specific measurement.
Step-by-Step Guide to Your Custom Half Shirt:
The beauty of this project lies in its simplicity and the fact that it’s completely customizable to your body and preferences.
Step 1: Choose Your Perfect Candidate T-Shirt
Select a t-shirt or tank top that you’re ready to transform. Consider the fabric (stretchy is key!), color, and neckline. Think about what you’ll be layering it under. Neutral colors like black, white, nude, or grey are versatile, but don’t hesitate to experiment with brighter hues for a fun pop of color peeking out.
Step 2: Try It On and Mark Your Length
This is the most crucial step for achieving a perfect fit. Put the t-shirt on as you would normally wear it. Stand in front of a mirror. With your pencil or tailor’s chalk, make a horizontal mark across the shirt just under your bust line. This is where you want the shirt to end. You might want it to be exactly under the bust, or perhaps an inch or two longer for a bit more coverage or to prevent it from riding up. Experiment with what feels most comfortable and secure for you.
Step 3: Lay Flat and Cut
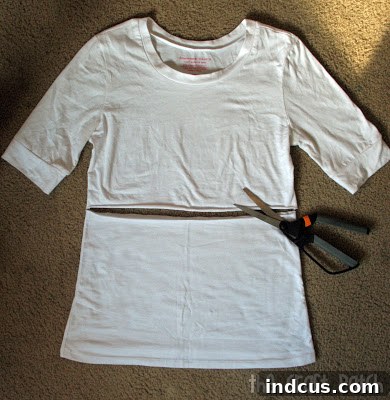
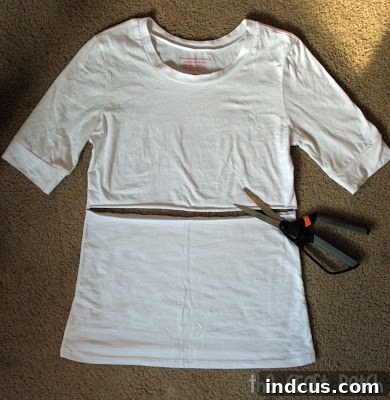
Carefully take off the marked t-shirt. Lay it flat on a clean, hard surface, smoothing out any wrinkles. Ensure both the front and back layers of the shirt are perfectly aligned. Using your mark as a guide, carefully cut a straight line across the fabric. A ruler can help ensure your line is truly straight, but with stretchy fabric, a slightly imperfect line won’t be noticeable. Remember, it’s better to cut a little bit longer than too short, as you can always trim more if needed.
Step 4: No Hemming Required!
This is where the “easiest project ever” truly shines. Because you’re using a stretchy knit fabric, the cut edge will not fray. The natural elasticity of the fabric, combined with the way your bust holds the shirt in place, means there’s absolutely no need for hemming or adding a band. The raw edge will lay flat and smoothly against your skin, making it incredibly comfortable and invisible under your outer layers.
Step 5: Try On and Enjoy!
Put on your newly transformed half shirt. Feel the difference! No more excess fabric bunching around your waist or riding up throughout the day. You’ll immediately notice how much more comfortable and streamlined your layered look becomes. This simple hack truly revolutionizes how you approach layering.
Styling Your DIY Half Shirt: Unlock Endless Possibilities
Now that you’ve created your custom half shirt, it’s time to explore the myriad ways it can enhance your wardrobe:
- Under Sleeveless Dresses and Jumpsuits: Say goodbye to the awkward bulk of a full undershirt. A half shirt provides modesty and a smooth line without adding volume to your midsection.
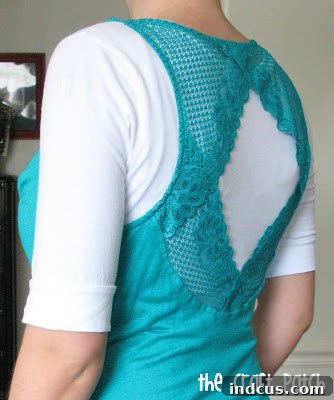
- With Sheer or Lace Tops: Add an opaque layer under your favorite see-through pieces without disrupting the aesthetic of the garment itself. The half shirt provides discreet coverage where you need it most.
- Beneath Low-Cut Necklines: Prevent wardrobe malfunctions and add a touch of modesty to plunging necklines, whether on dresses, blouses, or sweaters.
- Layering with Sweaters and Cardigans: Enjoy the warmth and style of layered knits without feeling overheated or having an inner layer bunch up. It’s perfect for creating a clean, professional look.
- For a Pop of Color: Choose a half shirt in a contrasting color to let a subtle hint of color peek out from your neckline, adding a stylish detail to your outfit.
- Workout or Loungewear: A stretchy half shirt can also serve as a comfortable, light layer for yoga, pilates, or simply relaxing at home.
The versatility of this DIY layering hack is truly remarkable. It allows you to transform countless outfits, adding comfort and confidence with minimal effort.
Tips for Maximizing Your Half Shirt Experience
- Experiment with Fabrics: While stretchy cotton blends are excellent, try modal or bamboo fabrics for an even softer, silkier feel.
- Consider Necklines: You can choose v-neck, crew neck, or scoop neck t-shirts to match the neckline of your outer garment.
- Multiple Colors: Create a collection of half shirts in various neutral and accent colors to cover all your layering needs.
- Long-Sleeved Options: Don’t limit yourself to short-sleeved tees. A long-sleeved t-shirt can be converted into a long-sleeved half shirt for cooler weather, providing arm coverage without torso bulk.
This simple DIY project offers an elegant solution to a common fashion dilemma, proving that sometimes, less truly is more. It’s not just about saving money; it’s about empowering yourself to customize your wardrobe, enhance your comfort, and elevate your style with ease. So go ahead, grab an old t-shirt, and get ready to experience the liberating comfort and seamless style of your very own half shirt. Your wardrobe (and your comfort) will thank you!







