
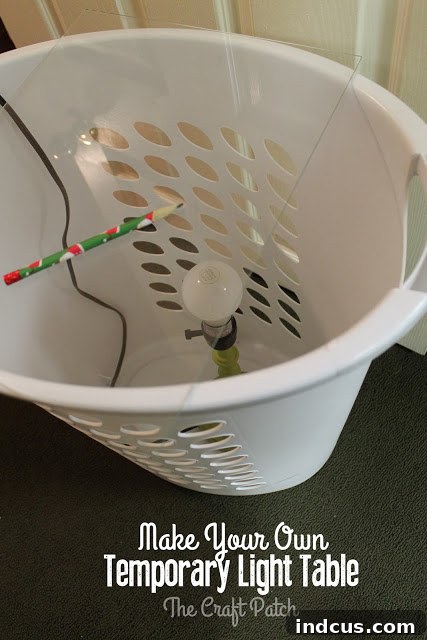
DIY Temporary Light Table: Illuminate Your Creativity with This Brilliant Craft Hack
Every artist and crafter knows the struggle: precise tracing can be a tedious and often frustrating task. Whether you’re transferring intricate patterns, detailing designs, or simply need a clearer view of your work, a reliable light source under your canvas is a game-changer. Professional light tables can be costly and bulky, making them an inaccessible luxury for many hobbyists and casual creators. But what if I told you there’s an incredibly simple, budget-friendly, and temporary solution right within your reach? A brilliant trick passed down from an artist mother, this DIY light table concept will revolutionize your crafting experience. It’s effective, easy to set up, and uses items you likely already have at home, embodying the perfect blend of ingenuity and practicality.
Recently, I found myself with a significant amount of tracing to do, particularly for an intricate Advent calendar pattern. The challenge was clear: how to achieve precise results without investing in expensive equipment or struggling with inadequate lighting. That’s when I remembered my artist mother’s ingenious method – a hack so clever, yet so straightforward, it feels like a revelation. This isn’t just a makeshift solution; it’s a testament to creative problem-solving that empowers you to tackle detailed projects with confidence and ease. Get ready to transform your tracing process and unlock new possibilities for your artistic endeavors.
Why Every Artist and Crafter Needs a Light Table (Even a Temporary One)
Before diving into the “how-to,” let’s explore why a light table, even a temporary one, is an indispensable tool in your creative arsenal. A light table provides a uniformly lit surface from underneath, allowing light to pass through your reference material and the paper you’re working on. This direct illumination makes it incredibly easy to see underlying lines, patterns, and designs, significantly improving the accuracy and speed of your tracing.
The benefits extend far beyond simple tracing. For illustrators and animators, it’s perfect for refining sketches or creating clean line art. Quilters can use it to precisely cut fabric patterns. Calligraphers find it invaluable for ruling guide lines on delicate papers without leaving indentations. Even for those working with stained glass patterns or detailed embroidery designs, a light table simplifies the transfer process. It reduces eye strain, eliminates the need for awkward window-tracing setups, and provides a comfortable, ergonomic workspace. This DIY solution offers all these advantages without the commitment of a permanent, store-bought unit, making it ideal for occasional use or for those just starting out.
Your Brilliant DIY Solution: Crafting a Temporary Light Table
The beauty of this temporary light table lies in its simplicity. You don’t need specialized tools or materials; just three common household items come together to create a fully functional tracing surface. This hack is not only incredibly effective but also cost-efficient, proving that sometimes the best solutions are the most resourceful ones. Say goodbye to struggling with faint lines or inadequate lighting, and say hello to a brighter, clearer, and more enjoyable creative process.
What You’ll Need: The Three Essential Items
To embark on this journey of illuminating your artwork, gather these three indispensable items:
- A Tall, Sturdy Container: This will form the base and structure of your light table. Think vertically!
- A Lamp (Shade Removed): This is your light source, providing the essential illumination.
- A Piece of Glass: This creates your transparent, flat working surface.
Detailed Breakdown of Materials and Considerations:
Let’s look at each component in more detail to ensure you choose the best options for safety and effectiveness:
1. A Tall (Clean) Garbage Can or Laundry Hamper
- Purpose: This acts as the stand and enclosure for your light source. Its height is crucial for placing the glass top at a comfortable working level and allowing space for the lamp inside.
- Ideal Characteristics:
- Height: Opt for something that brings your working surface to a comfortable height when seated or standing. A standard kitchen garbage can or a tall laundry hamper often works well.
- Stability: Choose a container that is sturdy and won’t easily tip over. Plastic or metal hampers are generally good.
- Material: The material doesn’t matter much as long as it’s opaque enough to contain the light and stable. Avoid anything flimsy or easily combustible.
- Cleanliness: Ensure it’s clean inside to avoid dust or debris falling onto your workspace or lamp.
- Alternatives: A sturdy cardboard box of sufficient height, an inverted bucket, or even a small, stable side table with a gap for light could potentially work, but ensure stability and safety above all else.
2. A Lamp Minus the Lamp Shade
- Purpose: This is the heart of your light table, providing the illumination. Removing the shade allows the light to spread upwards unhindered.
- Ideal Characteristics:
- Type: A standard desk lamp or a small table lamp works perfectly. Avoid floor lamps as they are generally too tall and their bases might not fit.
- Bulb Type: An LED bulb is highly recommended. They produce very little heat, are energy- efficient, and offer bright, consistent light. If using an incandescent bulb, choose a low-wattage one to minimize heat buildup, but LEDs are always safer and better.
- Brightness: Aim for a bulb that provides good, clear illumination without being blinding.
- Cord Length: Ensure the lamp has a sufficient cord length to reach an outlet safely without needing extension cords if possible.
- Safety Note: Always ensure the lamp is in good working order, with no frayed wires or damaged plugs. Heat management is crucial, especially when enclosed. LED bulbs mitigate this risk significantly.
3. A Piece of Glass from a Big Picture Frame or Table Top
- Purpose: This provides the flat, transparent surface upon which you will place your artwork.
- Ideal Characteristics:
- Size: Choose a piece large enough to comfortably accommodate your tracing projects. The glass from a large poster frame (e.g., 20×30 inches or larger) or an old coffee table top is ideal.
- Thickness: A reasonably thick piece of glass is preferable for durability and safety, but avoid excessively heavy glass if your base isn’t robust.
- Edges: Be extremely cautious of sharp edges. If the glass has unfinished edges, you might want to tape them with strong duct tape or sandpaper them gently (with appropriate safety gear) to prevent cuts.
- Alternatives: While glass is excellent for transparency and rigidity, a clear acrylic sheet (plexiglass) is a safer, shatter-resistant alternative, though often more expensive. Ensure it’s thick enough not to bow under pressure.
Assembling Your Ingenious Temporary Light Table: A Step-by-Step Guide
Now that you have all your materials, putting together your DIY light table is astonishingly simple. It takes mere minutes to set up, allowing you to transition quickly from idea to creation.
- Prepare Your Base: Take your tall garbage can or laundry hamper and place it on a stable, flat surface where you intend to work. Ensure it’s upright and won’t wobble.
- Insert the Lamp: Carefully place the lamp (with the shade removed) inside the container. Position it centrally so that the light will spread evenly upwards. Make sure the lamp is stable and won’t tip over inside the container.
- Add the Glass Top: Gently place the piece of glass across the top opening of your container. Ensure it’s securely balanced and won’t slide off easily. If the container opening is smaller than the glass, this provides excellent stability as the glass rests fully on the rim.
- Connect to Power: Plug in your lamp. Double-check that all connections are secure and there are no exposed wires.
And that’s it, baby! You’ve just created your very own temporary light table. Now, simply turn on the lamp, place your reference material and your tracing paper on top of the glass, and trace to your heart’s content. The difference in clarity and ease will be immediate and remarkable.
Maximizing Your DIY Light Table: Tips for Use and Creative Applications
Your new DIY light table is incredibly versatile. Here are some tips to get the most out of it:
- Optimize Lighting: For best results, work in a moderately lit room rather than complete darkness. This reduces eye strain from the contrast between your bright work surface and the dark surroundings.
- Secure Your Work: Use low-tack painter’s tape or artist’s tape to secure your reference image and tracing paper to the glass. This prevents shifting and ensures precise alignment.
- Choose the Right Paper: Thinner papers (like tracing paper, vellum, or lightweight bond paper) work best as they allow light to pass through more easily.
- Diverse Applications:
- Drawing & Illustration: Perfect for transferring sketches, inking comics, or refining character designs.
- Calligraphy & Hand Lettering: Use it to create consistent guidelines on various papers without visible pencil marks.
- Quilting & Sewing: Transfer intricate patterns onto fabric or mark cutting lines.
- Stained Glass & Mosaic: Great for laying out patterns and ensuring precise cuts.
- Animation: A basic tool for traditional animators to check frame-to-frame consistency.
- Scrapbooking & Card Making: Align elements perfectly or transfer decorative patterns.
The Unbeatable Benefits of This Homemade Solution
This ingenious DIY light table offers a plethora of advantages:
- Cost-Effective: You’re likely using items you already own, eliminating the need for a significant financial outlay.
- Space-Saving: Being temporary, it can be quickly set up when needed and dismantled for storage, freeing up valuable workspace.
- Accessibility: No special skills or tools are required, making it accessible to anyone, regardless of their crafting experience.
- Instant Gratification: From gathering materials to tracing your first line, the process is incredibly fast.
- Eco-Friendly: Reusing household items reduces waste and promotes sustainable crafting practices.
Safety First: Important Considerations for Your DIY Setup
While this method is simple, prioritizing safety is paramount:
- Electrical Safety: Ensure your lamp and its cord are in excellent condition. Avoid placing the lamp in a way that could cause it to overheat. Using an LED bulb drastically reduces heat output, making it the safest choice. Never leave the lamp unattended for extended periods.
- Glass Handling: Be extremely careful when handling the glass. Wear gloves if the edges are unfinished or sharp. Ensure the glass is stable and doesn’t wobble or risk falling off the base.
- Stability of the Base: Always check that your garbage can or hamper is stable and on a level surface. A wobbly base could lead to the glass toppling over.
- Supervision: If children are using this setup, ensure constant adult supervision, especially when dealing with glass and electricity.
Conclusion: Embrace the Simple Genius of Your DIY Light Table
I told you it was simple and brilliant! Or simply brilliant. Or brilliantly simple. Whichever way you phrase it, this temporary light table hack is a game-changer for anyone needing a reliable, accessible, and affordable tracing solution. It’s a testament to the power of resourcefulness and creativity, transforming everyday objects into a powerful artistic tool.
No longer will you be limited by the lack of expensive equipment or frustrated by imperfect tracing. This DIY light table empowers you to tackle detailed projects with newfound confidence and precision. So, gather your materials, set up your personal light studio, and illuminate your path to more precise and enjoyable crafting. Happy tracing!







