
Master the Art of Crafting Vibrant Duck Tape Beads: Your Ultimate DIY Guide
Unleash your inner crafter and dive into the exciting world of Duck Tape beads! This surprisingly simple yet incredibly rewarding craft allows you to transform ordinary Duck Tape into vibrant, unique beads that can elevate countless DIY projects. Whether you’re a seasoned crafter or just starting your creative journey, making these colorful beads is not only immensely fun but also opens up a universe of artistic possibilities.
I recently discovered the sheer joy of fabricating beads from Duck Tape, and the versatility of this technique compelled me to share this comprehensive tutorial with you. Imagine creating personalized jewelry, distinctive holiday ornaments, or charming decorative accents—all from durable and stylish Duck Tape. With an astonishing array of patterns, colors, and finishes available from Duck Brand, your creative options are virtually limitless, allowing you to tailor your beads to any theme or aesthetic.
From whimsical children’s crafts to sophisticated adult projects, these handmade beads are a fantastic alternative to traditional beads. They offer durability, water resistance, and a level of customization that store-bought beads simply can’t match. Get ready to embark on an enjoyable crafting adventure that promises not only beautiful results but also a deeply satisfying creative experience.
Essential Supplies for Your Duck Tape Bead Crafting Adventure
Before you begin transforming tape into delightful beads, gather your materials. Having everything at hand will ensure a smooth and enjoyable crafting process.
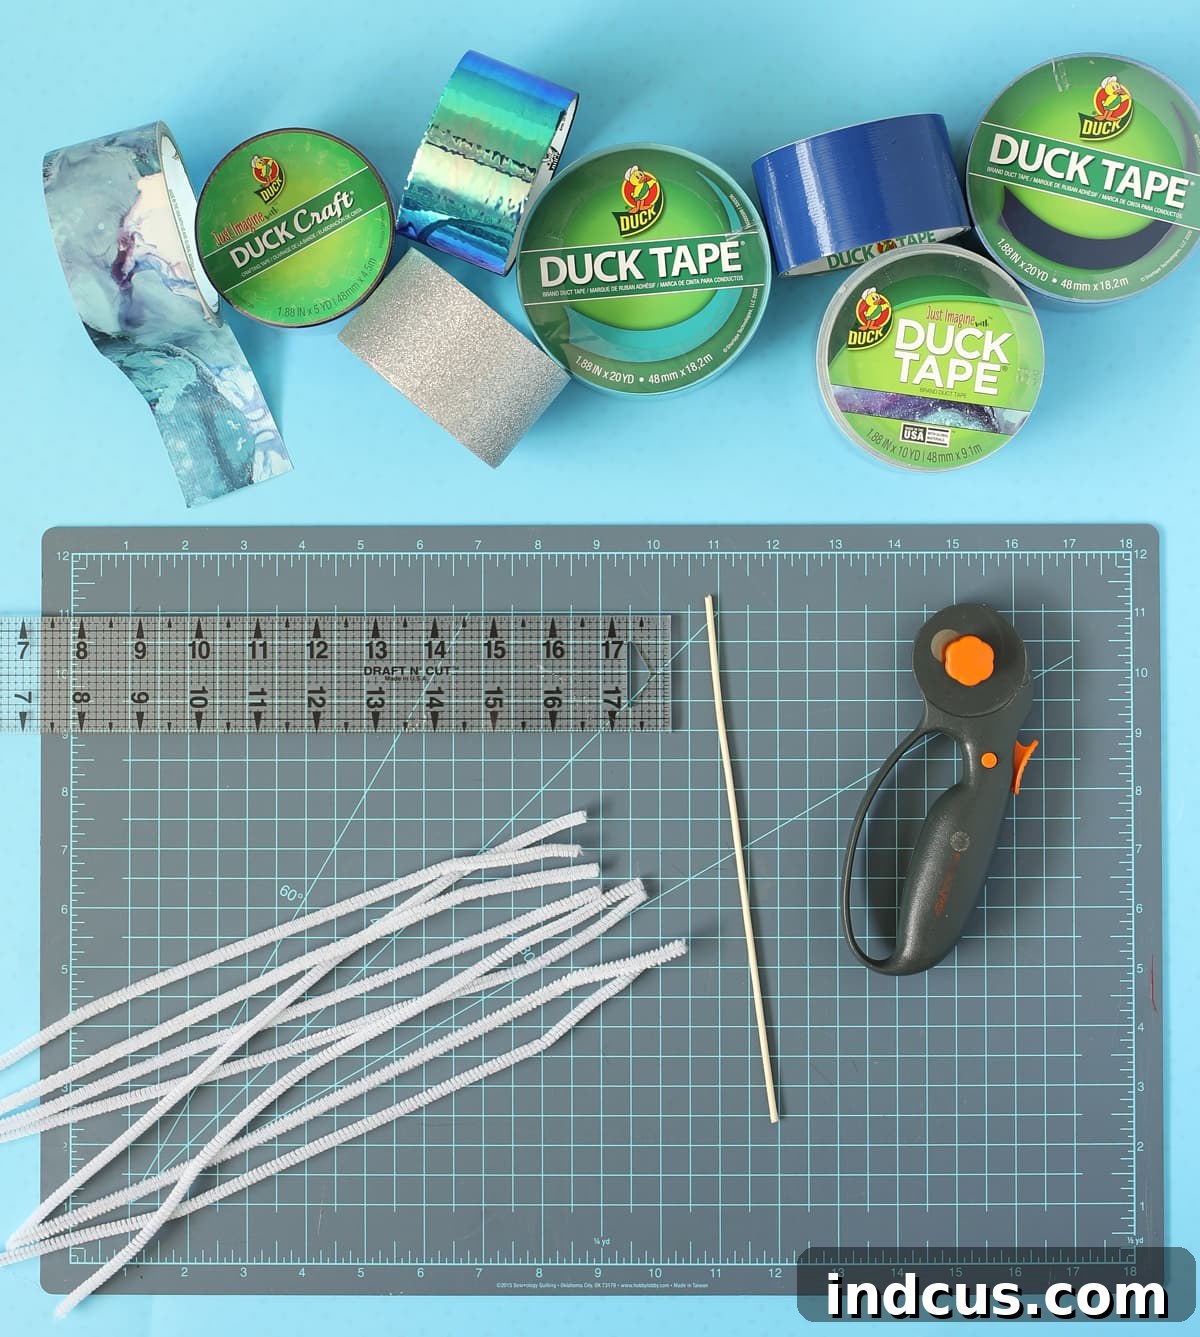
- Duck Tape: The star of our show! Experiment with different types like Color Duck Tape® for solid hues, Printed Duck Tape® for patterns, Duck Glitter®Tape for sparkle, or Duck Mirror®Crafting Tape for a reflective finish. The variety will greatly enhance your projects!
- Cutting Mat, Ruler, and Rotary Cutter: These tools are crucial for achieving precise, straight cuts and diagonal lines, which are essential for perfectly shaped beads. While scissors can work, a rotary cutter and mat offer superior accuracy and ease.
- Wooden Skewer: This serves as the core around which you’ll roll your tape. The skewer’s diameter will determine the size of the hole in your finished bead, making it easy to string.
- Chenille Stems (Pipe Cleaners): Primarily used for specific projects like the Star of David, these are flexible and ideal for stringing and shaping.
- Ribbon (Optional): For adding decorative flourishes, bows, or hanging elements to your finished crafts.
Crafting Your Own Unique Duck Tape Beads: Step-by-Step Instructions
Creating Duck Tape beads is a straightforward process, but attention to detail will yield the best results. Follow these steps carefully to produce beautifully consistent beads every time.
Step 1: Prepare Your Duck Tape Strip
Begin by unrolling a section of your chosen Duck Tape and measuring out a 12-inch strip. Carefully cut this strip using your rotary cutter and ruler on the cutting mat. This length is ideal for creating beads that are substantial enough for most projects without being overly bulky.
Step 2: Halve the Strip Lengthwise
Next, take your 12-inch strip and cut it in half lengthwise. You will now have two pieces, each approximately 1 inch wide and 12 inches long. This narrower width is crucial for forming the tapered shape that gives the beads their characteristic look when rolled.
Step 3: Create Triangular Shapes for Rolling
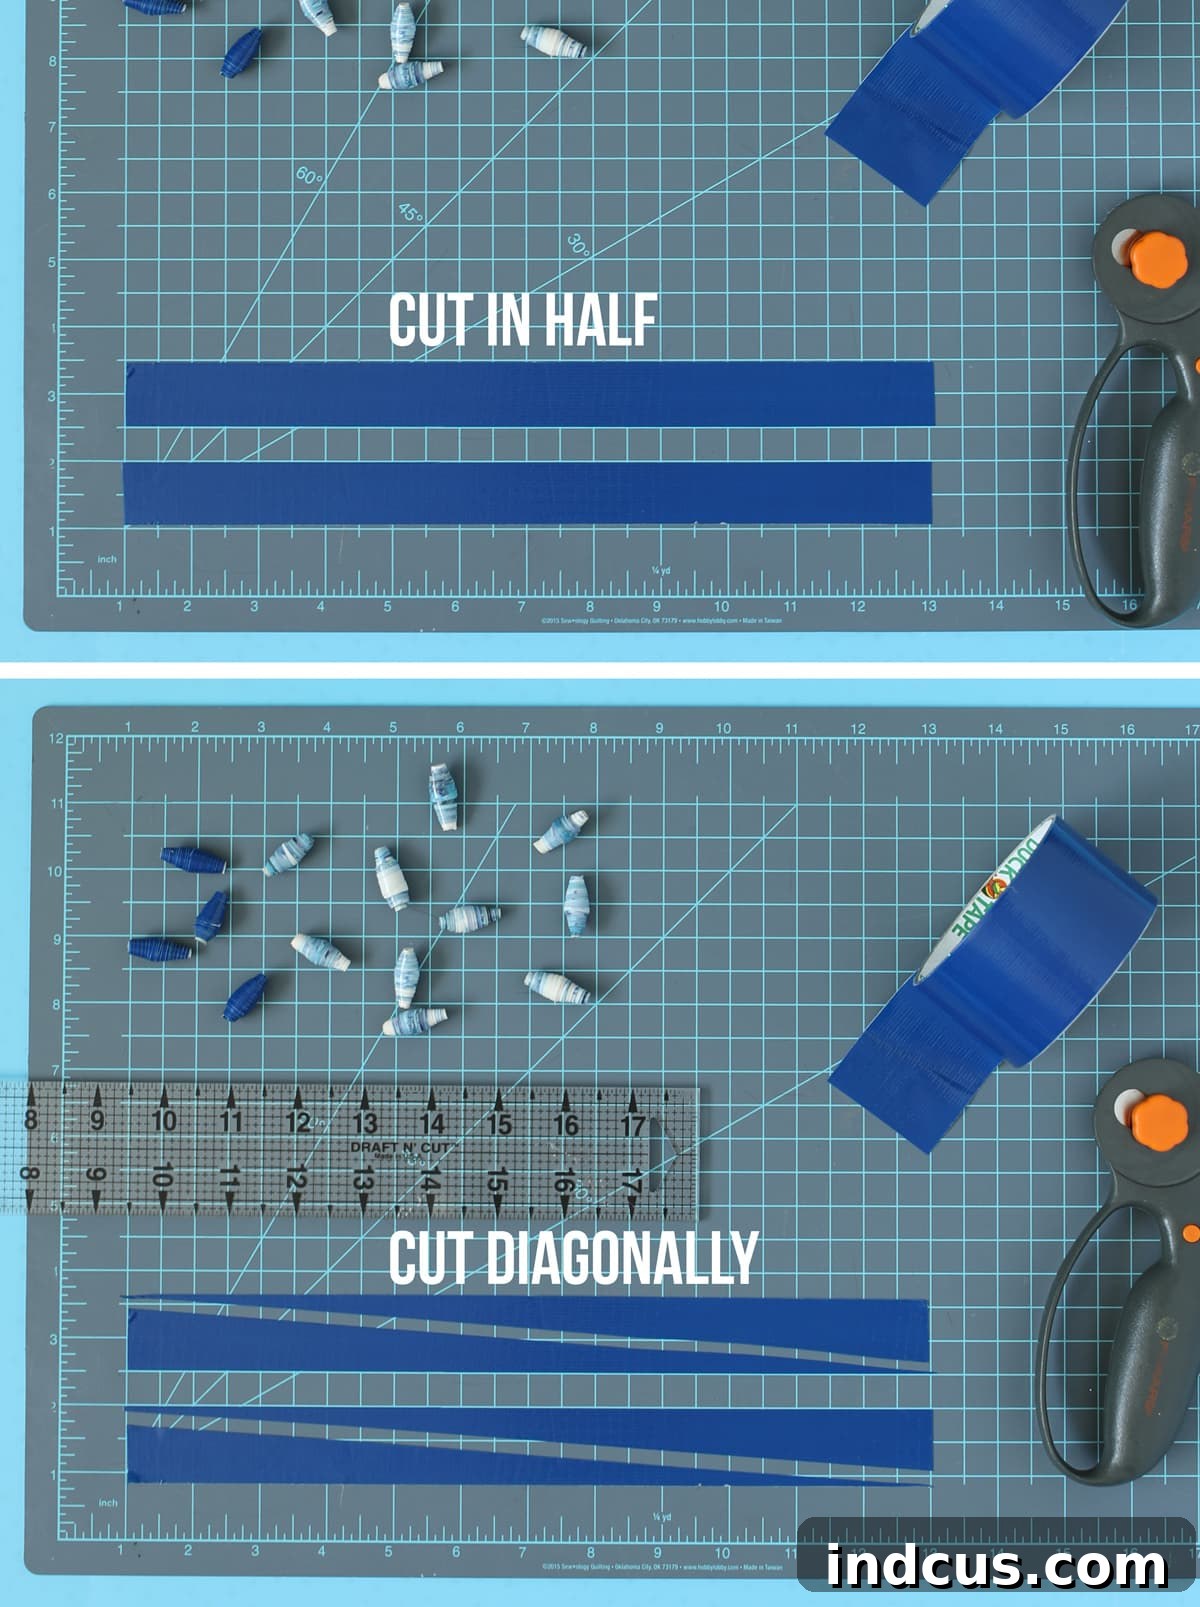
Place one of your 1-inch by 12-inch tape strips onto your cutting mat. Align your ruler diagonally from one corner to the opposite corner of the strip. Make a clean cut along this diagonal line. Repeat this process for the second 1-inch strip. You will now have four long, triangular-shaped pieces of Duck Tape. These triangles, wider at one end and tapering to a point at the other, are the fundamental shape for your rolled beads.
Step 4: Prepare the Core for Stringing
Carefully peel one of the triangular tape shapes off your cutting mat. Before you start rolling, fold over about a 1/2-inch section of the wider end of the triangle. This folded section creates a non-sticky core, which is absolutely vital. Without it, the center of your bead would be sticky, preventing you from stringing it onto a thread, skewer, or chenille stem. This small fold ensures a clean, functional opening for your projects.
Step 5: Roll Your Duck Tape Bead
Now, take the folded, wider end of your triangle and place it against a small wooden skewer. Begin to tightly roll the tape around the skewer, ensuring the folded part stays neat. As you roll, maintain consistent tension and continuously adjust the tape to keep it centered on itself. This careful centering will ensure your bead forms a symmetrical and aesthetically pleasing shape. Continue rolling until the entire triangular strip of tape is wrapped around the skewer, forming a compact, firm bead.
Step 6: Release and Repeat Your Bead Production
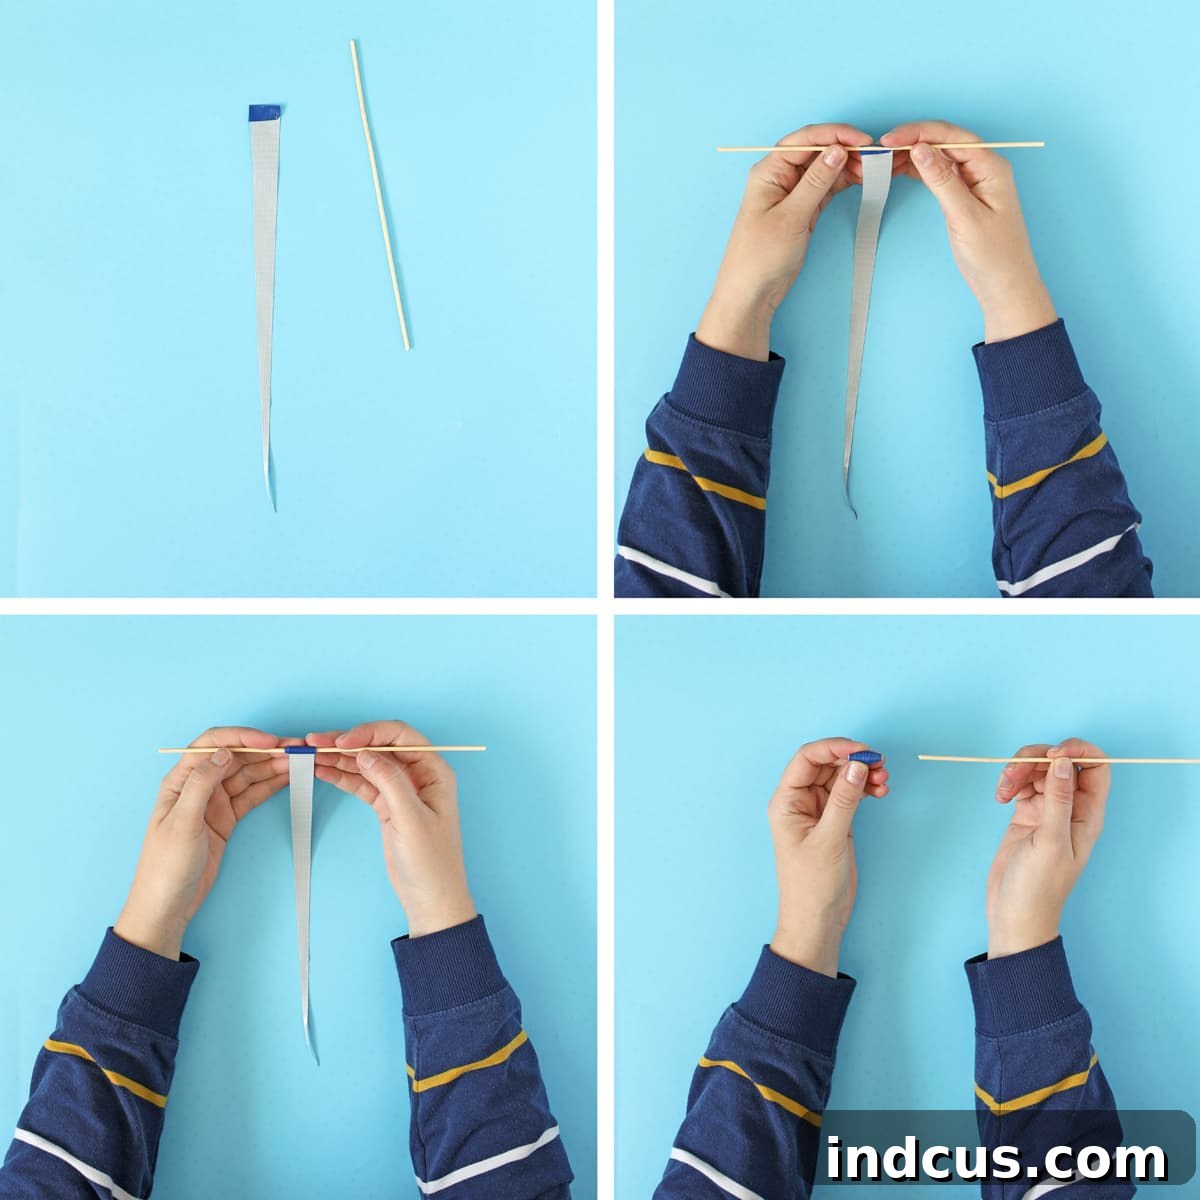
Once your bead is fully rolled, gently slide it off the wooden skewer. Admire your first handmade Duck Tape bead! Now that you’ve mastered the technique, repeat steps 1 through 6 to create as many beads as your project requires. Experiment with different colors and patterns of Duck Tape to build a diverse collection of unique crafting components.
Unleashing Creativity: Project Ideas with Your New Duck Tape Beads
Once you’ve crafted a collection of these delightful Duck Tape beads, the real fun begins! Their durability, vibrant colors, and unique texture make them perfect for a vast array of creative projects. Here’s a specific project idea, along with other inspirations to get your creative juices flowing.
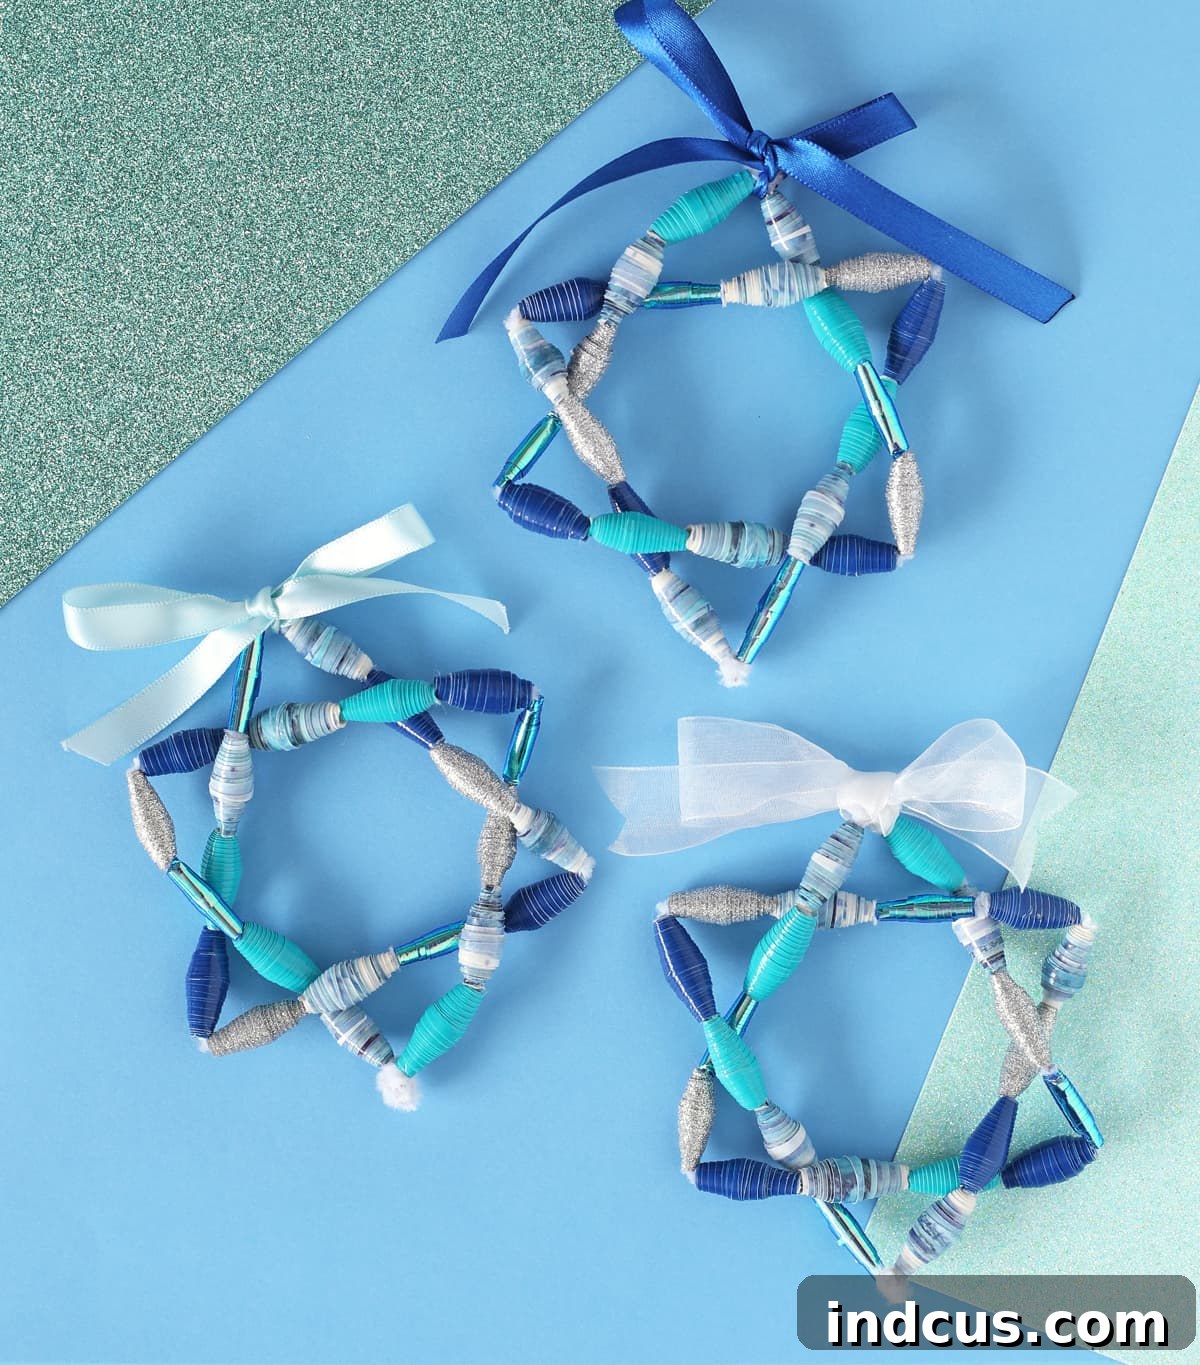
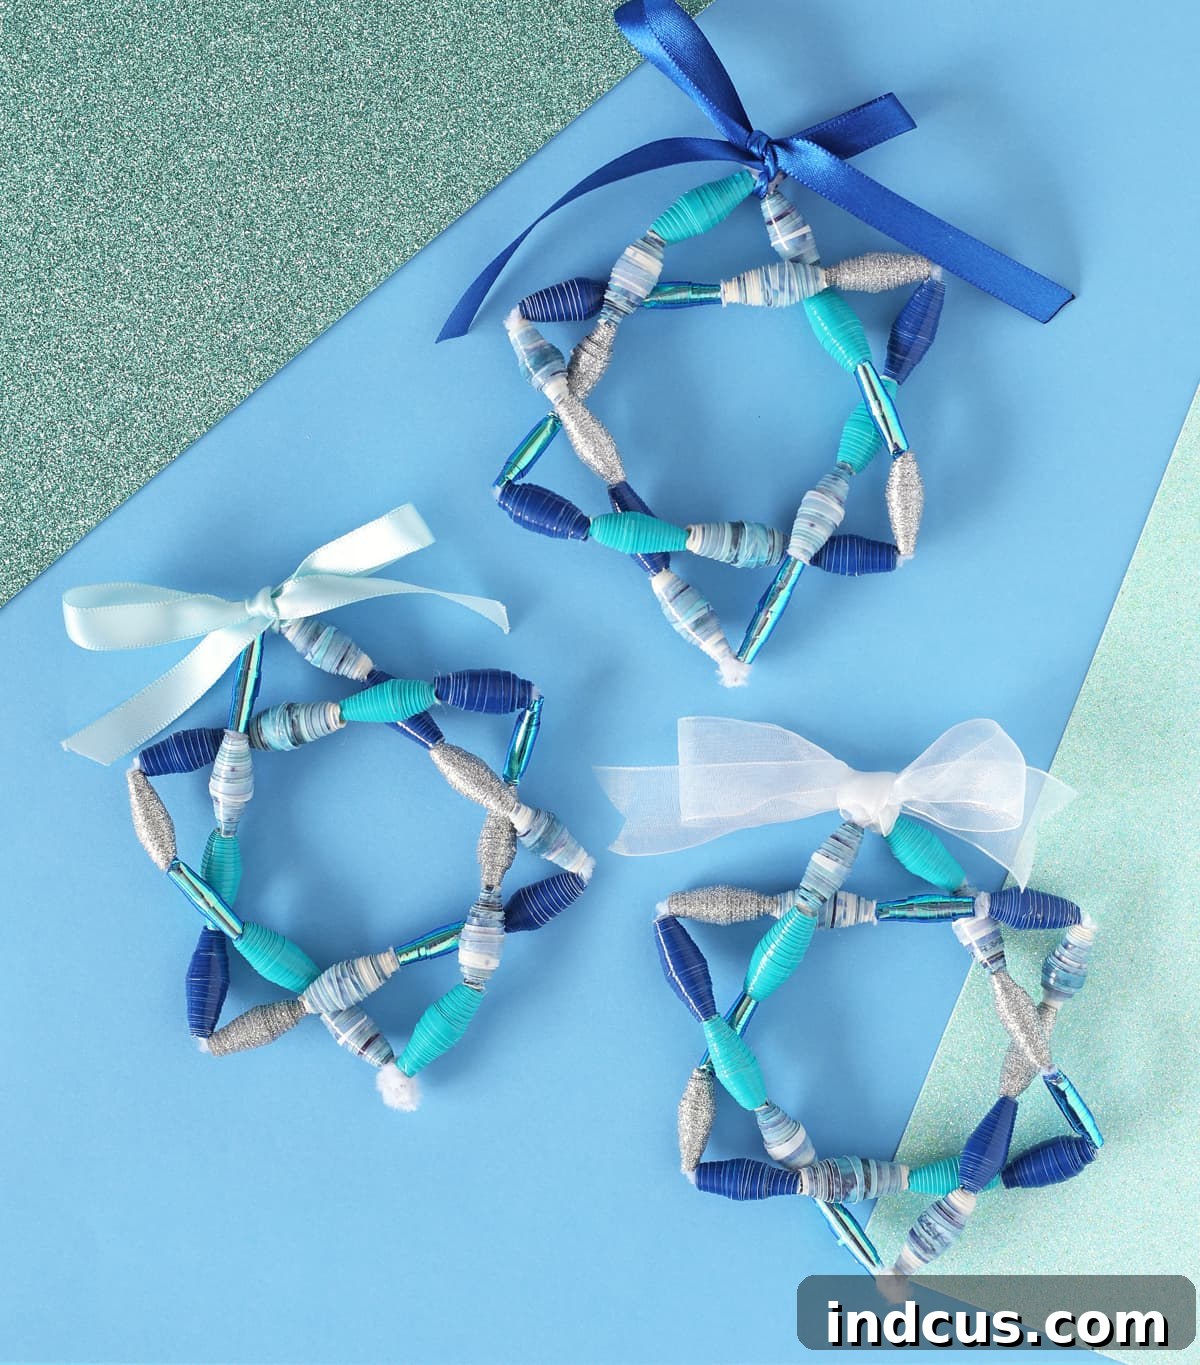
Crafting a Beautiful Beaded Star of David for Hanukkah
This meaningful craft is a wonderful way to celebrate Hanukkah and showcase your new Duck Tape beads. It’s a beautiful decoration or a thoughtful handmade gift.
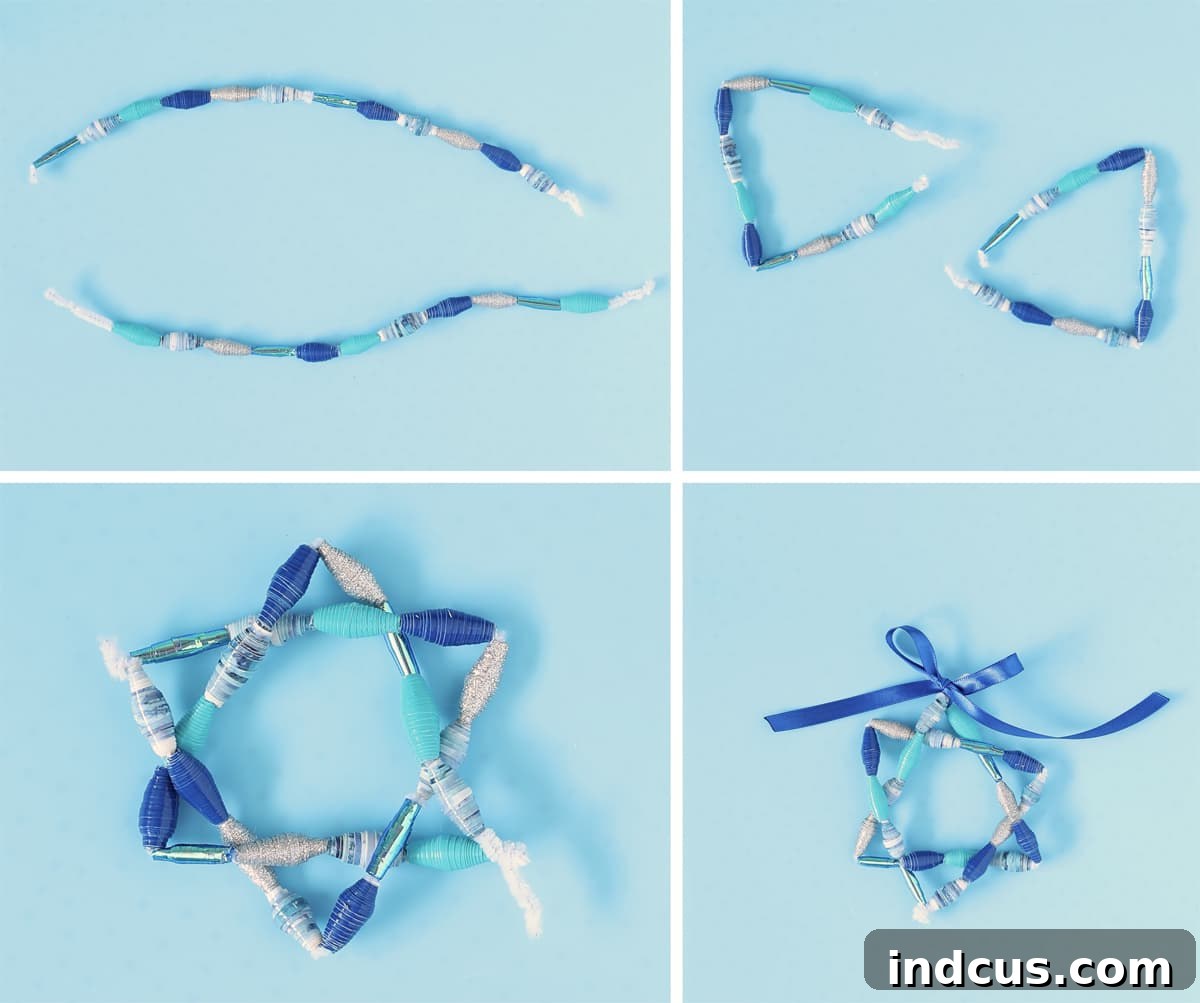
- Prepare Your Strands: Take a chenille stem and carefully slide twelve of your freshly made Duck Tape beads onto it. Repeat this process with a second chenille stem, so you have two separate strings of beads. Choose colors that evoke the spirit of Hanukkah, like blues, silvers, and whites.
- Form the Triangles: Gently fold each beaded chenille stem into a triangle shape. Ensure there are four beads neatly arranged along each of the three sides. Twist the ends of each stem temporarily to hold the triangle shape.
- Weave the Star: This is where the two triangles come together. Take one triangle and position it over the other to form the Star of David. The key to securely joining them is weaving: for each point where the two triangles intersect, one side of a triangle must go over the other, and the adjacent side must go under. It might take a moment to find the correct configuration, but there’s a specific way they interlock that creates a stable and beautiful star. This weaving technique securely connects the two triangles, giving the Star of David its distinctive interlocking appearance.
- Secure and Finish: Once the triangles are perfectly woven together to form the star, twist the open ends of the chenille stems firmly to close up the structure and hold everything securely in place. Trim off any excess chenille stem that protrudes using wire cutters or sturdy scissors.
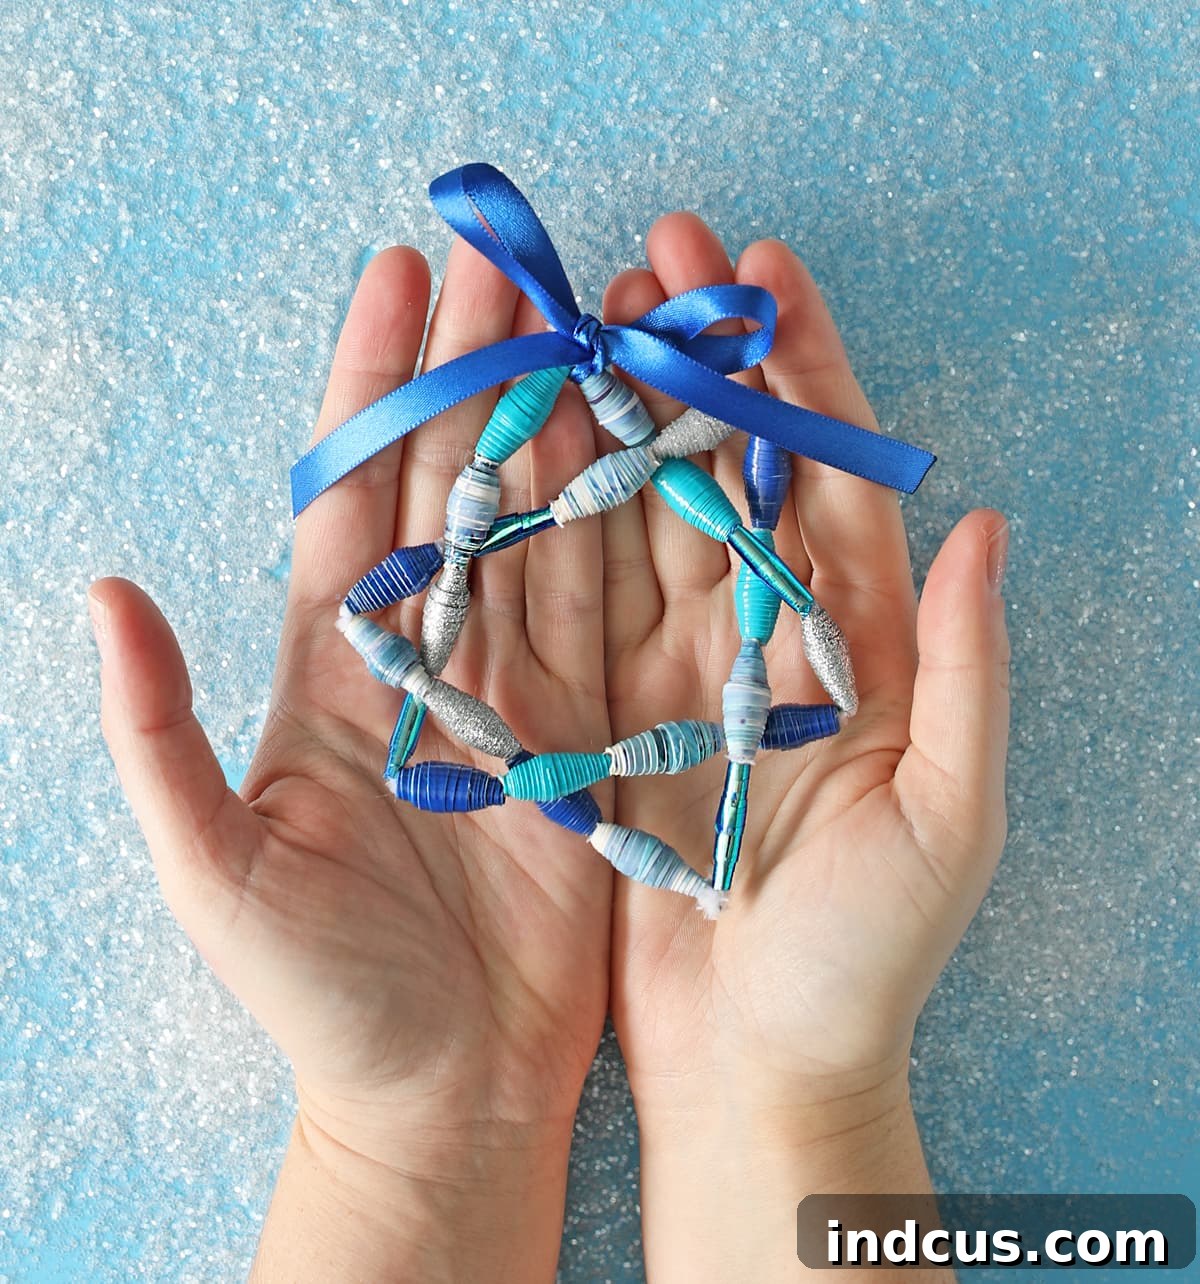
- Add Embellishments (Optional): For an extra touch of elegance, tie a small decorative ribbon bow to one of the star’s points. You can also add a loop for hanging, transforming it into a beautiful ornament or window decoration.
Beyond Hanukkah: Endless Crafting Possibilities
The versatility of Duck Tape beads extends far beyond holiday decorations. Let your imagination soar with these additional project ideas:
- Jewelry Making: String beads onto elastic cord or jewelry wire to create custom necklaces, bracelets, anklets, and even earrings. Mix and match patterns and colors to design truly unique wearable art that reflects your personal style.
- Home Decor Accents: Use your beads to create charming garlands for festive occasions or everyday decor. Attach them to lampshade fringes, add them as embellishments to picture frames, or string them together to make unique curtain ties.
- Zipper Pulls and Keychains: A few sturdy beads can transform a plain zipper or a dull keychain into a personalized accessory. This is a quick and practical project that adds a touch of handmade charm to everyday items.
- Kids’ Crafts: Duck Tape beads are wonderfully safe and durable for children’s projects. They can be used for sensory bins, learning counting or pattern recognition, or simply for freeform creative play.
- Gift Embellishments: Elevate your gift wrapping by attaching a few handmade beads to a gift tag or tying them onto the ribbon. It adds a thoughtful, personal touch that will surely be appreciated.
- Book Thongs/Bookmarks: String a few beads onto a ribbon and attach it to the spine of a book or create an elegant bookmark.
Tips for Success and Creative Expansion
To ensure your Duck Tape bead crafting experience is as enjoyable and successful as possible, consider these helpful tips:
- Practice Makes Perfect: Don’t get discouraged if your first few beads aren’t perfectly symmetrical. Like any craft, it takes a little practice to master the rolling technique.
- Sharp Tools are Key: Always use a sharp rotary cutter and a clean cutting mat. Dull tools can lead to jagged edges and frustrating tears in your tape.
- Experiment with Tape Designs: The beauty of Duck Tape beads lies in the incredible variety of tapes available. Mix solids with patterns, glitter with mirror finishes, to create diverse and visually interesting beads.
- Vary Bead Sizes: Experiment with different initial tape strip lengths (e.g., 9 inches or 15 inches) to create beads of varying sizes. This adds depth and interest to your projects.
- Involve the Family: This is a fantastic craft for all ages! Supervise younger crafters with cutting tools, but let everyone choose their favorite tape designs and enjoy the rolling process.
Caring for Your Duck Tape Creations
One of the great advantages of Duck Tape beads is their inherent durability. They are water-resistant and surprisingly robust, making them ideal for items that might see a lot of handling. If your creations get a little dusty or dirty, a quick wipe with a damp cloth is usually all that’s needed to restore their vibrancy. Avoid harsh chemicals or abrasive cleaners, which could damage the tape’s finish.
Unleash Your Inner Artist and Share Your Masterpiece!
Aren’t these Duck Tape beads absolutely fantastic? My creative brain is constantly buzzing with new ideas for how to use them, and I’m sure yours is too! From personal adornments to thoughtful gifts and festive decorations, the potential for creativity is truly limitless.
Now that you have the skills to create these wonderful beads, it’s time to let your imagination run wild. We encourage you to experiment, innovate, and most importantly, have fun with the process. Share your unique Duck Tape bead creations with friends, family, and online communities. Who knows what inspiring projects you’ll spark in others? Happy crafting!







