
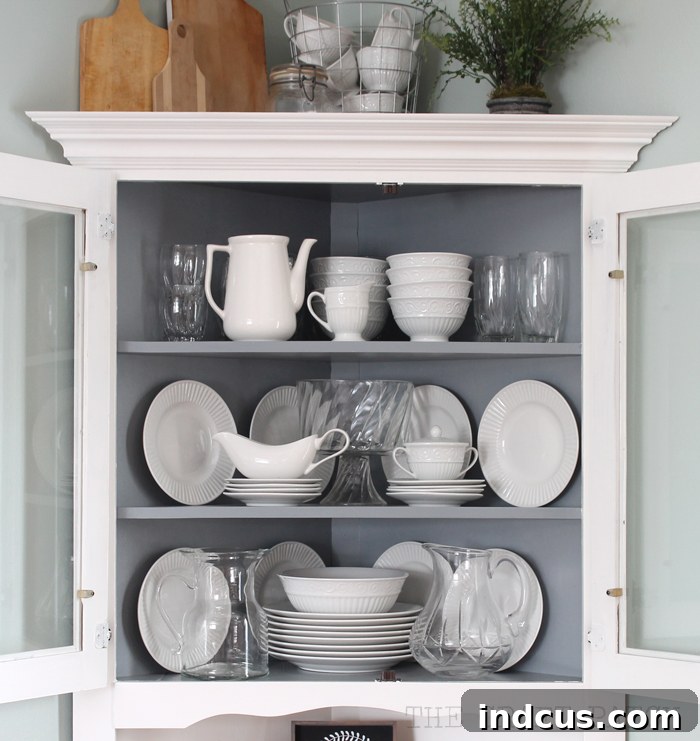
Transforming a house into a home often involves a journey of discovering and creating pieces that truly reflect your personal style. For a significant period, I envisioned a prominent corner hutch to grace my dining room. The space, with its existing layout and furnishings, strongly called for a substantial anchor in that particular corner to establish balance and introduce a touch of elegance. This quest for the perfect furniture piece wasn’t just about utility; it was about completing a vision for a harmonious and inviting dining area.
The challenge, as many DIY enthusiasts know, is finding a piece that fits both the spatial requirements and the aesthetic aspirations without breaking the bank. New furniture can be prohibitively expensive, and often lacks the unique character that a pre-loved item can offer. This is precisely why my heart leaped when I stumbled upon this rather unassuming, even ‘ugly,’ corner cabinet second-hand. Despite its current appearance, I instantly recognized its hidden potential. It wasn’t just a piece of furniture; it was a blank canvas awaiting a creative transformation into the exact dining room corner hutch I had long desired.
The Perfect Find: A Diamond in the Rough
What made this particular cabinet stand out amidst countless other second-hand pieces? Beyond its undeniable “ugly” exterior, it possessed several crucial qualities that made it an ideal candidate for a complete DIY furniture redo. First and foremost, it was crafted from solid wood – a rare and valuable find in an era often dominated by particle board and veneers. This guaranteed its durability and the longevity of any makeover efforts. Secondly, its dimensions were precisely what my dining room corner demanded, neither too large to overwhelm the space nor too small to be insignificant. And finally, the price tag was an absolute steal at just $75! This budget-friendly acquisition meant I could allocate more resources to high-quality paint and hardware, ensuring a truly premium finish.
The excitement of the find quickly morphed into the anticipation of the makeover process. My vision for this dated piece was clear: a fresh, elegant, and timeless vintage hutch restoration that would elevate the entire dining room. This wasn’t merely about painting; it was about thoughtfully refining every detail to transform it from overlooked to outstanding.
The Transformation Process: A Step-by-Step Guide
Embarking on a painted furniture project, especially one as significant as this dining room cabinet transformation, requires a methodical approach. The goal was to take this sturdy, solid wood piece and imbue it with a renewed sense of purpose and aesthetic appeal. The steps undertaken were crucial for achieving a professional and long-lasting finish.
Preparation is Key: Sanding and Cleaning
The first and arguably most critical step in any furniture makeover is proper preparation. After years of experience with various painting projects, I’ve learned an invaluable lesson that I cannot stress enough: always, always, always sand. Skipping this step is a common mistake that invariably leads to regret. Sanding serves multiple vital purposes. Firstly, it smooths out any imperfections, scratches, or rough patches on the wood surface. Secondly, and perhaps most importantly, it creates a “tooth” or fine texture on the surface, allowing the new paint to adhere much more effectively. Without adequate sanding, paint is more likely to chip, peel, or scratch off, compromising the entire effort. For this solid wood hutch, I started with a medium-grit sandpaper (around 120-150 grit) to remove any existing varnish or irregularities, followed by a fine-grit sandpaper (220 grit) for a super smooth finish. After sanding, a thorough cleaning with a damp cloth to remove all dust and grime is essential to ensure a pristine surface for painting.
Priming for Perfection: A Step Not to Be Skipped
While not explicitly mentioned in the original list, priming is a crucial intermediate step that significantly contributes to the success and durability of a painted finish. Applying a good quality primer, especially on darker wood or surfaces with existing stains, creates an even base, blocks bleed-through, and further enhances paint adhesion. It allows the topcoats of paint to achieve their true color without requiring an excessive number of coats, ultimately saving time and paint. For this project, a high-quality gripping primer was applied after sanding and cleaning, ensuring maximum adhesion for the latex paint.
Painting with Patience: The Secret to a Smooth Finish
With the surface perfectly prepared, it was time for the paint. I opted for a standard latex paint, chosen for its durability, ease of application, and cleanability – perfect for a frequently used piece like a dining room hutch. The choice of a crisp white color was deliberate, aimed at brightening the corner and providing a neutral backdrop for any future decorative schemes. Applying multiple thin coats, rather than one thick coat, is key to achieving a smooth, professional-looking finish without drips or brush marks. I used a high-quality synthetic brush for intricate areas and a small foam roller for the larger, flat surfaces to minimize texture.
This is where another vital lesson from my many furniture painting endeavors comes into play:
- Always, always, always sand. This foundation ensures your paint has a solid surface to grip onto, preventing chips and ensuring a smooth finish. It’s the non-negotiable first step for any lasting furniture makeover.
- Read the label on your paint can and follow the instructions about dry time explicitly. If it says wait 2 hours between coats, wait the full two hours. This isn’t just a suggestion; it’s a critical instruction to allow the solvents in the paint to fully evaporate and the paint layer to properly cure. Painting a second coat over a coat of paint that’s not completely dry will leave your piece feeling sticky to the touch – potentially forever! This “tacky” feeling means the paint hasn’t properly bonded, leading to an inferior, easily damaged finish that can attract dust and lint. Patience is not always my strongest virtue, especially when eager to see a project completed, but I’ve learned that observing the recommended drying times between coats is absolutely worth the wait for a hard, durable, and non-tacky finish.
Upgrading the Details: Crown Molding and Hardware
Beyond the paint, two key elements dramatically transformed the hutch: replacing the outdated wavy top piece with elegant crown molding and updating the hardware. The original wavy trim dated the piece significantly. Carefully removing it and meticulously installing new crown molding instantly elevated the hutch, giving it a more sophisticated, built-in appearance. Selecting the right profile of crown molding was important to match the desired classic aesthetic. This step required careful measurements and precise cuts to ensure seamless corners, a challenging but rewarding part of the crown molding upgrade.
For the hardware, I replaced the old knobs with stunning crystal knobs. This small detail made a huge impact, adding a touch of sparkle and luxury. Finding six large crystal knobs for just $9 at Ross was an unexpected stroke of luck – truly a fantastic price for such substantial pieces. It goes to show that you can find incredible deals for crystal knob hardware if you keep an eye out, adding significant value without significant cost. The new hardware perfectly complemented the fresh white paint and classic crown molding, completing the sophisticated look.
The Grand Reveal: A Dining Room Transformed
Okay, enough about the technicalities of the DIY furniture transformation. You came here to see the beautiful outcome! Without further ado, let’s unveil the stunning corner hutch makeover.
The finished hutch is everything I envisioned and more. It now serves as a beautiful focal point in the dining room, drawing the eye and adding a sense of curated elegance. I’m absolutely thrilled to finally have such a pretty and functional place to display my favorite dishes and to decorate seasonally, allowing the space to evolve with holidays and personal touches. The transformation is not just cosmetic; it’s about giving an old piece a new lease on life and integrating it seamlessly into the home’s aesthetic.
The versatility of a freshly painted piece truly shines when it comes to seasonal decor. For instance, here it is, adorned with festive ornaments and greenery, perfectly decorated for Christmas:
The Domino Effect of Home Improvement
It’s a phenomenon familiar to many homeowners and DIY enthusiasts: the “domino effect” of home improvement. You know how it goes. You tackle one project, like this gorgeous budget-friendly home decor hutch, and suddenly, its newfound beauty highlights all the surrounding imperfections. Placing that pristine, sophisticated new piece of furniture in the dining room undeniably made me realize that the trim around the back door, once unnoticed, now screams for attention and needs to be replaced. And it’s gotten me itching to finish off the crown molding throughout the entire room, which now looks incomplete next to the hutch’s elegant trim. The baseboards also seem tired and worn in comparison. My eyes have also started to drift upwards, considering taking down the ceiling fan for a more modern light fixture, and contemplating ripping out the cabinets hanging over the peninsula to achieve a more open, airy feel in the kitchen adjacent to the dining space. It’s a classic case of “if you give a mouse a cookie,” right? One successful home improvement domino effect project inevitably sparks a dozen more ideas and desires, creating an endless cycle of upgrades and enhancements.
A Side-by-Side: Spectacular Transformation
To truly appreciate the extent of this furniture makeover, a side-by-side comparison is indispensable. The visual impact is simply stunning.
Ah! The difference is night and day! From a dated, almost forgotten piece, it has been reborn as something truly fresh and sophisticated. This project perfectly encapsulates why I just love a good furniture redo. It’s absolutely amazing what a little vision, some elbow grease, and the transformative power of paint can accomplish, isn’t it? This painted hutch tutorial proves that even the most unpromising items can be given a new life and become cherished features in your home. It’s an inspiring reminder that beauty often lies just beneath the surface, waiting to be revealed.







