
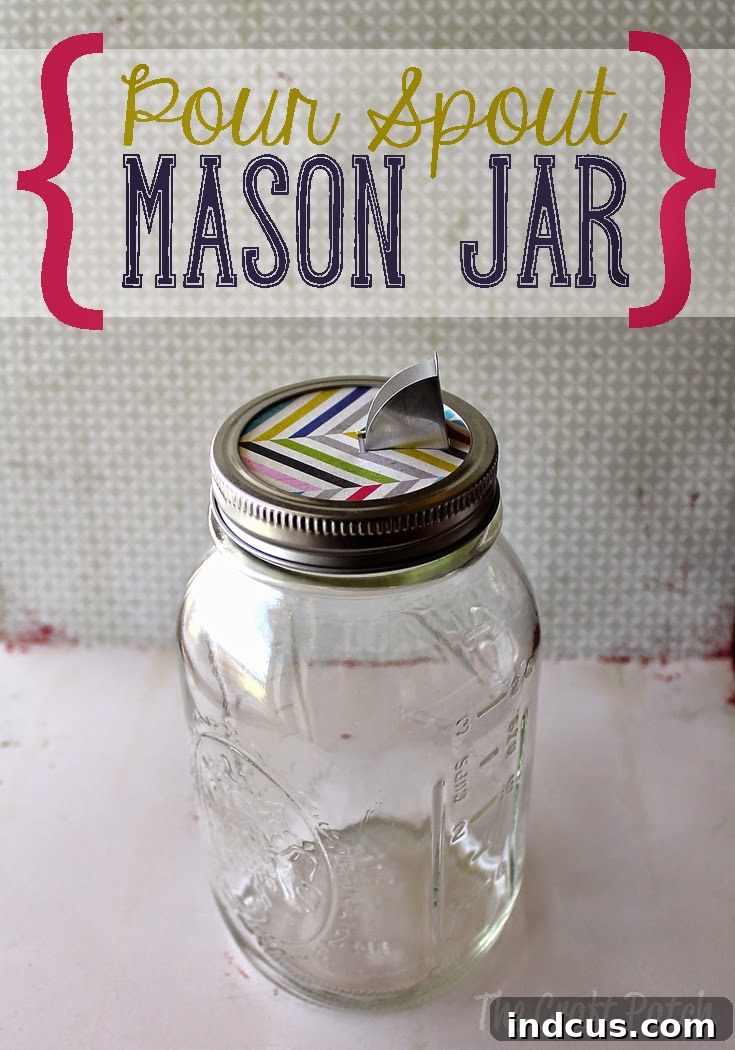
DIY Pour Spout Mason Jar: The Ultimate Guide to Stylish & Functional Kitchen Storage
In the world of home organization and charming kitchen aesthetics, some DIY projects simply stand the test of time. Today, we’re diving back into a beloved classic that first took the internet by storm on this very blog: the ingenious pour spout mason jar! This project isn’t just a craft; it’s a game-changer for anyone looking to add a touch of rustic elegance and unparalleled functionality to their pantry. Whether you’re a seasoned baker, a minimalist organizer, or simply someone who appreciates a tidy and beautiful kitchen, this easy-to-make pour spout jar is an absolute must-have. I recently found myself needing a fresh one, which presented the perfect opportunity to update our tutorial with even better pictures and more comprehensive instructions, ensuring your success from start to finish. Get ready to transform your kitchen staples into beautiful, accessible works of art!
Why Every Kitchen Needs a Pour Spout Mason Jar
Before we jump into the crafting fun, let’s talk about why this seemingly simple DIY project has garnered so much love over the years. It’s more than just “cute” – it’s a brilliantly functional solution that addresses several common kitchen dilemmas, all while embracing sustainable practices.
1. Elevate Your Pantry’s Style and Cohesion
Imagine opening your pantry doors to a perfectly organized, aesthetically pleasing display instead of a chaotic jumble of mismatched bags and bulky cartons. Traditional store-bought packaging for ingredients like sugar, salt, cornmeal, or even baking powder can be unsightly, taking away from an otherwise organized space. Our DIY pour spout mason jars replace these unattractive containers with uniform, clear glass jars that instantly bring a sense of calm and order. The transparent glass allows you to easily see your ingredients at a glance, while the rustic charm of mason jars, coupled with your personalized pour spout, adds a touch of farmhouse chic or modern minimalist elegance to any kitchen décor. It’s a simple change that makes a dramatic visual impact, transforming your kitchen from drab to fab with minimal effort.
2. Effortless Organization and Spill-Free Measuring
Beyond aesthetics, the practical benefits of these jars are undeniable. The integrated pour spout — ingeniously repurposed from an everyday item — makes measuring and dispensing dry ingredients incredibly easy and mess-free. No more wrestling with flimsy bags or scooping out of wide-mouthed containers only to spill half the contents on your countertop. With a pour spout, you can precisely control the flow of ingredients directly into your measuring spoons or cups, significantly reducing waste and cleaning time. This functionality is particularly invaluable for frequently used items like sugar for your coffee, salt for cooking, or baking soda for those impromptu baking sessions. It simplifies your cooking process, making your kitchen more efficient and genuinely more enjoyable.
3. An Eco-Friendly & Sustainable Kitchen Solution
One of the most appealing aspects of this project is its commitment to sustainability. By upcycling an empty salt container and repurposing a standard mason jar, you’re actively reducing household waste. Instead of tossing perfectly good materials into the landfill, you’re giving them a second life as a beautiful and incredibly useful kitchen essential. This DIY encourages a more mindful approach to consumption and promotes the idea that creativity can lead to environmentally conscious solutions right in your own home. It’s a small but significant step towards a greener kitchen, demonstrating that practical sustainability can also be wonderfully stylish.
4. Unmatched Versatility for Various Dry Ingredients
While often celebrated for baking ingredients, the utility of these pour spout jars extends far beyond. Their clear design and easy access make them incredibly adaptable to your specific needs, helping you maintain order throughout your home. They are perfect for storing a wide array of dry goods, including:
- Baking Essentials: Granulated sugar, brown sugar, salt, baking soda, baking powder, yeast, cornmeal, cocoa powder, colorful sprinkles, and chocolate chips.
- Breakfast Boosters: Granola, rolled oats, flax seeds, chia seeds, chopped nuts, and various dried fruit bits.
- Spice Rack Heroes: Larger spices, dried herbs, and frequently used seasoning blends for everyday cooking.
- Pantry Staples: Lentils, small pasta shapes (like orzo or ditalini), dried beans, and rice (for controlled pouring into pots or measuring cups).
- Beyond the Kitchen: Don’t limit yourself! These versatile jars can also store craft supplies like glitter, beads, small buttons, or even decorative sand for terrariums, keeping tiny items organized and accessible.
Gather Your Materials: What You’ll Need
Ready to create your own? The beauty of this project lies in its simplicity and the ingenious use of readily available materials. You likely have most of what you need already!
Here’s a detailed list of what you’ll need to gather:
- 1 Empty Mason Jar: Standard mouth jars (pint or quart size work best depending on the ingredient volume) are ideal. Ensure it’s thoroughly clean and completely dry before use.
- 1 Empty Salt Container (with a pour spout lid): Look for the cardboard container that features a plastic flip-top pour spout. Brands like Morton Salt are perfect examples. Clean and dry the container completely.
- Sharp Scissors or Craft Knife: Essential for making precise and clean cuts through cardboard. A craft knife is excellent for detailed work.
- Pen or Marker: For accurately tracing shapes onto your cardboard.
- Strong Craft Adhesive: Options include hot glue (for quick drying and strong immediate bond), E6000, Gorilla Glue, or any robust all-purpose craft glue. Ensure it adheres well to both cardboard and any decorative paper you might use.
- Decorative Paper (Optional, but highly recommended): Scrapbook paper, pretty wrapping paper, contact paper, or even small fabric scraps. Choose something that complements your kitchen’s style!
- Ruler: Extremely helpful for achieving straight and even cuts, especially if you’re adding decorative paper.
Step-by-Step Tutorial: Crafting Your Pour Spout Mason Jar
Now for the fun part! Follow these simple, detailed steps to construct your stylish new kitchen organizers. Remember, precision and patience will yield the most professional and durable results.
Step 1: Prepare the Pour Spout Component from the Salt Container
Begin by carefully cutting the top section off your empty salt container. You’ll want to aim for the portion that includes the plastic pour spout mechanism and extends slightly beyond it, creating a small “collar” of cardboard. Next, take a canning lid (specifically the flat, circular metal disc part of your mason jar lid, *not* the outer metal screw band) and place it onto the cardboard base of the salt container’s top. Use your pen or marker to meticulously trace around the canning lid onto the cardboard. Once traced, carefully cut out the cardboard circle. The goal here is to create a sturdy cardboard disc that fits perfectly inside the metal screw band of your mason jar, with the pour spout firmly attached. Ensure your cuts are as clean and smooth as possible for a professional and seamless finish.
Step 2: Personalize Your Lid with Decorative Paper (Optional)
This is where your creativity truly shines! If you choose to add decorative paper – and we highly recommend it for that extra touch of charm – now is the time to prepare it. Measure the circumference and height of the cardboard collar you just cut, and cut a strip of your chosen decorative paper to size. You might also want to cut a circular piece of paper to cover the very top of the cardboard disc for an even more polished and finished look. Don’t be afraid to experiment with vibrant patterns, soothing colors, or even interesting textures like fabric scraps to perfectly match your existing kitchen décor or to add a delightful pop of personality. For a truly seamless and professional appearance, consider wrapping the paper tightly and smoothly around the cardboard collar.
Step 3: Secure the Decorative Paper to the Cardboard Base
Apply your chosen strong craft adhesive evenly to the back of your decorative paper strips. Carefully position and wrap them around the cardboard collar, ensuring there are no unsightly air bubbles or wrinkles. If you’ve prepared a circular piece for the top, glue that down as well, aligning it perfectly. Press firmly to secure the paper in place and allow ample drying time according to your adhesive’s specific instructions. While a hot glue gun offers immediate adhesion, a strong liquid craft glue will typically provide a more durable and long-lasting bond. This step is crucial for transforming a simple repurposed item into a stylish, custom kitchen accessory that reflects your unique taste.
Step 4: Assemble Your New Pour Spout Lid onto the Mason Jar
Once your glue has fully dried and all decorative elements are firmly in place, it’s time to bring your functional masterpiece to life. Take the metal screw band from your mason jar. Carefully place your newly crafted cardboard pour spout lid (with the pour spout clearly pointing upwards, ready for action) inside the metal screw band. Then, simply screw the entire assembly onto your mason jar, just as you would with a regular canning lid. Make sure it’s screwed on tightly and securely to ensure a snug fit, which is essential for preventing any accidental spills or moisture from affecting your ingredients. Test the spout mechanism to ensure it opens and closes smoothly, ready for easy dispensing. You’ve done it!
Congratulations! You’ve successfully created your very own, incredibly useful, and utterly adorable pour spout mason jar. Now for the exciting part…
What to Store in Your New Pour Spout Jars
The possibilities are vast, limited only by your imagination and the types of dry ingredients you typically use in your home. These jars are not just for baking; they are wonderfully versatile!
- The Baking Duo: Keep granulated sugar and finely ground salt handy for all your baking adventures and cooking needs.
- Seasoning Saviors: Perfect for large-grain salt (like kosher or sea salt), baking soda for cooking and cleaning, or even nutritional yeast.
- Breakfast Favorites: Easily dispense oats, your favorite granola blend, or even homemade pancake or waffle mix for quick morning meals.
- Small Snacks & Toppings: Store chocolate chips, colorful sprinkles, various nuts, or even your favorite trail mix components for quick grabs and dessert decorating.
- Craft Corner Companions: Beyond the kitchen, these jars are fantastic for organizing and dispensing fine glitter, small beads, tiny buttons, or other minute craft supplies that require controlled pouring.
- Health Boosters: Keep chia seeds, flax seeds, or other powdered superfood supplements easily accessible for smoothies and recipes.
Pro Tips for Maximizing Your Pour Spout Mason Jars
To ensure your pour spout jars are as functional, long-lasting, and aesthetically pleasing as possible, consider these additional tips and creative ideas:
- Labeling is Absolutely Key: While the clear glass allows you to see the contents, a clear and durable label is essential, especially for similar-looking ingredients like granulated sugar and salt, or baking soda and baking powder. Use chalkboard labels for a rustic touch, printable labels for a uniform look, or even a permanent marker directly on the glass or decorative paper.
- Consider Different Jar Sizes: Optimize your storage by using pint-sized jars for frequently used, smaller quantities (like yeast, spices, or sprinkles) and quart-sized jars for larger, bulkier items (like granulated sugar, cornmeal, or oats). This creates a versatile and efficient storage system.
- Ensure a Tight Seal: The metal screw band should always be screwed on tightly. A secure fit is crucial for preventing moisture and air from getting in, which can compromise the freshness and shelf life of your dry ingredients. Periodically check that the band remains snug.
- Get Creative with Decorating: Don’t feel limited to just paper! You can paint the cardboard collar (ensure it’s food-safe paint if directly touching ingredients), wrap it with natural twine or colorful ribbon, or even use fabric scraps to perfectly match your kitchen’s specific theme or seasonal decor.
- Fantastic Gift Ideas: These handmade pour spout jars make incredibly thoughtful and personal gifts! Fill them with homemade spice blends, gourmet flavored salts, a custom baking mix, or even a delightful hot cocoa mix. Tie a pretty ribbon around them for a charming and practical present that shows you care.
- Cleaning and Care: The glass jar itself can be safely washed in the dishwasher or by hand as usual. For the cardboard lid with the pour spout, gently wipe it clean with a damp cloth or sponge. Avoid submerging the cardboard lid in water, especially if you’ve used paper or fabric decorations, to preserve its integrity and prevent damage to the adhesive.
Final Thoughts: Transform Your Kitchen Today!
The DIY pour spout mason jar is a testament to how a simple, ingenious idea can profoundly impact your daily routine and kitchen environment. It’s an incredibly satisfying project that offers a perfect blend of style, undeniable functionality, and admirable sustainability. Say goodbye to cluttered cupboards, frustrating messy spills, and uninspiring store-bought packaging. Embrace the rustic charm and practical elegance of these handmade organizers, and enjoy the beauty of a kitchen that not only works hard but also looks effortlessly coordinated and inviting.
So, gather your materials, unleash your inner crafter, and get ready to enjoy a more organized, beautiful, and efficient kitchen. Three cheers for prettier baking ingredients, a tidier pantry, and a happier, more inspired cooking experience!







