
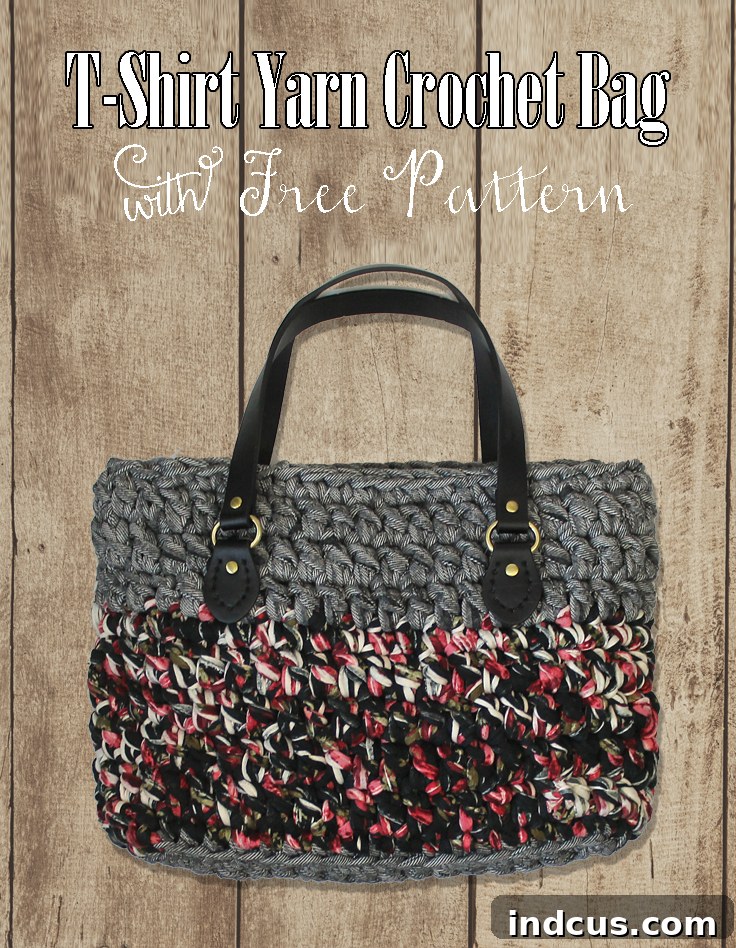
Master the Art of Crocheting a Stylish T-Shirt Yarn Purse: Your Ultimate Free Pattern Guide
Welcome, fellow craft enthusiasts, to a delightful journey into the world of chunky crochet! If you’ve been searching for a rewarding project that combines style, practicality, and the unique texture of t-shirt yarn, you’ve landed in the perfect spot. Today, we’re thrilled to share an incredibly fun and absolutely free crochet pattern for creating your very own chic and sturdy bag. This particular design features a vibrant two-color combination of t-shirt yarn, beautifully complemented by elegant faux leather handles, making it a true statement piece for any outfit.
We absolutely fell head over heels for t-shirt yarn while bringing this project to life! Its substantial weight and unique texture lend themselves perfectly to creating durable and visually appealing accessories like this purse. It works up quickly, offering instant gratification, and the resulting fabric is wonderfully robust, ideal for a bag that will see a lot of use. Once you experience the joy of crocheting with this versatile material, you’ll be eager to explore its endless possibilities for future creations. Whether you’re a seasoned crocheter looking for a quick and satisfying make or a beginner ready to tackle your first bag, this pattern promises an enjoyable experience and a stunning finished product.
Are you ready to dive in and create your own fabulous t-shirt yarn purse? Let’s gather our supplies and unleash our creativity!
Essential Tools & Materials for Your T-Shirt Yarn Purse
Before we begin our exciting crochet adventure, it’s crucial to have all your materials ready. The right supplies can make all the difference in the success and enjoyment of your project. Here’s a detailed look at what you’ll need:
- 2 skeins Lion Brand Fettuccine Yarn: This chunky t-shirt yarn is the star of our project. It comes in a fantastic array of colors and patterns, offering a unique texture that’s perfect for sturdy bags.
- Size N (10mm) crochet hook: A large hook is essential for working with chunky t-shirt yarn, ensuring your stitches are loose enough to prevent hand strain and create a beautiful drape.
- 2 faux leather purse handles: These handles add a professional and polished finish to your handmade bag.
- Black thread and a large needle: You’ll need these for securely attaching the faux leather handles.
Unveiling the Magic of Fettuccine Yarn
Let’s take a moment to discuss the unique characteristics of Lion Brand Fettuccine Yarn. Unlike conventional yarns, Fettuccine is crafted from fabric remnants, meaning each ball boasts its own distinct charm and character. This artisanal quality means you won’t always find consistent colors or patterns on the shelves, making each skein a delightful discovery. Part of the fun is hunting for the perfect combination! I recall spending months keeping an eye out for just the right skeins, and when I stumbled upon the two complementary colors used in this project, I knew they were meant to be together.
While other brands of t-shirt yarn (which you might find at craft stores like Hobby Lobby) may offer more uniform coloring, they often lack the unique prints and textures that make Fettuccine so special. The variability of Fettuccine adds a wonderful, one-of-a-kind element to your finished purse, ensuring your creation is truly unique. If Fettuccine isn’t available, don’t fret! Any chunky t-shirt yarn will work, just be sure to check your gauge to maintain the intended size and structure of the bag.
Sourcing the Perfect Purse Handles
When it comes to finding the ideal faux leather purse handles, my top recommendation is to head straight to Joann. From my experience, Joann consistently offers the widest and most diverse selection of purse handles compared to other craft stores. You’ll find a variety of styles, colors, and sizes, giving you ample choice to personalize your bag. Save yourself the hassle of running around to multiple stores – start with Joann, and you’re likely to find exactly what you need. Opting for faux leather not only provides a sophisticated look but is also a cruelty-free and often more affordable option.
Now that we’ve covered the supplies in detail, let’s move on to the exciting part: the crochet pattern! First, I’ll guide you through the step-by-step instructions with accompanying photos to illustrate each stage. Following this visual tutorial, I’ll provide the complete, concise pattern summary at the bottom of the post, perfect for printing out and keeping handy while you work.
Step-by-Step Crochet Purse Pattern: Visual Guide
This pattern uses basic crochet stitches – the chain (ch), single crochet (SC), and slip stitch (sl st) – making it accessible for confident beginners and enjoyable for experienced crocheters. We’ll be working the base in rows and then transitioning to rounds for the body of the bag, creating a seamless and sturdy structure.
Starting the Base: The Foundation Chain (Yarn A)
To begin, we’ll create the foundation of our bag using Yarn A (in this specific example, a lovely gray shade). A firm foundation is key to a well-structured bag.
Step 1: Using Yarn A, chain 15 stitches. This chain forms the initial length of your purse’s base. Ensure your chains are not too tight, as you’ll be working into them in the next step. Turn your work.
Building the Flat Base
Now we’ll establish the flat rectangular base of the bag, working back and forth in rows.
Step 2: In the second chain from your hook, single crochet (SC) across all remaining chains. You should have 14 single crochet stitches. This creates your first row.
Step 3: Chain 1. Turn your work. The chain 1 acts as a turning chain and does not count as a stitch.
Step 4: In the second chain from the hook (which is actually the first SC of the previous row), single crochet across all stitches. You should again have 14 single crochet stitches.
Step 5: Chain 1. Turn your work. This completes the flat portion of your bag base. You now have a small rectangle.
Shaping the Corners and Working in the Round
This is where we transition from a flat rectangle to the three-dimensional base of the bag, allowing us to work upwards in continuous rounds.
Step 6: Single crochet across the current row. Once you reach the very last stitch of the row, work 3 single crochets into that same last space. This cluster of stitches begins to create the rounded corner of your bag.
Step 7: Now, you’ll work along the short edge of the rectangle. Single crochet 2 stitches along this short edge. This helps to maintain the shape as you turn.
Step 8: Work 3 single crochets in the next corner space to round out the other short edge. From this point onward, you will continue working in continuous rounds, spiraling upwards, instead of turning your work at the end of each row.
Step 9: Single crochet across the long edge of the base. This should align with your initial chain stitches.
Step 10: Work 3 single crochets in the next corner, just as you did before, to form the third rounded corner.
Step 11: Single crochet across the remaining short edge. Finish this round by working 3 single crochets in the last corner. Connect to the very beginning of this round with a slip stitch. Congratulations! The sturdy base of your bag is now complete and ready to build upon.
Establishing the Bag’s Body (Yarn B)
Now comes the exciting part of adding color and height to your bag! We’ll introduce Yarn B (the floral pattern in the original example) and employ a specific technique to create a defined edge.
Step 12: Change to Yarn B. To create a crisp ridge that helps the bottom of the bag sit flat and provides a clear transition to the sides, single crochet in the back loop only (BLO) all the way around the entire perimeter of the bag. This technique involves inserting your hook into only the loop furthest from you, rather than both loops, creating a distinctive horizontal line. After this initial round, continue to single crochet normally (through both loops) for a total of five rounds with Yarn B, or until you are close to running out of this skein. The number of rounds can be adjusted based on your desired bag height and yarn quantity.
Finishing the Top Edge (Yarn A)
To complete the body of the bag and prepare for handle attachment, we’ll switch back to Yarn A and create a clean, finished top edge.
Step 13: Switch back to Yarn A. Single crochet four more rounds to create a contrasting border at the top of your bag. This also adds extra stability. After these four rounds, work one final round of slip stitches around the very top edge. This slip stitch border creates a neat, firm finish, giving your bag a professional look. Fasten off your yarn, leaving a tail long enough to weave in securely.
Attaching the Faux Leather Handles
The handles are not just functional; they are a crucial design element that elevates the entire look of your crochet purse. Proper attachment ensures both durability and aesthetics.
Step 14: Position your faux leather handles on the inside top edge of the bag, ensuring they are evenly spaced and centered. I found the most effective way to attach the handles securely is a two-step process: first, temporarily tack them in place with a small dab of hot glue. This prevents them from shifting while you sew. However, a crucial word of warning: do not rely solely on hot glue! Your handles *will* fall off with regular use – trust me on this one. For a truly durable attachment, stitch through the pre-drilled holes in the faux leather handles using a doubled-up strand of black thread and a large, sturdy needle. Sew through each hole multiple times for maximum security, pulling the thread tightly. Weave in any remaining thread tails on the inside of the bag to hide them.
Optional Finishing Touches: Lining Your Bag
While this chunky t-shirt yarn creates a dense fabric, some crafters might prefer to add an interior fabric liner for an even more polished look, extra structure, or to prevent small items from potentially slipping through the stitches. If your stitches are particularly tight, as mine were, a liner might not be strictly necessary. However, if you desire a truly “fancy” finish or anticipate carrying very small items, adding a simple fabric lining can be a wonderful touch. You can hand-stitch or machine-sew a simple rectangular liner to the inside, securing it along the top edge. For this project, I simply tucked in my yarn ends very well and left it as-is, embracing the rustic charm of the t-shirt yarn.
Isn’t the finished bag simply adorable? The contrasting colors and the elegant handles create a stunning piece that looks far more intricate than it is to make.
The best part about handmade items is the sense of accomplishment. I vividly remember my husband’s reaction: “You made that?!?” And I, with a knowing smile, replied, “Hello, Mr. Doubty Mustafa. Do you not know me at all? *Of course* I made it!” There’s nothing quite like the pride of creating something beautiful and functional with your own hands.
Pro Tips for Crocheting with Chunky T-Shirt Yarn
Working with t-shirt yarn, especially chunky varieties, offers a unique experience. Here are some extra tips to ensure your project is a success:
- Tension is Key: T-shirt yarn doesn’t have the same elasticity as traditional yarns. It’s crucial to maintain a consistent, relaxed tension. Too tight, and your hands will ache, and the fabric will be stiff. Too loose, and your bag might lack structure. Practice a few stitches to find your sweet spot.
- Yarn Variability: As mentioned, t-shirt yarn can vary in thickness even within the same skein or brand. Don’t be surprised if you encounter slight differences. Embrace them as part of the unique charm of your handmade item. If the thickness changes significantly, you might adjust your hook size slightly to maintain gauge.
- Ergonomic Hooks: Because t-shirt yarn requires a bit more effort to pull through stitches, consider using a crochet hook with an ergonomic handle. This can significantly reduce hand fatigue, especially on larger projects like bags.
- Counting Stitches: Even for simple patterns, regular stitch counting is your best friend. It helps prevent uneven edges and ensures your bag grows symmetrically. Place a stitch marker at the beginning of each round when working in the round.
- Weaving in Ends: T-shirt yarn ends can be bulky. When weaving them in, try to split the plies (if possible) or weave them through the inside of the stitches for a less noticeable finish. A larger tapestry needle will be very helpful here.
- Care for Your Bag: T-shirt yarn bags are generally quite durable. For cleaning, spot cleaning is usually best. If a full wash is needed, hand wash in cold water with mild detergent, reshape, and lay flat to dry to prevent stretching. Always check the yarn label for specific care instructions.
Full Printable T-Shirt Yarn Crochet Bag Pattern Summary
For those who prefer a concise, printable version of the pattern, here is a complete summary. This condensed version outlines all the essential steps without the detailed explanations, perfect for reference while you crochet.
T-Shirt Yarn Crochet Bag Pattern
This pattern creates a sturdy and stylish purse using chunky t-shirt yarn. Finished size is approximately 9″ by 14″.
Materials:
- 2 skeins Lion Brand Fettuccine Yarn (or similar chunky t-shirt yarn, one for main color ‘A’, one for accent color ‘B’)
- Size N (10mm) crochet hook
- 2 faux leather purse handles
- Black thread and large needle
Instructions:
- Foundation & Base Rows (Yarn A):
- Row 1: Using Yarn A, chain 15. Single crochet (SC) in the second chain from the hook and in each remaining chain to the end. (14 SC). Chain 1. Turn.
- Rows 2-3: SC in each stitch across. (14 SC). Chain 1. Turn.
- Shaping the Base & Working in Rounds (Yarn A):
- SC in each stitch across the last row. In the very last stitch, work 3 SC. Do NOT turn.
- Continue working along the side edge: SC 2 stitches along the short edge.
- Work 3 SC in the next corner space.
- SC across the next long edge (opposite your starting chain).
- Work 3 SC in the next corner space.
- SC 2 stitches along the last short edge.
- Work 3 SC in the final corner space.
- Slip stitch to connect to the beginning of this round. The bottom of your bag is now complete.
- Body of the Bag (Yarn B):
- Switch to Yarn B. SC in the back loop only (BLO) all the way around for the first round. This creates a defined ridge.
- Continue to SC in both loops around for an additional 4 rounds (total of 5 rounds with Yarn B), or until desired height/yarn is almost used up.
- Top Edge (Yarn A):
- Switch back to Yarn A. SC in both loops around for 4 rounds.
- Work one final round of slip stitches around the top edge to create a neat finish.
- Fasten off and weave in all loose ends securely.
- Attach Purse Handles:
- Position handles evenly on the inside top edge of the bag.
- Temporarily tack handles in place with a small amount of hot glue (optional, but recommended for stability during sewing).
- Securely stitch through the holes of the faux leather handles using doubled-up black thread and a large needle. Ensure handles are firmly attached.
Conclusion: Your Handmade Masterpiece Awaits!
Congratulations! You’ve just completed a truly beautiful and functional crochet purse using chunky t-shirt yarn. This project is a testament to the joy of handmade crafts – not only have you created a stylish accessory, but you’ve also honed your crochet skills and experienced the unique pleasure of working with an unconventional material. From the satisfying weight of the t-shirt yarn to the chic touch of the faux leather handles, every element comes together to form a piece you’ll be proud to carry.
This pattern is designed to be straightforward and rewarding, even for those new to bag making. The chunky yarn works up quickly, offering a fulfilling experience with a tangible result. Whether you’ve made it for yourself or as a thoughtful gift, your new t-shirt yarn purse is sure to turn heads and spark conversations.
We encourage you to share your finished creations with us! Seeing your unique color combinations and personal touches is always an inspiration. Don’t hesitate to explore other projects with t-shirt yarn – its versatility is truly amazing. Happy crocheting!







