
Transforming Dingy Canvas Bins: A Budget-Friendly DIY Storage Makeover Guide
Every now and then, a project comes along that sparks an undeniable thrill, making my creative spirit truly giddy. Today, I’m absolutely delighted to share one of those deeply satisfying transformations with you. It’s a testament to how a little imagination and a splash of paint can breathe new life into seemingly worn-out items, turning them into personalized treasures. This journey began with a simple yard sale find, and it evolved into a brilliant solution for practical, stylish craft room storage, proving that upcycling isn’t just eco-friendly – it’s incredibly fun and rewarding!
The Humble Beginnings: A Yard Sale Treasure Hunt
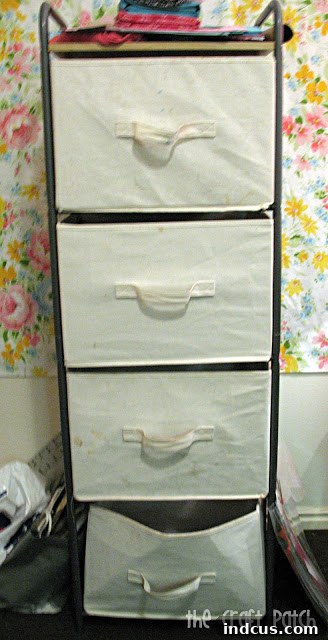
My adventure began with a fantastic bargain: a four-cubby shelf complete with four canvas bins, purchased for an astonishingly low price at a local yard sale. I immediately envisioned it as the perfect organizational solution for my bustling craft room. The thought of neatly tucking away supplies, fabrics, and tools into these bins filled me with excitement. It felt like a blank canvas, waiting for a personal touch to make it truly mine, even if that touch wasn’t immediately clear.
While the shelf itself was in good condition, the canvas bins were, admittedly, a bit worse for wear. They were more than “a little dingy” – perhaps “a lot dingy” would be a more accurate description. However, seeing past the grime is often part of the upcycling magic, isn’t it? I optimistically believed a good wash would restore them to their former glory, ready to serve as charming and functional storage.
The Unexpected Hurdle: Cardboard Concerns and DIY Dilemmas
My initial optimism quickly faced a common DIY challenge. After happily bringing my whopping $3 purchase home, the reality of the bins’ construction set in. Upon closer inspection, I realized the interior supports of the canvas bins were made of cardboard. This presented a significant problem for my planned wash-and-refresh strategy. Water and cardboard are not friends, and soaking them would undoubtedly lead to warped, ruined bins. Doh! It was a classic case of excitement overshadowing practical inspection.
I found myself at a crossroads, pondering alternative solutions. My mind immediately jumped to the idea of a complete overhaul: carefully dismantling the bins, using the old cardboard as templates, and sewing entirely new canvas covers. This seemed like a viable, albeit labor-intensive, path. The thought of measuring, cutting, and stitching four new bins, however, quickly deflated my enthusiasm. It sounded like a considerable amount of work, far more than I was willing to commit to for a $3 yard sale find. I wanted a quick, satisfying win, not a lengthy sewing marathon. The bins sat, waiting for inspiration to strike, challenging me to find a simpler, more elegant solution to their dingy predicament.
A Midnight Spark: The Painting Revelation
As is often the case with creative breakthroughs, the perfect solution arrived when I least expected it. One night, around 1:00 AM, I suddenly woke up with a brilliant, crystal-clear idea. (Yes, I know, my brain works in mysterious ways, especially in the wee hours of the morning!) It was one of those “aha!” moments that make you want to jump out of bed and start creating immediately. The answer was so simple, yet it had completely eluded me during my earlier brainstorming sessions: PAINT!
Why hadn’t I thought of it sooner? The bins couldn’t be washed, but they could absolutely be painted. This wasn’t just about covering up the stains; it was about giving these tired, worn-out canvas bins a complete transformation, a vibrant new identity. The idea ignited a renewed sense of excitement and possibility. I could paint those dirty bins, cover the imperfections, and infuse them with personality, breathing a whole new life into them without any complicated sewing or deconstruction. The project suddenly shifted from a chore to an exhilarating artistic endeavor. The potential for personalization and creative expression was boundless!
The anticipation of seeing my vision come to life was almost overwhelming. What do you think of the transformation? The results, I believe, speak for themselves, showcasing the power of a simple, imaginative DIY approach.
The Creative Process: Bringing Canvas Bins to Life with Paint
The actual painting process was surprisingly straightforward and incredibly enjoyable, especially fueled by my newfound giddiness. There’s something immensely satisfying about taking a simple craft material and transforming it with your own hands. The ease of this project made the creative journey even more delightful, and I couldn’t help but feel an almost childish excitement with every stroke of the brush. It was a testament to how accessible and rewarding DIY painting can be, even for those who might not consider themselves seasoned artists.
Step-by-Step DIY Canvas Bin Painting Guide
Creating these personalized storage bins was a simple, yet impactful, DIY project. Here’s a detailed breakdown of the steps I followed to bring my vision to life:
- Preparation (Minimal but Important): Since the bins couldn’t be thoroughly washed due to the cardboard, I focused on a light surface cleaning. I gently wiped down each bin with a slightly damp cloth to remove any loose dirt or dust, being careful not to saturate the fabric. Allowing them to air dry completely was crucial before moving on to the next step. This minimal prep ensures the paint adheres well without causing any moisture damage to the cardboard interior.
- Design Conceptualization & Sketching: This is where the fun truly begins! I spent a little time considering what kind of designs would best suit my craft room and inspire me. Simple geometric patterns, abstract shapes, or even stylized floral motifs are all great options. Once I had a clear idea, I lightly penciled the designs directly onto the canvas fabric. Using a pencil allows for easy corrections and ensures your lines are exactly where you want them before committing with paint. Don’t be afraid to experiment with different patterns on scrap fabric if you’re unsure.
- Choosing Your Paint & Tools: The beauty of this project lies in its simplicity. I used regular old acrylic craft paint, which is readily available and very affordable. You can find an entire aisle dedicated to it at craft stores like Michaels and Hobby Lobby, offering a rainbow of colors to choose from. For tools, I gathered a selection of brushes: a few flat brushes for larger areas and finer detail brushes for precise lines. A palette (an old plate or plastic lid works perfectly) and a cup of water for rinsing brushes completed my setup.
- The Painting Process: With my designs sketched and paints ready, I began filling in the outlines. Acrylic paint dries relatively quickly, which is a huge advantage for projects like this. I applied the paint in thin, even coats, allowing each layer to dry before adding another, especially for areas where I wanted a more opaque finish. If you make a small mistake, a slightly damp brush can often lift fresh acrylic paint, or you can simply paint over it once dry. The key is to enjoy the process and not strive for absolute perfection; the charm of hand-painted items often lies in their unique character.
- Sealing (Optional but Recommended): For added durability and to protect your beautiful designs from wear and tear, especially if the bins will be handled frequently, consider applying a clear sealant. A spray-on clear acrylic sealer (matte or gloss, depending on your preference) or a brush-on fabric medium mixed with a clear topcoat can work wonders. This step helps to lock in the colors and provide a protective layer, ensuring your personalized bins stand the test of time.
The Stunning Transformation: Before & After Reveal
The transformation was nothing short of miraculous. From dingy, disheartening storage solutions, my canvas bins emerged vibrant, personalized, and utterly cheerful. The simple act of painting not only salvaged them but elevated them into statement pieces that reflect my style and bring joy to my creative space. The comparison truly highlights the incredible power of a DIY makeover, proving that potential often lies hidden beneath a layer of wear and tear.
I absolutely adore how they turned out. Each bin now tells a story, adorned with designs that make me genuinely happy every time I look at them. They’ve gone from being a functional necessity to an inspiring element in my craft room, encouraging me to keep creating and surrounding myself with beauty. It’s a fantastic reminder that even the smallest DIY projects can have a huge impact on your environment and your mood.
Why Choose Acrylic Craft Paint for Your DIY Projects?
Acrylic craft paint is a DIY enthusiast’s best friend for many reasons, making it the ideal choice for projects like this canvas bin makeover:
- Affordability: It’s incredibly budget-friendly, allowing you to experiment with a wide range of colors without breaking the bank.
- Vast Color Range: Available in virtually every shade imaginable, you’ll always find the perfect color to match your vision.
- Ease of Use: Acrylics are forgiving and easy to work with, even for beginners. They blend well and can be layered for different effects.
- Quick Drying Time: Their fast-drying nature means you can apply multiple coats or switch colors relatively quickly, speeding up your project.
- Water-Soluble Cleanup: While wet, acrylics clean up easily with soap and water, making brush care and accidental spills less of a hassle.
- Versatility: They adhere well to a variety of surfaces, including fabric, wood, paper, and even some plastics, making them perfect for countless craft projects.
- Accessibility: Found in almost any craft store, discount store, or even major retailers, they are always within reach.
Beyond Bins: Other Creative Uses for Painted Canvas
The success of this canvas bin project truly opens up a world of possibilities for using paint on fabric. Once you realize how easy and effective it is, you’ll start seeing potential transformations everywhere! Here are just a few ideas for other items you can similarly upcycle with acrylic craft paint:
- Old Storage Boxes: Give plain cardboard or fabric-covered boxes a fresh, designer look.
- Laundry Hampers: Customize drab laundry hampers with playful patterns or monograms.
- Plain Tote Bags: Transform a simple canvas tote into a personalized shopping bag or gift for a friend.
- Fabric Wall Art: Paint directly onto stretched canvas or a piece of sturdy fabric for unique, custom artwork.
- Throw Pillows: Add hand-painted details to solid-colored pillow covers for a custom touch (ensure to use fabric medium if washing will be frequent).
- Placemats or Table Runners: Create custom dining accessories that match your decor.
- Footstools or Ottomans: If they have a canvas or sturdy fabric cover, a fresh coat of paint can revive them.
Don’t limit yourself! Look around your home for items that could benefit from a splash of color and a touch of your personal creativity. The possibilities are truly endless, allowing you to bring cohesive style and personality to every corner of your home.
Tips for a Successful Canvas Painting Project
To ensure your canvas painting endeavors are as successful and enjoyable as mine, here are a few additional tips:
- Start Small: If you’re new to fabric painting, begin with a smaller project or a simpler design to build confidence.
- Work in a Well-Ventilated Area: Although craft acrylics are generally low odor, good ventilation is always a good idea.
- Protect Your Workspace: Lay down newspaper, a drop cloth, or old cardboard to protect your surfaces from paint spills.
- Allow Ample Drying Time: While acrylics dry quickly to the touch, it’s best to allow items to cure fully (often 24-72 hours) before heavy use or stacking, especially if you apply a sealant.
- Don’t Be Afraid to Experiment: Play with colors, patterns, and brushstrokes. The beauty of DIY is that it doesn’t have to be perfect.
- Embrace Imperfections: Hand-painted items have a charm that machine-made ones often lack. A slight wobble in a line or an unexpected blend of color adds character.
- Consider Stencils: For intricate designs or if freehand drawing isn’t your forte, stencils are a fantastic tool to achieve professional-looking results.
This project proves that with a little creativity and minimal investment, you can transform everyday items into functional works of art. My once-dingy canvas bins are now cheerful, inspiring pieces that brighten my craft room and remind me of the joy of creating. I hope this detailed guide inspires you to look at your own “tired” items with fresh eyes and embark on your own satisfying DIY adventure. Go ahead, unleash your inner artist, and paint your way to a more vibrant and personalized home!







