Transform Your Rental Kids’ Room with a Vibrant DIY Hexagon Wall Treatment: No Paint Needed!
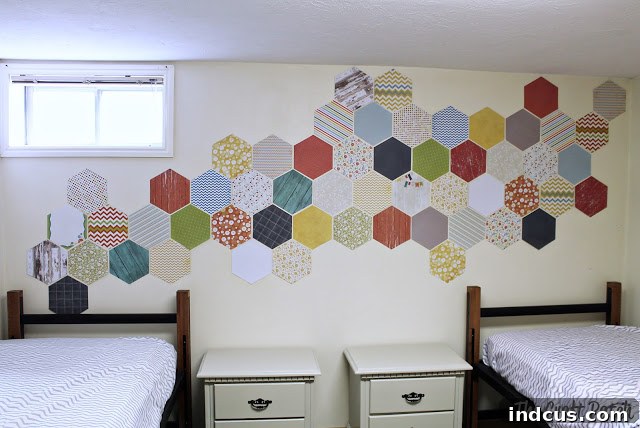
Yesterday, I offered a glimpse into the cheerful transformation of our kids’ bedroom, showcasing the custom-painted nightstands that now add a pop of personality. Today, I’m thrilled to unveil the full centerpiece of this room makeover: an exciting and wonderfully geometric wall treatment that completely redefines the space. Get ready to discover how we brought vibrant energy to a challenging room, proving that stunning decor is entirely possible, even in a rental. This project tackles common rental restrictions head-on, offering an imaginative solution for adding color and character without a single drop of paint. Dive in to see the full “shuh-bang”!
The Rental Decor Challenge: Brightening a Dark Basement Bedroom
Living in a rental home often comes with a unique set of decorating hurdles. For us, the biggest challenge lay in the kids’ bedroom, located in the basement. This space features just one small window, meaning natural light is a precious commodity, often leaving the room feeling dim and uninviting. The primary restriction, however, was the universal “no painting” rule, a common dictate in rental agreements. This meant traditional methods of brightening and personalizing the walls were off-limits. We were faced with plain, stark white walls that, while neat, offered zero warmth or character. The goal was clear: infuse this otherwise dull and dark space with cheerful colors and playful design, much like the creative solutions I had to devise for our nursery.
The quest for suitable rental-friendly decor often leads to a search for temporary, non-damaging solutions that can be removed without leaving a trace. This constraint pushed me to think outside the box, beyond mere wall art, towards a more immersive and impactful wall treatment. How could I make a significant visual statement that was reversible, budget-friendly, and truly transformative? The answer needed to be bold, energetic, and perfectly suited for a kids’ space, turning a perceived disadvantage (the lack of paint) into an opportunity for creative ingenuity. This project wasn’t just about decoration; it was about crafting an environment that fostered joy and imagination, even in a basement room.
Geometric Inspiration: Why Hexagons Are The Perfect Choice
As I pondered creative wall solutions, I couldn’t help but notice a recurring trend in modern design: hexagons. These six-sided wonders were popping up everywhere – from tiles and fabrics to furniture and wall art. Their unique geometric qualities immediately captivated me. Hexagons offer a fantastic blend of structure and organic flow, providing a dynamic visual interest that is both contemporary and timeless. Unlike simpler shapes, the hexagon introduces a fascinating complexity that can be arranged in countless ways, creating patterns that feel both ordered and playful.
Choosing hexagons for the kids’ room felt like a natural fit. Their bold lines and tessellating nature meant I could create a statement wall that was impactful without being overwhelming. The ability to choose different colors and arrange them in a free-form manner promised to inject the much-needed cheer and vibrancy into the otherwise stark white walls. This shape allowed for a flexible design that could grow and adapt, or be easily changed in the future, aligning perfectly with the temporary nature of rental decor. The geometric appeal also added a touch of sophisticated fun, ensuring the room felt stylish and age-appropriate for growing children. It was the perfect blend of modern aesthetics and playful design, ready to bring an exciting dimension to the kids’ personal space.
Gathering Your Affordable DIY Supplies
One of the most appealing aspects of this hexagon wall treatment is its incredible affordability. Achieving a high-impact design doesn’t require breaking the bank, which is always a bonus, especially for temporary rental decor. For this project, the shopping list was delightfully short and sweet:
- Paper Pack: I snagged a vibrant paper pack from Michael’s for just $10. These packs typically contain a variety of colored or patterned sheets, offering an instant palette to work with. The key is to find paper that is sturdy enough to hold its shape but not too thick, making it easy to cut. The diverse patterns and colors within the pack were perfect for creating a visually rich and engaging wall display that the kids would adore.
- Double Stick “Permanent” Tape: My initial choice was a roll of double-stick “permanent” tape from WalMart, an absolute steal at just $1. This seemed like a promising solution for its supposed strong hold and ease of application. However, as you’ll read later, “permanent” sometimes has a different meaning in the world of DIY, especially on painted rental walls!
This minimalist supply list underscores the project’s accessibility. You don’t need specialized tools or expensive materials to create a custom, eye-catching feature wall. The beauty of DIY lies in transforming simple, readily available items into something truly unique and personal. Before you head to the store, consider the overall color scheme of the room and choose a paper pack that complements or introduces a desired color palette. Think about variations in texture or pattern if you want to add another layer of visual interest. This budget-friendly approach ensures that anyone can tackle this project and bring a burst of color to their living space without financial strain.
The Cutting Process: Smart Templating for Efficiency
With supplies in hand, it was time for the most labor-intensive part of the project: cutting out all the individual hexagons. To ensure consistency and save time, I started by printing out a hexagon shape from my computer to serve as a master template. This allowed me to control the size and maintain uniformity across all the pieces.
A clever trick I employed to speed up the cutting process involved optimizing the template for the standard 8.5×11 inch paper sheets from my pack. I designed the hexagon template so that its two vertical sides aligned perfectly with the long edges of the paper. This simple adjustment meant I only had to cut four sides for each hexagon instead of six, significantly reducing the overall cutting time and effort. It might seem like a small detail, but when you’re cutting dozens, if not hundreds, of shapes, every saved cut adds up!
To ensure clean lines, I carefully traced the template onto each piece of colored paper using a pencil. For cutting, a sharp pair of scissors is essential. If you’re tackling a very large wall or prefer extra precision, an X-Acto knife and a cutting mat could also be used, but for this project, scissors worked perfectly fine. I recommend stacking a few sheets together and cutting them simultaneously if your scissors are strong enough and the paper isn’t too thick; this can further expedite the process, but always test on a scrap first to ensure clean cuts without slipping.
This phase requires a bit of patience and attention to detail, but seeing the growing pile of vibrant hexagons is incredibly satisfying and builds anticipation for the wall transformation. Each perfectly cut hexagon is a step closer to creating a dynamic and engaging feature wall for the kids.
The Learning Curve: Precision is Key for Straight Lines
Once all the hexagons were cut, the exciting part began: sticking them to the wall. I eagerly started applying the double-stick tape to the back of each shape and placing them on the wall, envisioning a beautifully aligned pattern. In my enthusiasm, I initially relied on my eye to guide the placement, convinced that I could maintain a straight line as I worked across the wall. It seemed straightforward enough at the beginning, aligning the first few hexagons with what appeared to be perfect precision.
However, as I continued to add more hexagons and the pattern expanded, a subtle, then increasingly obvious, problem emerged. What looked perfectly straight when I started quickly began to veer off course. My “eyeballed” lines became progressively crooked, creating an undeniable wonkiness in the overall design. The initial few rows might have looked acceptable, but as the deviation compounded, the entire wall treatment started to look uneven and messy. It was a classic case of an inch becoming a mile!
The realization hit me hard: I had to go back and painstakingly adjust every single hexagon I had already placed. This meant carefully peeling off the tape, realigning each piece, and re-sticking it, a process that was both time-consuming and slightly frustrating. The image below vividly illustrates just how far off the hexagons got before I intervened, a testament to the deceptive nature of relying solely on visual estimation.
This experience served as a crucial lesson in DIY wall decor. While creativity often thrives on spontaneity, certain aspects demand meticulous precision. Learning from this misstep was invaluable, and it’s a lesson I’m eager to share so you can avoid the same pitfall.
The Indispensable Tool: A Level is Your Best Friend
After the frustrating realization that my freehand approach was leading to a disaster, I paused, stepped back, and reached for an essential but often overlooked DIY tool: a level. It was a simple solution, yet it made all the difference. This invaluable lesson is one I’m passing on to you with full conviction:
Once I started using the level, my placement issues vanished. Each hexagon I placed after that was perfectly straight and aligned with the others. The lines were crisp, the pattern flowed beautifully, and the entire wall started to come together exactly as I had envisioned, but with professional precision. This simple tool eliminated all guesswork and frustration, turning a challenging task into a rewarding one.
So, here’s my cardinal rule for any wall-based DIY project: don’t try to eyeball it! Whether you’re hanging shelves, pictures, or intricate wall treatments like these hexagons, a level is your absolute best friend. It ensures that your hard work results in a polished, professional finish that you’ll be proud of. Invest in a good quality level, or even use a level app on your smartphone if you’re in a pinch. It will save you time, effort, and the agony of correcting crooked decor. This small step makes a monumental difference in the final aesthetic of your project, guaranteeing perfectly straight lines every single time.
Embracing the Free-Form Design
With the precision challenges behind me, I could focus entirely on the artistic aspect of the project. I decided against a rigid, grid-like pattern for the hexagons. Instead, I opted for a more organic, free-form design, letting the “hexies” appear to wander and flow across the wall. This choice was deliberate: a free-form arrangement offers a whimsical touch, perfectly suited for a kids’ room, and also provides a forgiving quality, as slight imperfections in spacing become part of the charm rather than glaring errors.
The free-form approach allowed me to create a dynamic visual narrative on the wall. Some clusters of hexagons are denser, while others are more sparse, creating a sense of movement and depth. The varied colors from the paper pack are interspersed, ensuring no single area feels monotonous. This spontaneous arrangement feels modern, playful, and adds an artistic flair that a strict pattern might not have achieved. It’s like a burst of colorful energy radiating across the room, transforming a blank canvas into a captivating focal point.
I am absolutely thrilled with how this free-form design turned out. It exceeded my expectations, injecting so much character and vibrancy into the room. The hexagons, with their bold geometric qualities, now create a sense of fun and modernity, making the basement bedroom feel significantly brighter and more inviting. This wall treatment has single-handedly elevated the entire aesthetic of the space, proving that even temporary, rental-friendly decor can make a powerful and lasting visual impact. It’s a testament to how creative choices, combined with a bit of DIY effort, can completely transform a room and bring a unique personality to it.
Looking Ahead: The Evolving Kids’ Room
While the hexagon wall treatment has made a dramatic impact, the kids’ room transformation is still a work in progress. Decorating is often an iterative process, especially when creating a layered and comfortable space. With the vibrant wall now serving as a stunning backdrop, I have several exciting projects lined up to complete the room’s cohesive design.
- Sewing New Bedding: Currently, the beds feature simple chevron white/grey sheets, which are merely placeholders. My next big task is to sew custom bedding that complements the colorful hexagons and ties into the overall playful yet serene aesthetic I envision for the room. This will involve selecting fabrics that add texture, pattern, and an extra layer of comfort, creating a cozy sanctuary for the kids.
- Styling the Nightstands: The freshly painted nightstands are ready, but their tops are still awaiting their final styling. This is where personality comes in! I plan to incorporate functional yet decorative elements such as small lamps for reading, perhaps some carefully chosen books, and a few cherished items or small toys that reflect each child’s interests. The goal is to make these surfaces both practical and visually appealing.
- Creating Artwork Holders: Kids’ rooms are vibrant spaces where creativity should be celebrated. I want to design and create something unique to hold their artwork – a place where their drawings and masterpieces can be proudly displayed and easily rotated. This could be a magnetic board, a gallery wire system, or a series of clipboards, ensuring their artistic expressions contribute to the room’s decor.
Each of these upcoming projects will build upon the foundation of the hexagon wall, adding layers of comfort, functionality, and personal touch. It’s incredibly satisfying to see the room starting to come together, piece by piece. The once plain white walls of this basement bedroom are now bursting with life and character, proving that with a little imagination and DIY spirit, you can absolutely conquer the decorating challenges of a rental space. Take that, plain white walls!
The Tape Dilemma: Seeking Permanent Solutions for Temporary Decor
**Update:** So, remember that double-stick “permanent” tape I was so enthusiastic about? Well, it turns out “permanent” is a rather subjective term, especially when it comes to adhering paper to rental walls! We’ve had a number of falling hexagons, people! It seems the initial stick wasn’t quite robust enough, or perhaps the humidity levels or wall texture in the basement bedroom proved to be too challenging for the adhesive over time. Discovering hexagons peeled off and lying on the floor was certainly an unexpected, albeit somewhat comical, twist in this DIY saga.
This experience highlights a common challenge in rental decorating: finding adhesives that offer a strong, reliable hold without causing any damage to the walls upon removal. The balance between “temporary” and “secure” is a delicate one, and many products claim to achieve it but fall short in practice. For anyone looking to replicate this project or similar temporary wall treatments, the adhesive choice is paramount.
This leads me to a crucial question for our wonderful DIY community: Anyone have a suggestion on what will stick effectively without damaging the walls? I’m on the hunt for a truly rental-friendly, yet dependable, adhesive solution. Here are a few options I’ve considered, but I’d love to hear your personal experiences and recommendations:
- Command Strips/Poster Strips: Known for their clean removal, but would they be too bulky for individual paper hexagons?
- Removable Mounting Putty: Could work for smaller, lighter items, but might leave an oily residue on some wall types.
- Temporary Wallpaper Adhesive: This is a more involved solution, perhaps applying it with a brush to the back of each hexagon, but might offer a stronger, more even hold.
- Painter’s Tape (rolled): While good for temporary holds, it might not be strong enough for long-term wall decor.
- Low-Tack Spray Adhesive: Offers even coverage but can be tricky to apply without overspray and might still pose removal issues.
- Craft Glue Dots: Similar to double-sided tape, but specific brands might offer stronger, cleaner removal.
The ideal solution would be something that holds up against gravity and time, withstands the occasional bump from active kids, and peels off cleanly when it’s time to move or redecorate. Your insights and tried-and-true recommendations would be incredibly valuable not just for me, but for anyone looking to undertake similar creative, rental-friendly decor projects. Let’s conquer this adhesive conundrum together and ensure our beautiful DIY wall treatments stay exactly where we put them!